How to remove background in Illustrator? This article explains the four best methods for removing backgrounds in Illustrator and introduces an even better technique for erasing backgrounds while keeping fine details intact.

Table of Contents
1. How to Remove Background in Illustrator With Image trace
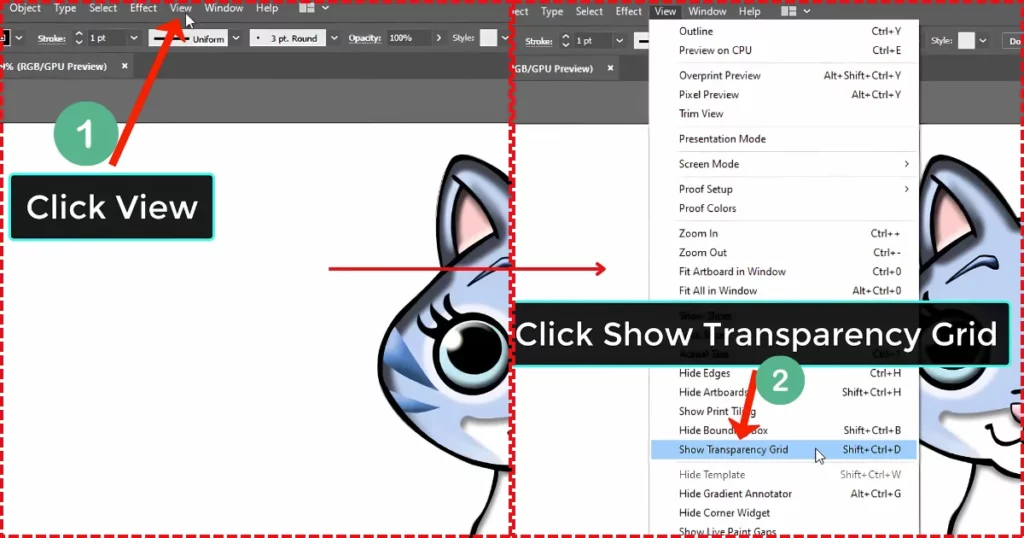
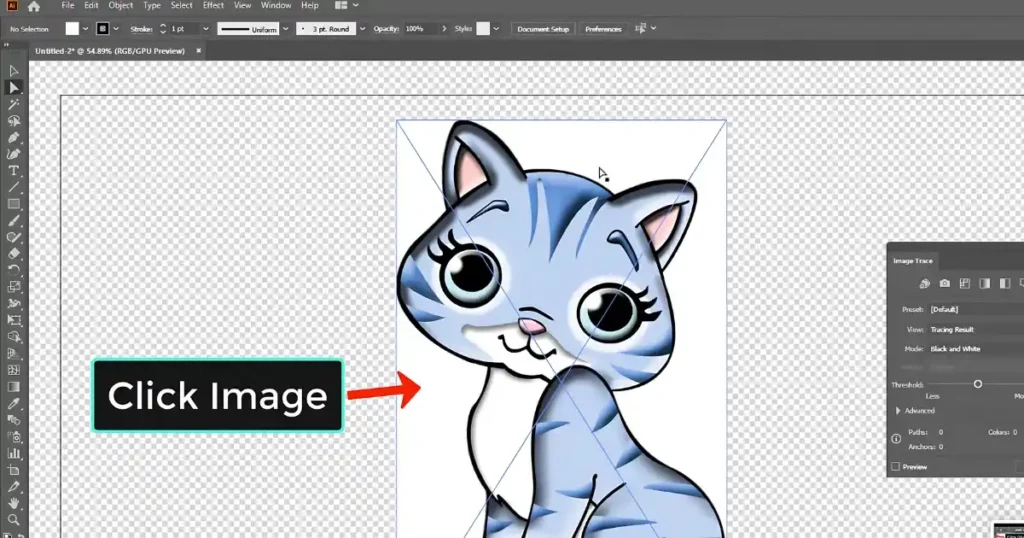
- Click “View > Show Transparent Grid“.
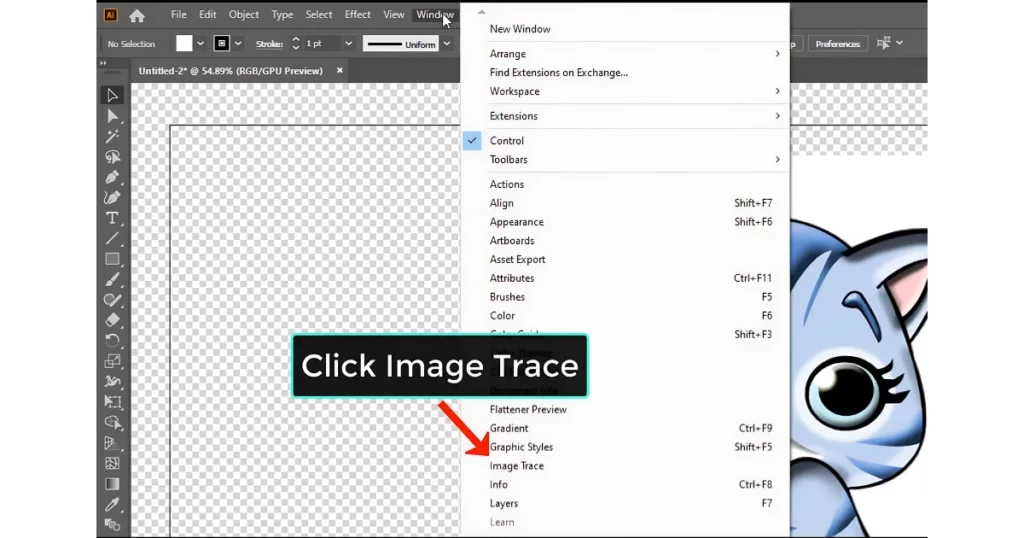
- Click “Window > Image Trace“.
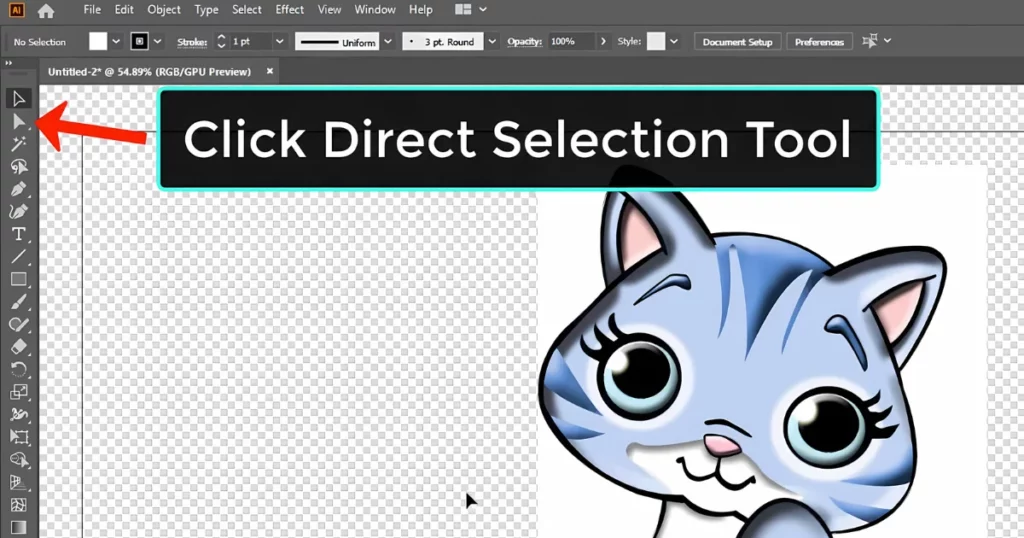
- Click “Direct Select Tool“.
- Click your image.
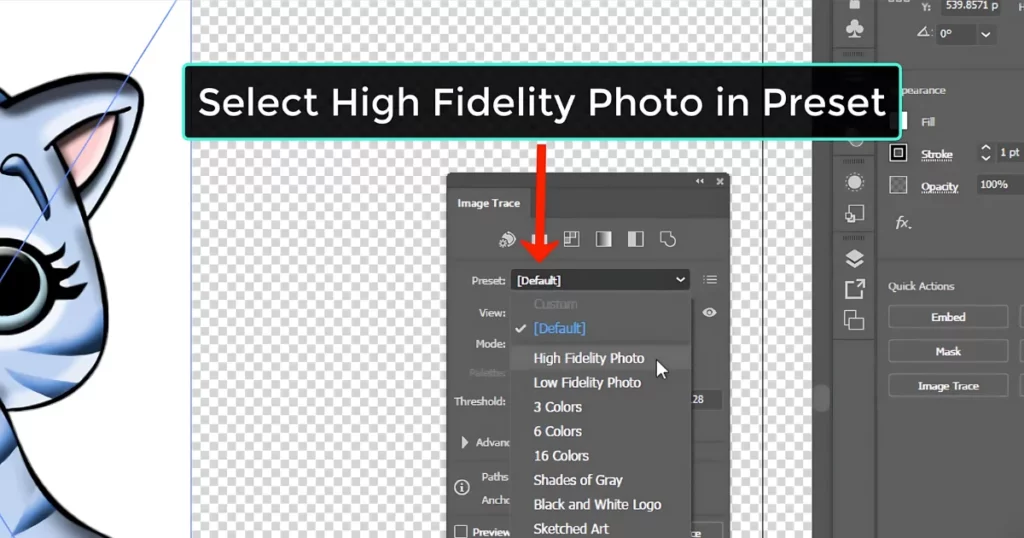
- In the present option, change “Default to high fidelity photo“. Wait for the Image Trace process to finish.
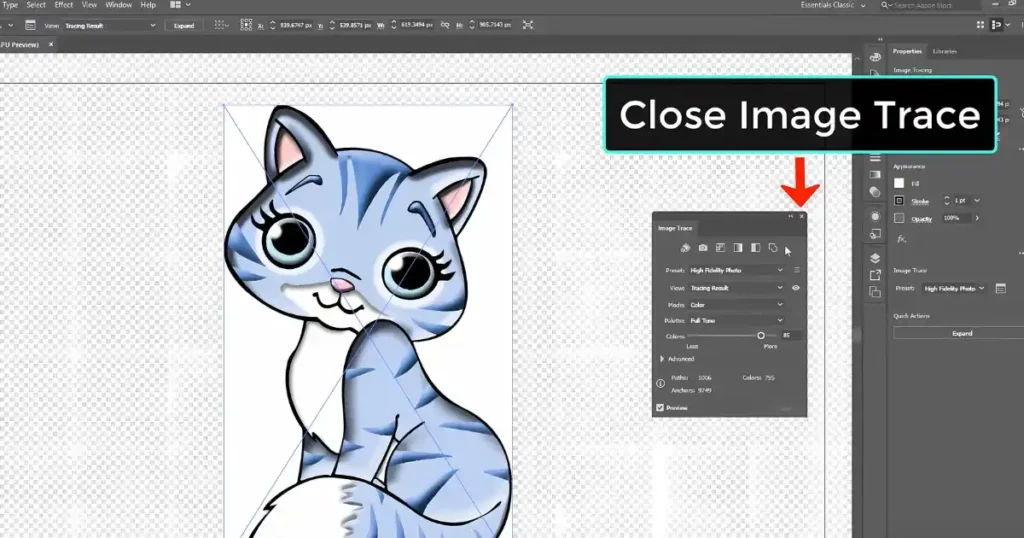
- Now close Image Trace.
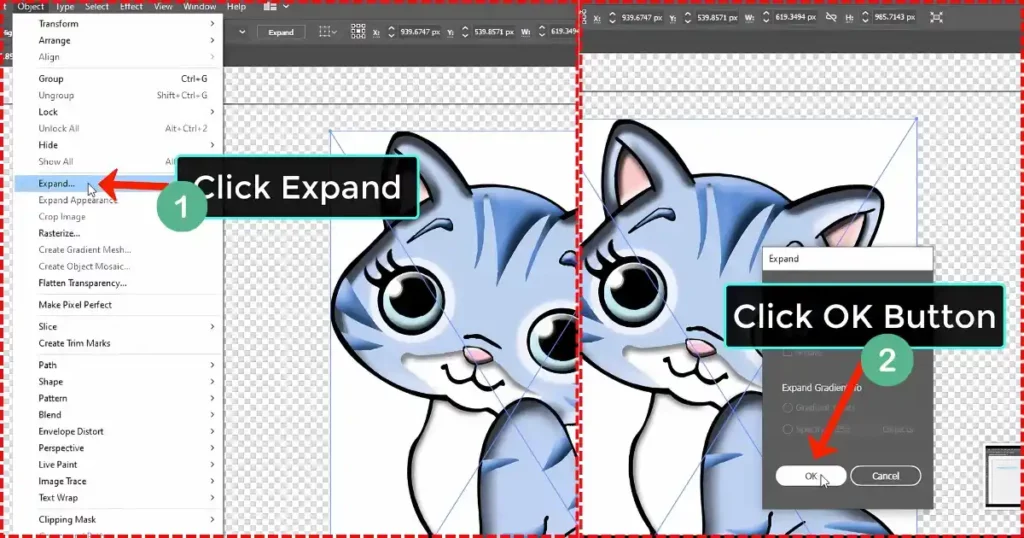
- Click “Object > expand > Ok“.
- Click outside the canvas.
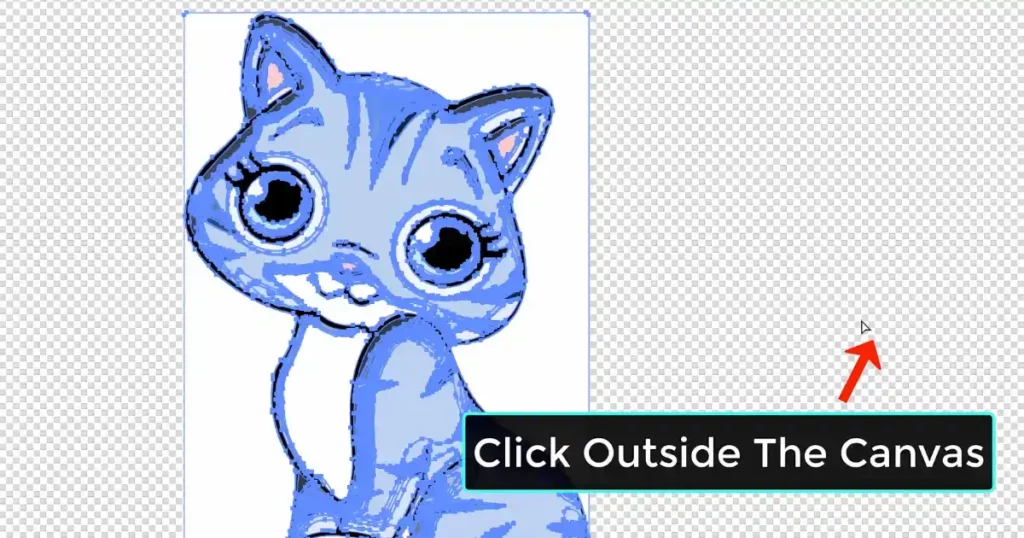
- Then click on the white background.

- Click the delete button on your keyword.
- If any white background is left, click it and delete it.
- Now again click “View > Hide Transparency Grid“. Done.
Done!
2. How to Remove the Background in Illustrator With Magic Wand
Use the Magic Wand feature when your photo’s background is a consistent or solid color. This tool is made for vector files such as SVG or EPS and might not work on raster pictures.
Here’s how to remove a background in Illustrator using the Magic Wand feature:
- Open your image.
- Click “Select > ALL“.
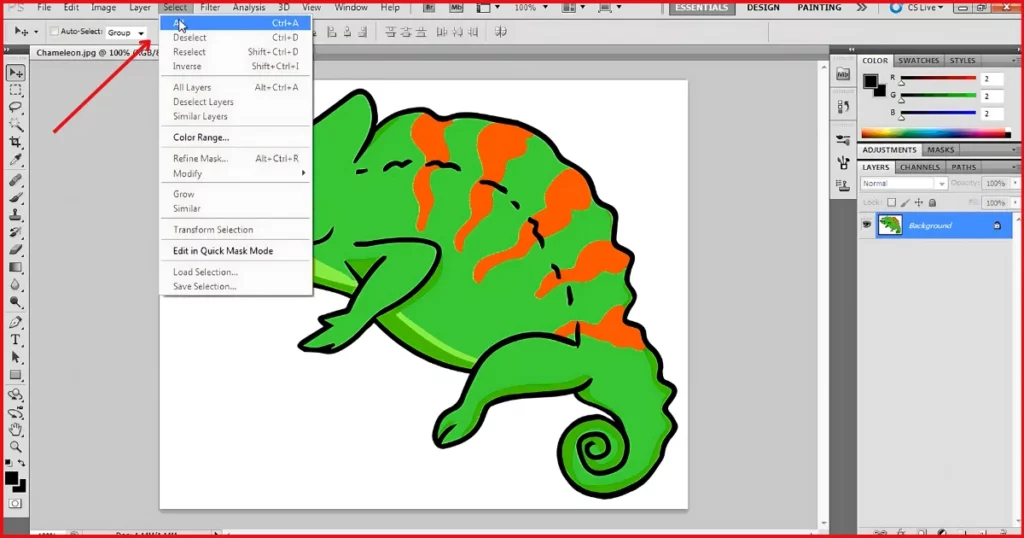
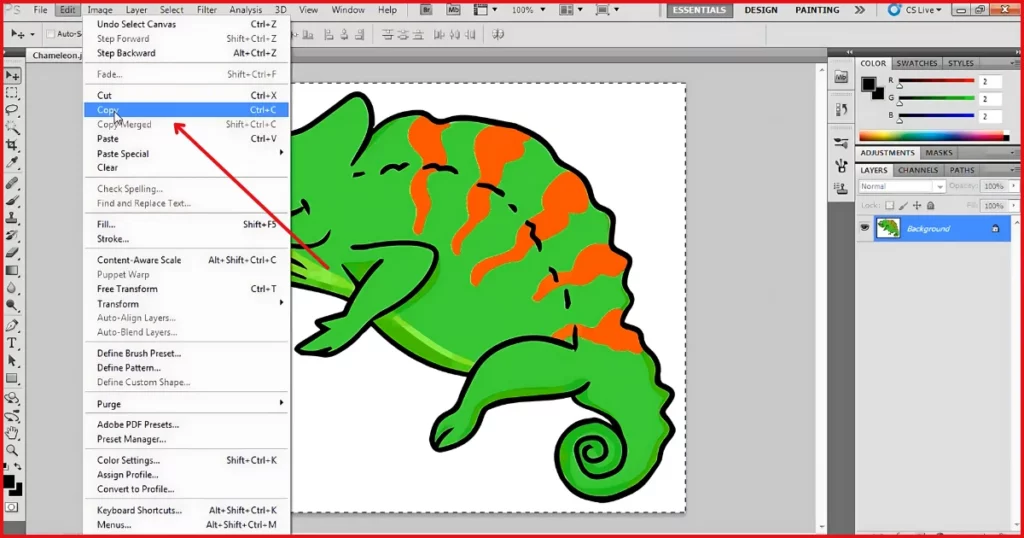
- Now click “Edit > Copy“. We need to paste this image into the new document.
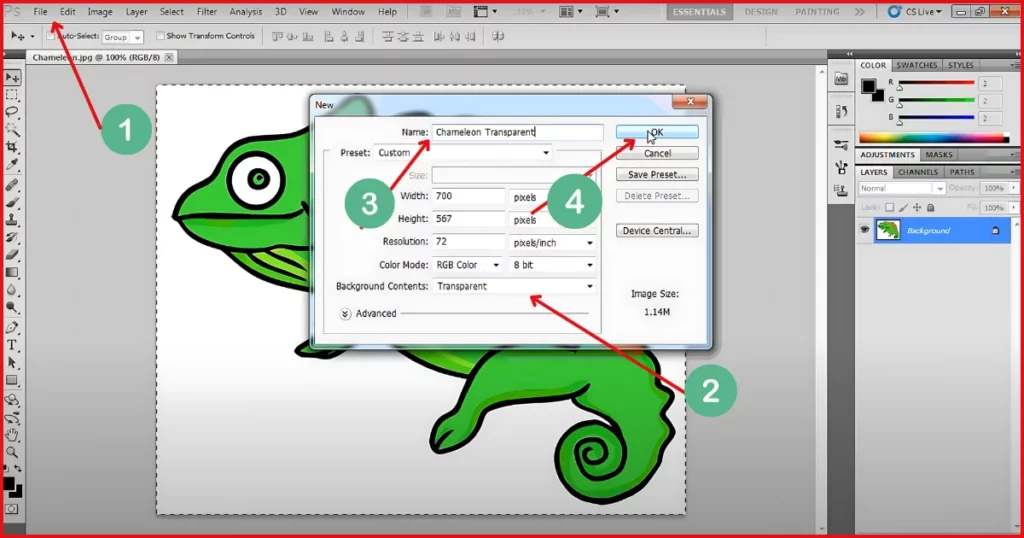
- Click “File > New“. From the options here, change to “Transparent” in “Background contents“. Name your file. Now click ok.
- Now paste the image by clicking “Edit > Paste“.
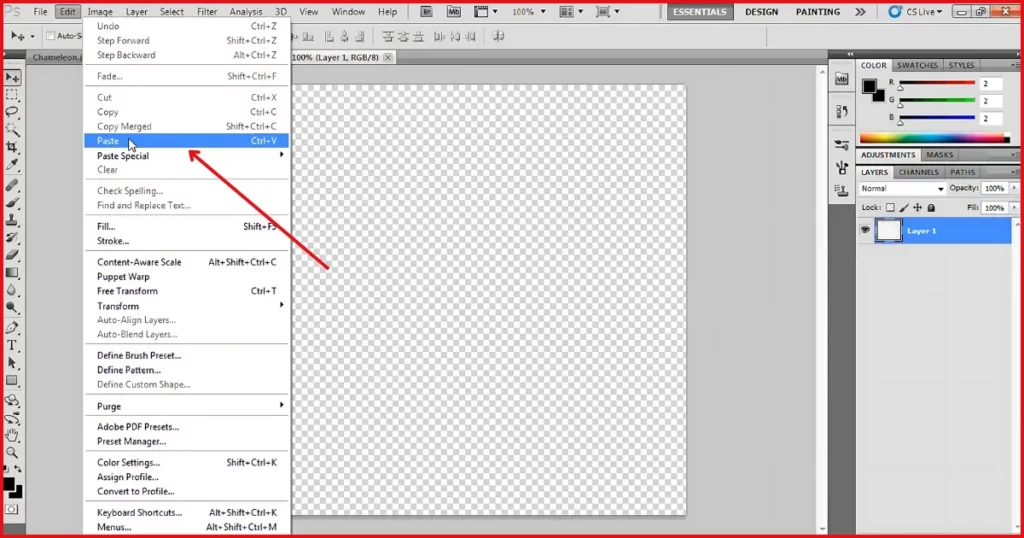
- Now we need to delete the background. We do this by clicking the “Magic Wand” tool from the tool panel.
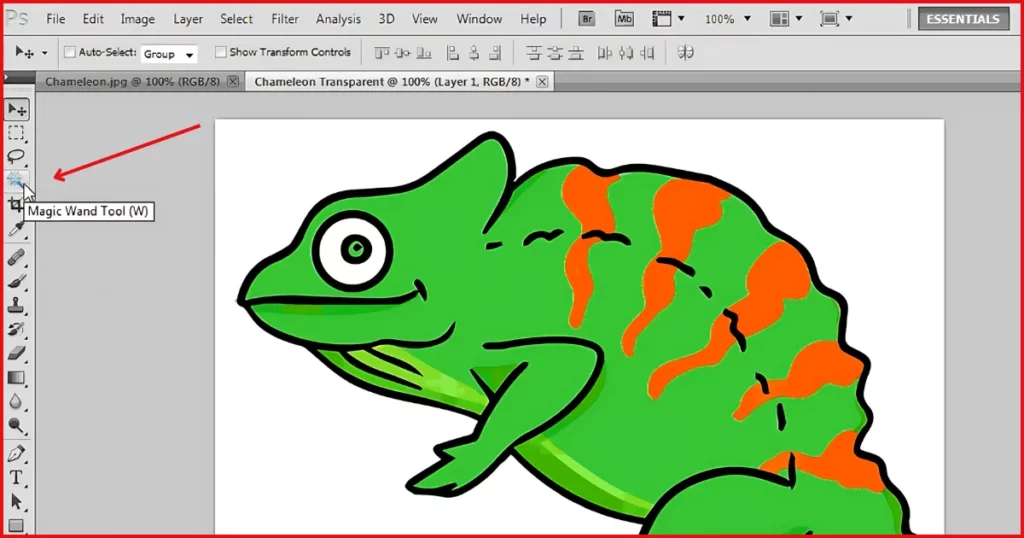
- Then, click the white background of your image. You can see there is a dotted line surrounding the white section.
- Now simply click the “Delete” key on your keyboard. You can see your image is transparent.
- Now “File > Save as > Format > PNG“. Click OK.
3. How to Remove Background in Adobe Illustrator Using Pen Tool
Another way to remove background in Illustrator is by using a clipping mask. A clipping mask hides parts of an image, showing only what’s inside the mask’s shape. It works like a template that clips the image to fit within its bounds.
A clipping set is a mask that hides objects. It can include all objects in a layer or just selected ones.
Let’s begin!
- First, choose the image you like to keep after removing the background. When making your selection, be sure to use the Pen Tool.
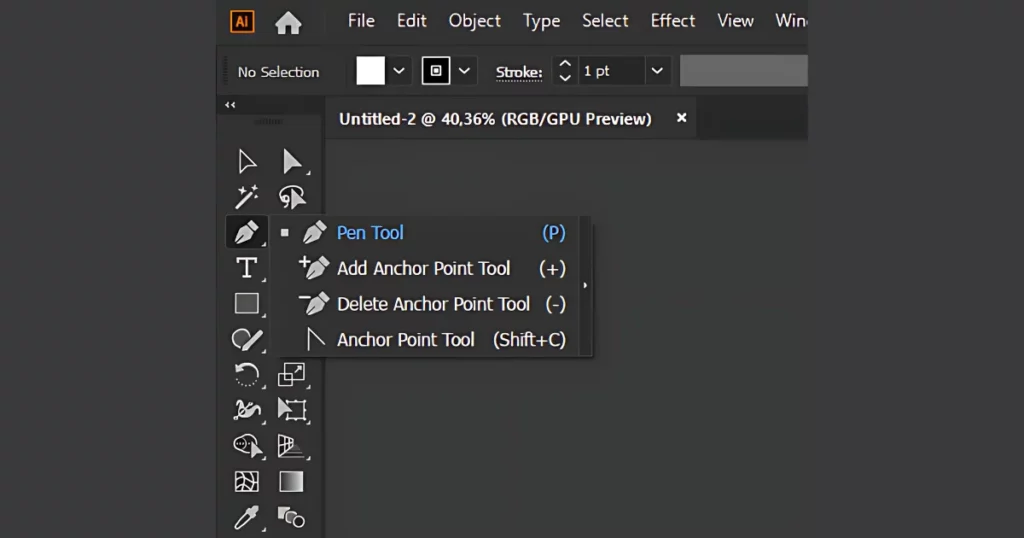
Adobe’s Pen Tool in Illustrator is excellent for removing backgrounds. It offers precise control for drawing straight lines and curves, though it requires some practice to master.
To do this, follow these steps:
- Open your object and zoom in. To get a precise mask around the object, you need to zoom in closely. Press Z for this.
- Now launch the Pen Tool. Choose a stroke color and pick the No Fill option. Create your outline by taping around your image to place anchor points (dots). Adjust the line by creating straight lines, shaping curves with the dots, or subdividing lines.
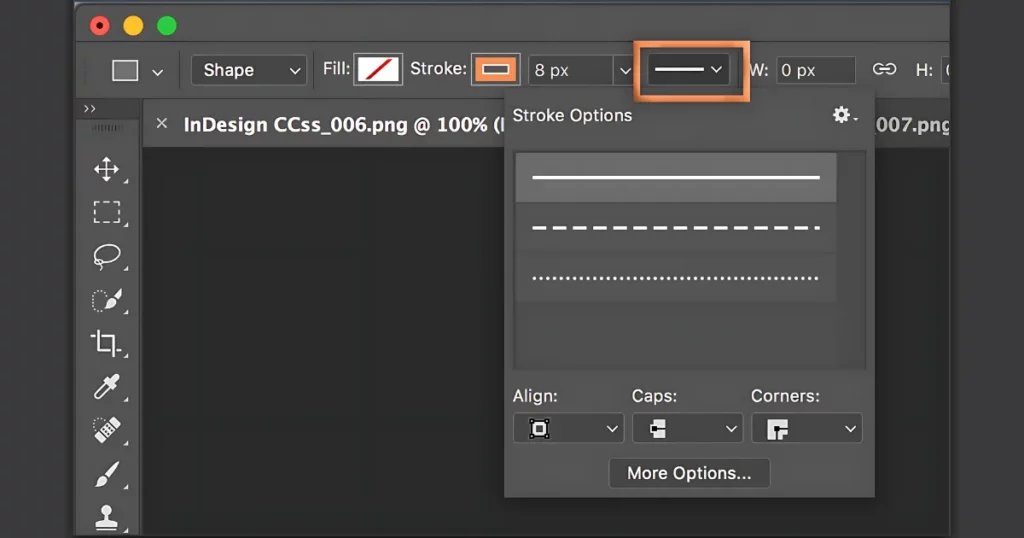
- Once you have your outline, tap the first anchor point to close the shape.
After creating your selection with its Pen Tool, follow these steps to create a Clipping Mask:
- Hold down the shift key and click to select both the entire image and the outline.
- Right-click (or CTRL-click on your Mac) and choose “Make Clipping Mask.” This will isolate your object.
- Keep refining your mask using the Pen Tool to add more points.
- To see the transparent checkerboard background, go to View > Show Transparency Grid.
- Export the file as a .PNG, ensuring you have selected the Background Transparent option.
4. How to Remove Background from Image in Illustrator By Saving as EPS
We’ve discussed the benefits of using vectors. Unlike bitmap images, vectors can be scaled without losing quality, so they remain smooth even when zoomed in.
For logos or designs, saving them as EPS files is wise for future use. You can enlarge them as needed for printing or digital use.
You can also quickly remove your white background in Illustrator. When you save your image in an EPS file, the background turns transparent automatically.
Saving your file as an EPS is straightforward.
- Click on File and then Save as. Choose the Illustrator EPS that appears. Click Save.
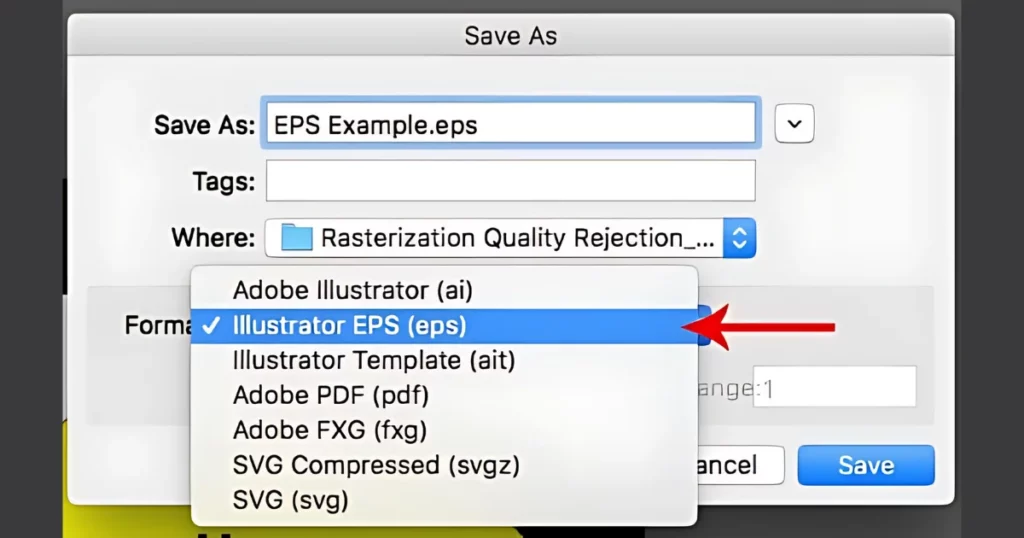
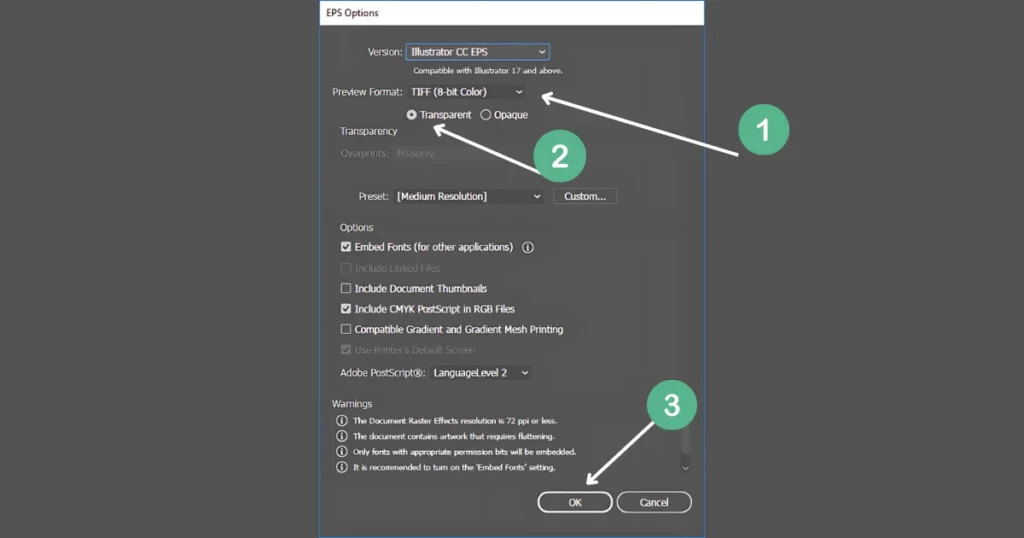
- In the next window (Format), select TIFF (8-bit Color) under Preview in the EPS window. Make sure to select Transparent and then click OK. That’s it! You now have your image with a transparent background as an EPS file.
A Best Alternative for Removing Background from a Picture
There is a great alternative to Illustrator that you can use to remove the background from a picture.
Try a quicker tool like Mockey AI background remover.
Mockey helps you automatically remove picture backgrounds in seconds:
- Visit the AI background remover.
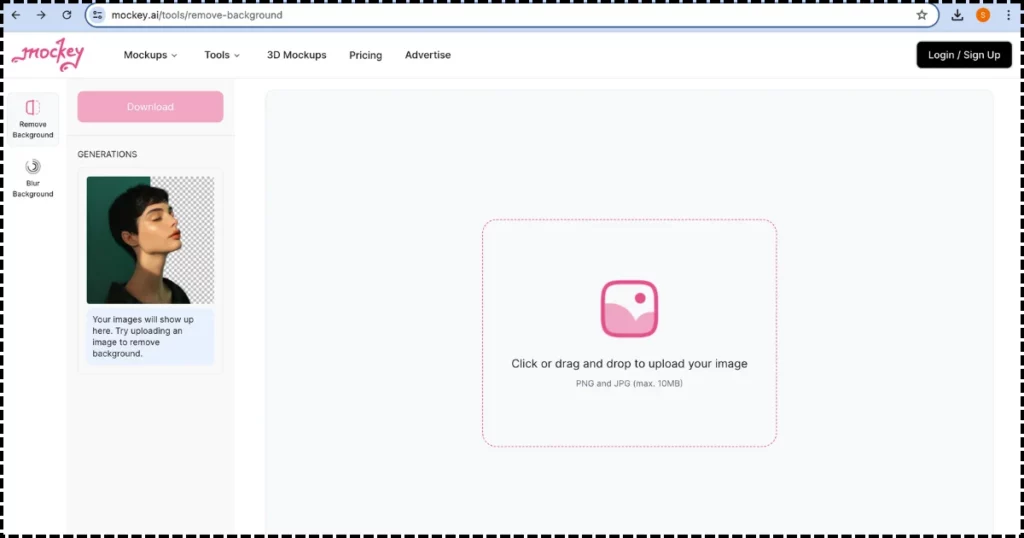
- Upload or drag and drop your image.
- Mockey will instantly remove the background.
- Click “Download” to save your picture with a transparent background on your device.
Now your background-free picture is ready for the latest presentation. Enjoy removing backgrounds with Mockey!
We took our idea to remove background in Illustrator from Gametrick and Mr Gill’s YouTube channel.
Is It Better to Use Illustrator or Photoshop for Background Removal
Since it started in 1987, Illustrator has been the go-to tool for creating artistic materials. It’s great for editing vector graphics such as logos, fonts, infographics, and illustrations.

However, unlike Photoshop, it has limited options for removing backgrounds from images.
You can easily remove backgrounds from a picture with Photoshop using the Remove Background feature for basic tasks and the Pen Tool for more complex ones. Photoshop works best for editing pictures made of pixels, which affects their quality and limits their scalability compared to vector graphics.
Why to Use Illustrator for Background Removal
You rely on high-quality photos to capture moments beautifully, showcase skills, and maintain memories. Additionally, stunning visuals are essential for promoting your products online.
Recent statistics show that 75% online shoppers expect high-quality visuals when deciding what to buy. If your images have harsh lighting, unwanted things, or distracting backgrounds, customers may choose to shop elsewhere.
These small flaws can draw attention away from your images. So, you might want to use Adobe Illustrator to remove the background.
Benefits of using Adobe Illustrator’s background remover:
- Image Improvement: Remove distractions, unwanted objects, and imperfections from photos.
- Preparation for Edits: Easily add reflections, shadows, and other enhancements.
- Optimization for Various Uses: Create high-quality photos for different communication channels, from personal memories to online product listings.
- Color Adjustments: Change backgrounds for aesthetic purposes.
- Visual Impact: Enhance photos to attract more attention to your website and brand.
- Adding Elements: Seamlessly incorporate new objects without making the edit look artificial.
- Background Swapping: Create professional-looking photos with transparent backgrounds.
How do You Make Designs Look Professional
- Choose your background designs that enhance the subject and fit the design concept.
- Experiment with custom backgrounds, patterns, textures, or gradients to add depth.
- Use adjustment tools to fine-tune brightness, hue, saturation, and contrast.
- Apply effects or filters to generate a cohesive visual.
- Refine the subject’s edges with tools such as the Eraser, layer masks, or Feathers for smooth transitions.
- Use layer blending modes to seamlessly merge the subject with the new background.
- Ensure shadows and lighting make the subject look naturally integrated into the scene.
Conclusion
In this article, we explained how to remove background in Illustrator. You can use the Image trace, Magic Wand, Pen tool or Save image as EPS to make the background transparent.
You can also use Mockey’s AI background remover to easily make your picture transparent and save it in PNG format.
FAQs
How do I remove the background of an image in Illustrator?
To remove background in Illustrator, you can use the Image Trace feature to turn the image into a vector and then delete the background. Another method is to trace the subject with the Pen Tool and create a clipping mask. Magic Wand Tool also removes background.
How to make the background transparent in Illustrator?
To make a transparent background in Illustrator, first, ensure the artboard has a transparent background by selecting View > Show Transparency Grid. When exporting, choose the PNG format, as it supports transparency, unlike JPEG. In the export options, select the Transparent setting to export the artboard with a transparent background.
How do you remove the background of an image?
To remove an image’s background, use software like Mockey. It lets you select the subject and remove the background, making it transparent or solid-colored.
How do I get rid of the white background in Illustrator workspace?
To remove the white background in Illustrator first, go to View and deselect Overprint Preview. On macOS, you can use the Command + Shift + H shortcut. If needed, switch to Pixel Preview under the View menu. Another option is to adjust the background color in Preferences under User Interface and Brightness settings.
How do I fade the background of an image in Illustrator?
To blur the background of an image in Illustrator, you can start by drawing a rectangle that covers the entire image. Fill this rectangle with a gradient that goes from white to black. Next, select both the image and the rectangle together, and then navigate to the Transparency panel. From there, choose the option labeled Make Mask to apply the effect.
Related reading:
