If you want to show off your latest design or create a portfolio, a square trifold brochure mockup is a great way to start!
In this simple square brochure tutorial, you’ll learn all the basics you need. By the end, you’ll have design skills you can start using right away.
In this tutorial, you’ll learn how to make a brochure mockup in Photoshop. You’ll get to know tools like adjustment layers and smart objects and learn to make a page look like it’s turning for a realistic effect.
Table of Contents
What you’ll learn:
- How to create brochure mockups in Photoshop
- The best Photoshop alternative to make a brochure mockup
A Quick Guide on How to Make a Brochure Mockup in Photoshop
Here’s a quick guide on how to create brochure mockups in Photoshop that you can use to get ideas.
- First, convert your design layer to a smart object for easy editing.
- Then, create three equal partitions with rectangles, add guides, and use the Line Tool for dashed lines. Adjust the opacity.
- Use the Puppet Warp tool to align your design with the brochure perspective. Set the layer mode to Multiply for a realistic look, and add shine with overlay and screen layers.
- Finish with Level adjustment for contrast. Update designs easily by double-clicking the smart object.
Step-by-step Guide
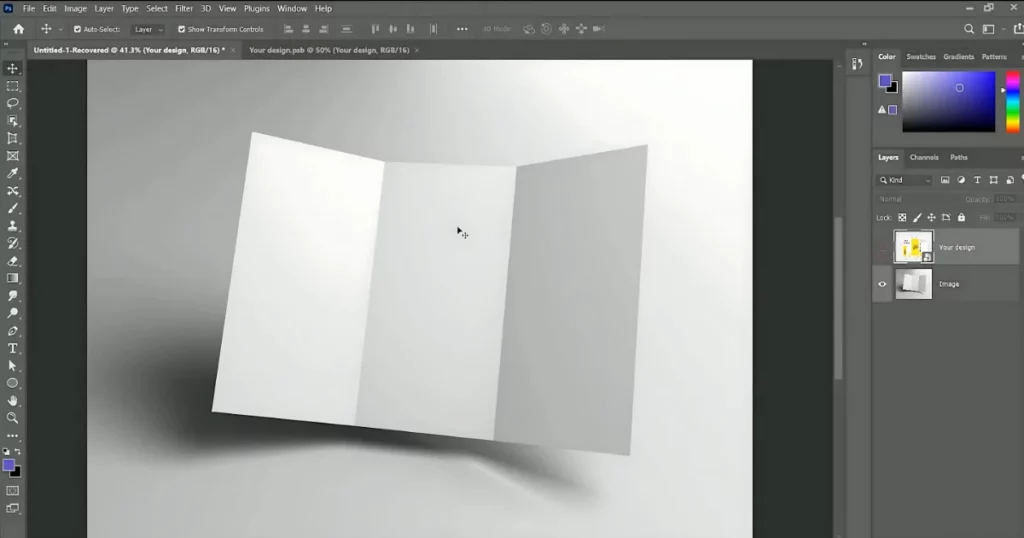
Today we will learn how to make a brochure mockup in Photoshop. So let’s get started. We have already prepared the image and the design. We recommend you follow along with this process so that you can get engaged more.
We will add a tree partition just like in the mockup image.
Step 1: Convert Your Design Layer to a Smart Object
So first we will convert your design layer to a smart object. So that we can work non-destructively and also be able to change the design later.
Now double-click on your design layer and we will add a partition just like these three.
Step 2: Create Three Partitions
So we have this technique that we normally use. We created three rectangles with different colors and placed them right next to each other.
Make sure there is no gap between them and while holding the controller command select all rectangles.
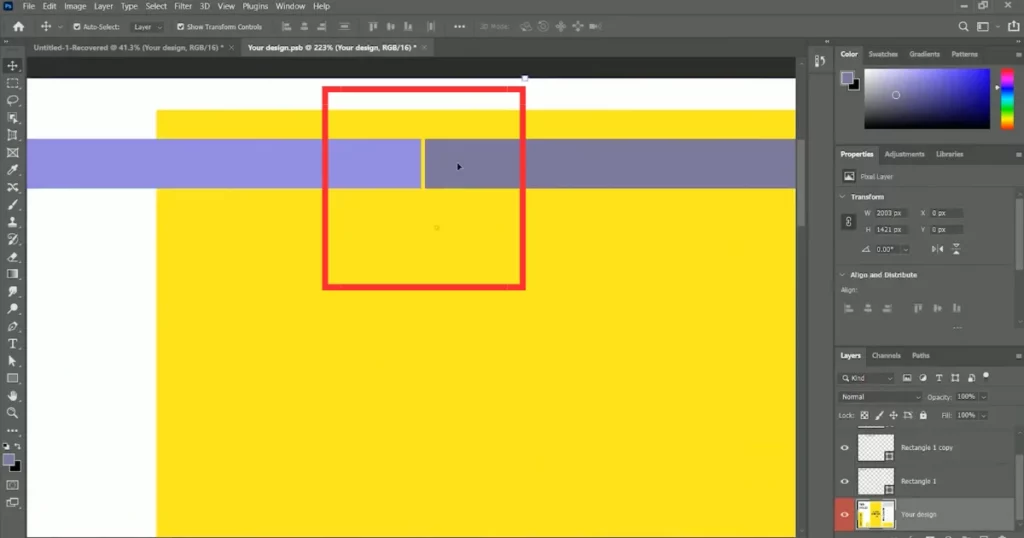
Place them in the left top corner. Then scale towards the right top corner.
Now we have equal size partition of three rectangles according to the document.
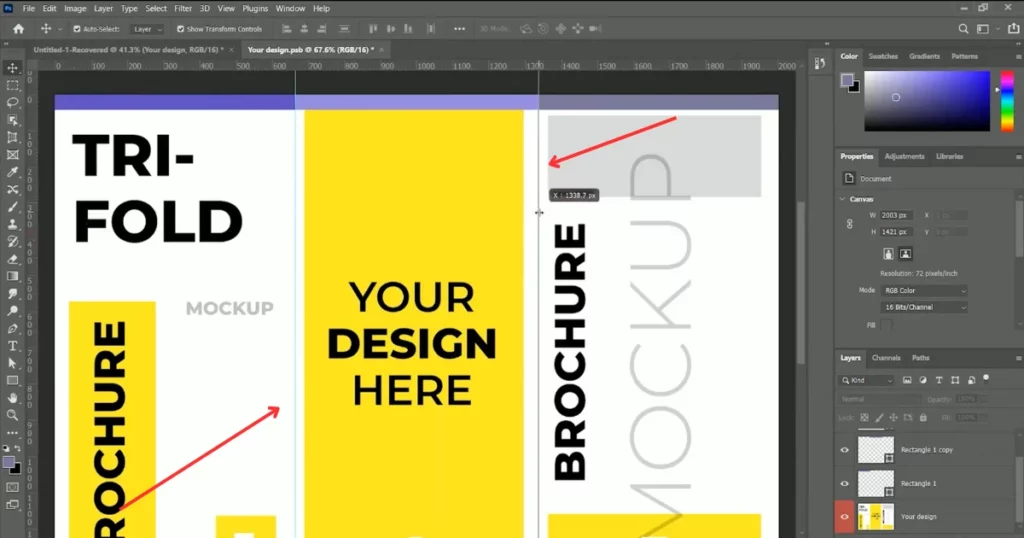
Now press ctrl or command r for the ruler and drag the guide from the left and place it in between rectangles.
Step 3: Add Dashed Partition Lines
Now we don’t need this rectangle. Delete them. Take the line tool, set the style to dash and create two lines over the guide.
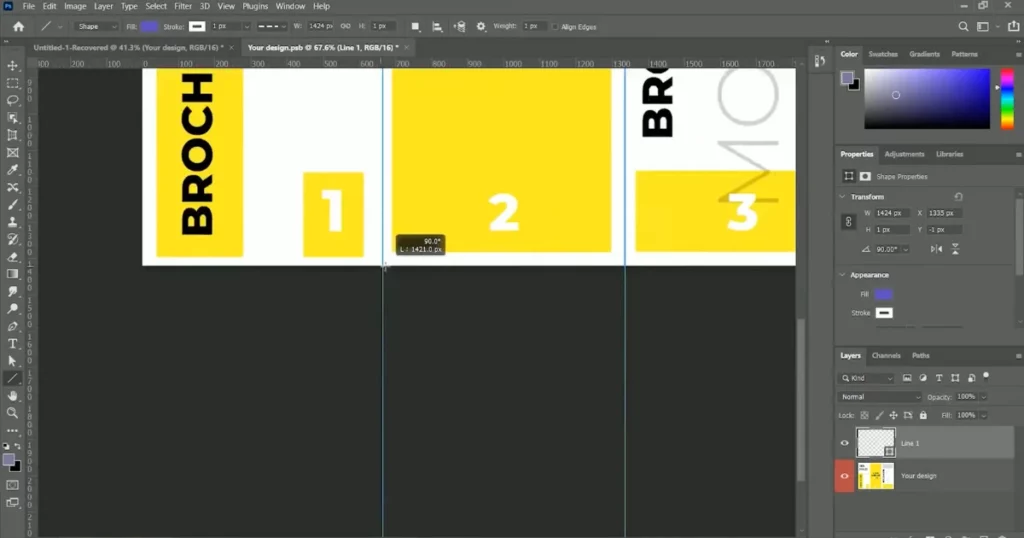
Press the ctrl command h to hide the guides and save them.
Step 4: Apply Puppet Warp for Perspective Adjustment
Close the file it will automatically update it in our main file now. Reduce the opacity to 45%. Now go to edit and take the puppet warp tool.
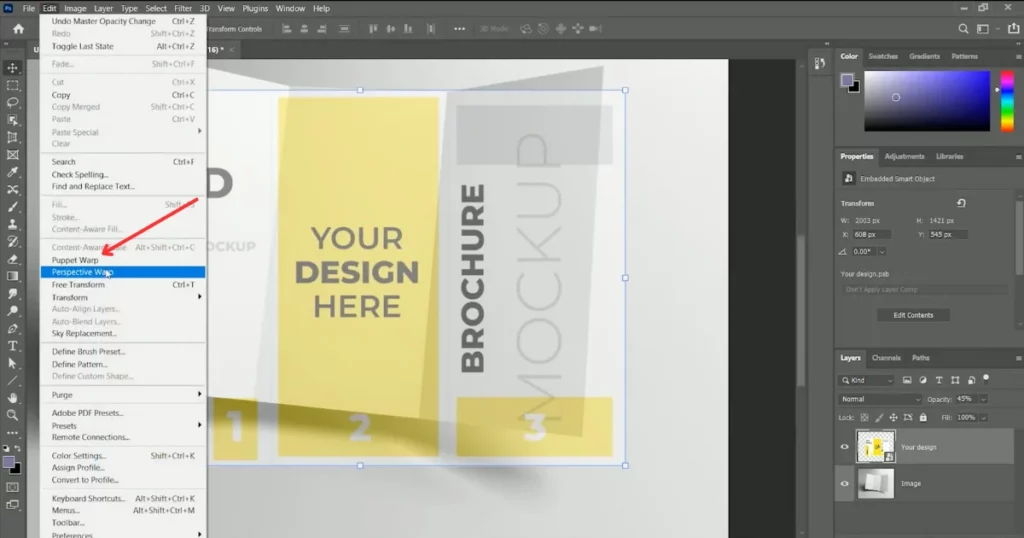
This is the main tool to make any image or text perspective.
Now create a rectangle over the design.
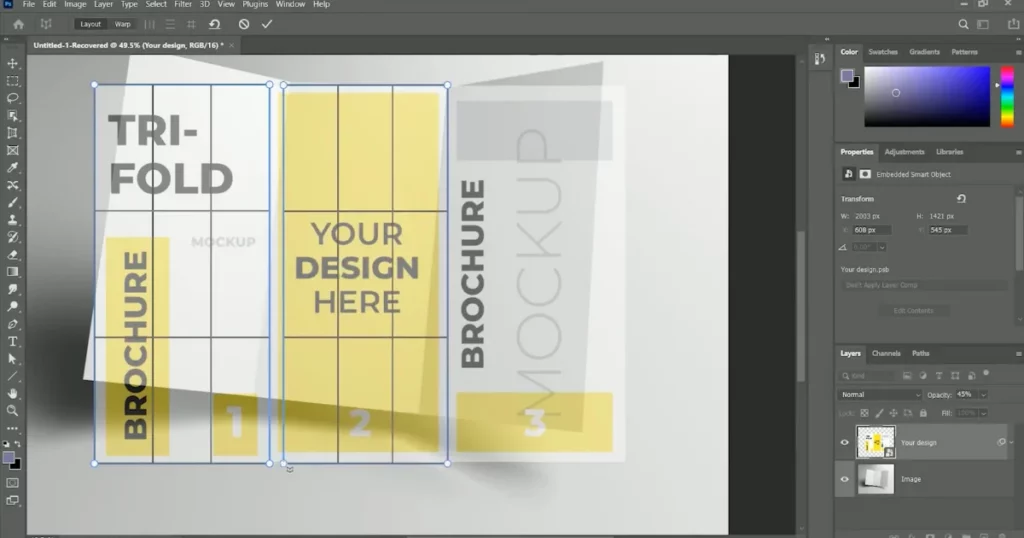
As you can see, the partition line is very important in this process; otherwise, we will not be able to get good results from it.
Another feature of the tool’s perspective is that when we create two rectangles side by side, they will automatically snap together. Make sure all the points are inside the design, not outside, and the partition is on the dashed line. You can take your time in this process.
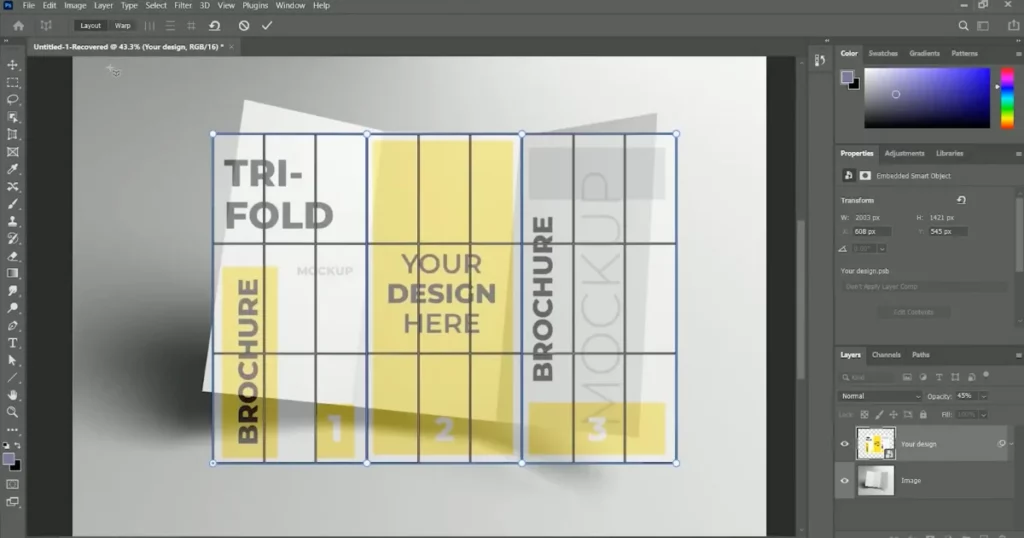
Now in the header section click on the warp button and move the points to distorted.
So when we click on the Warp button in the header we can now move the points according to the perspective of the image. Take your time here as well. Make sure all the points are on the design not outside.
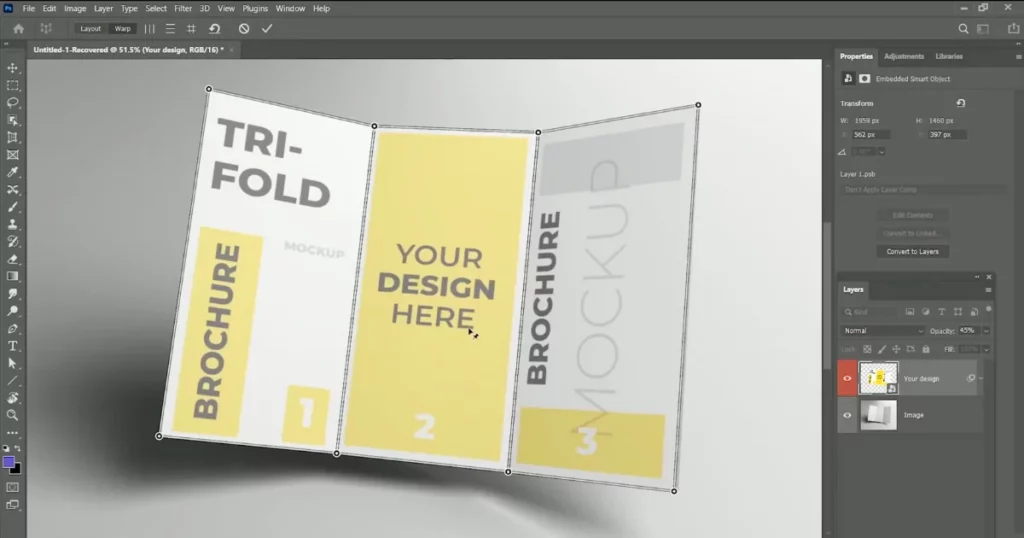
After that click on tick (✅) and increase the opacity to 100%.
Step 5: Set Layer Mode
Now the design is according to the image but it’s missing the environment. A realistic feel is very important for any mockup.
So to do that set the layer mode to multiply.
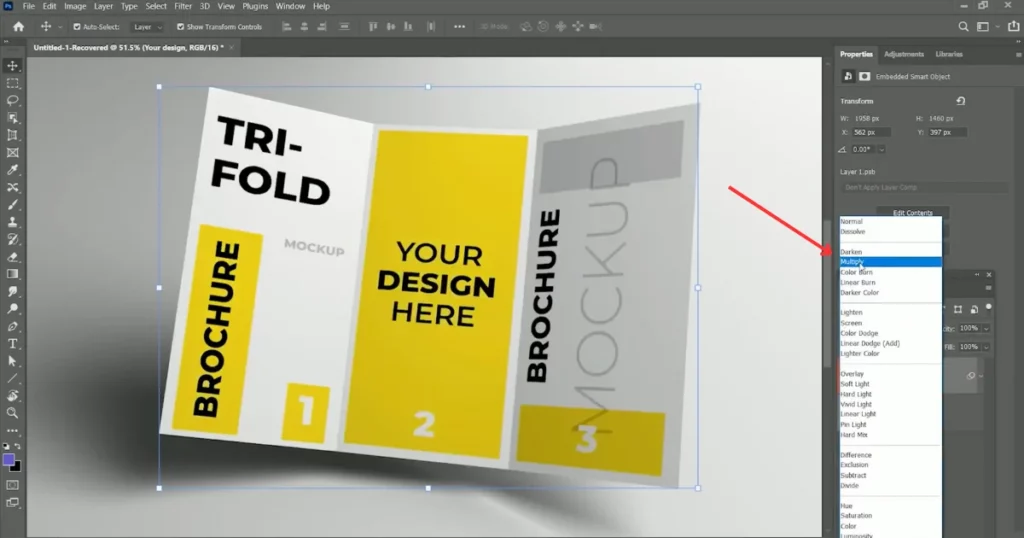
Step 6: Add Shine Effects for Depth
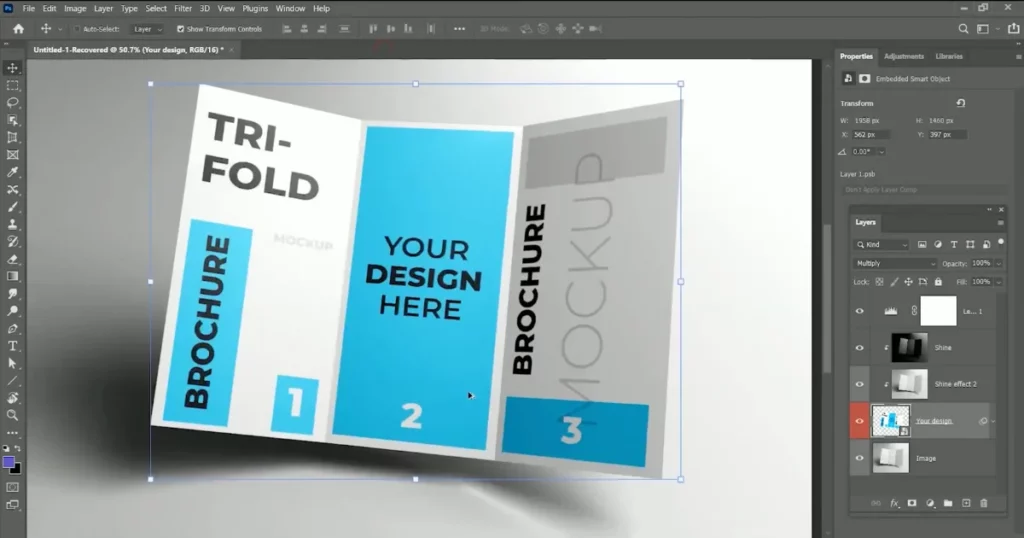
It’s already giving a realistic look. But we are not going to stop here while holding the alt or option drag a copy of the image on the top. Then again while holding the alt or option click between your image and the top layer. It will be clipped with your design layer and set in layer mode to overlay and opacity will be 60%.
It will give a shiny effect to the brochure now while holding controller command j to make another copy of the top layer. Set the layer mode to normal and increase opacity to 100.
Step 7: Enhance Shine with Adjustment Layers
Add an adjustment layer of levels and clip it with the bottom layer so it will only affect the clip layer.
Now set the mid tones towards white and slide the blacks towards white as well. Not too much we just want white to shine on the black.
Step 8: Merge Shine Layers and Set to Screen Mode
While holding controller options select both layers and press ctrl or command d to merge them.
Now again clip it with the bottom layer and set the layer mode to screen. You can rename both layers as shine and shine effect too.
Step 9: Add Final Touches and Adjustments
If you want to add more contrast to your design add an adjustment layer of levels to adjust the whites mids and blacks.
We can now hide the dashed lines. Double-click on your image and hide both layers you can place your design here and also you can change the color of the design. It will automatically update it in the main file. That’s the beauty of a smart object.
A Photoshop Alternative to Make a Brochure Mockup
Mockey AI is the best mockup website to make a brochure mockup and is a great alternative to Photoshop. You get free brochure templates, AI mockup bundles, new brochure designs every week and many more.
Follow the steps:
Step 1: In the navigation bar, follow “Mockups > Print > Brochure“.
Step 2: Pick a brochure template.
Step 3: Hit “Upload Design” and begin personalizing it.
Step 4: Lastly, click “Download” to save your brochure mockup for free with no watermark.
Conclusion
We’ve covered how to make a brochure mockup in Photoshop. While using Photoshop for mockups requires some design experience, Mockey AI mockup generator offers a better alternative for creating mockups for free without any watermarks.
FAQs
How to create a brochure image in Photoshop?
To make a brochure in Photoshop, start by opening a new document that’s 11 inches by 8.5 inches. Set up guides to show where the brochure will fold. Use the Rectangle tool to create different sections for each part of the brochure. Then, add background colors, pictures, and text to finish the design.
Which is the best brochure mockup generator?
Mockey AI brochure mockup generator is a great tool for making brochure mockups. It’s easy to use and helps you create amazing, personalized designs fast.
Why Mocky AI is best for creating brochure mockups?
Mocky AI is great for making brochure designs because it has over 500+ ready-made templates, an easy-to-use layout, and smart tools that help you customize each design.
Related reading:
