Want to learn how to make a box mockup design? Box mockups are a great way to showcase the product before it strikes the shelves.
Mockey is great for making mockups. You can use ready-made PNG files, but it’s more enjoyable and satisfying to create your own mockup.
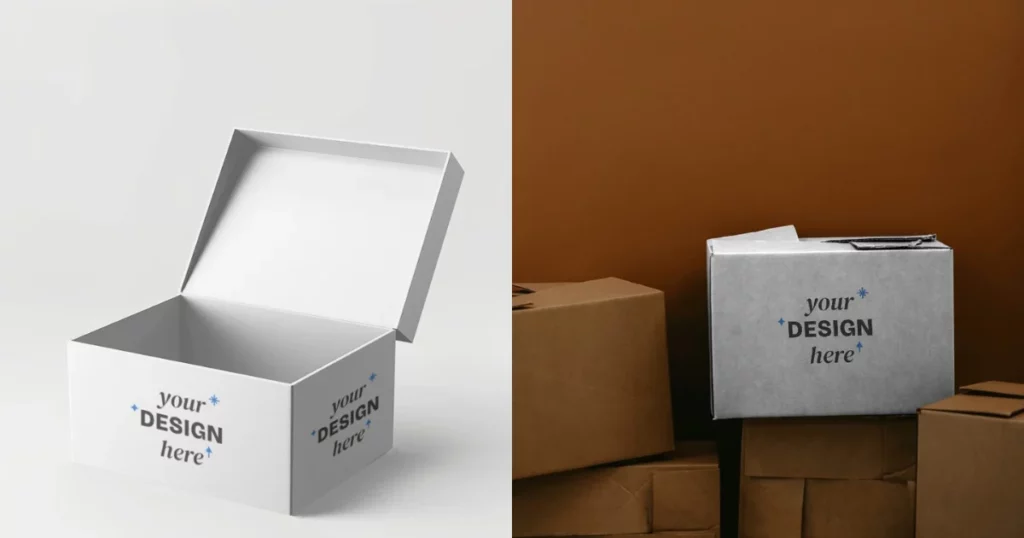
This blog post will explain what a box mockup is, how to make box mockups, explore the types, and share tips on designing eye-catching mockups.
Table of Contents
What Is a Box Mockup?
What is a box mockup? A box mockup is a digital version of your box or package design. It shows how your packaging will look when printed, folded, and put together. By creating an image with realistic textures and lighting, you can see a preview of your design as it would appear in real life.
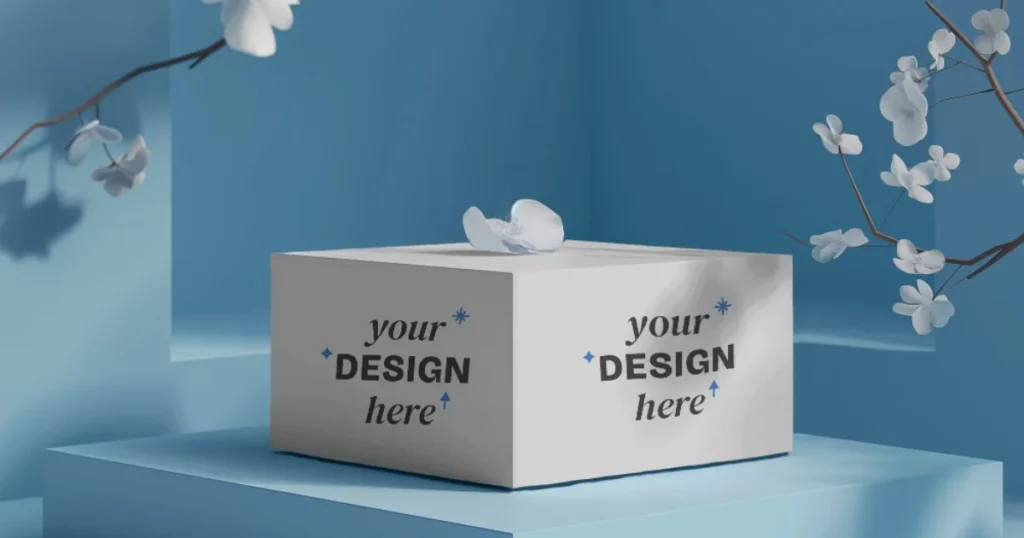
Box mockups let you assess how your packaging looks and consider practical aspects. You can try out different sizes and materials to make sure everything fits well and looks consistent.
These mockups are useful for designing boxes in any industry, such as cosmetics, food, electronics, and more. They help you fine-tune your mockups before starting production.
A Quick Guide on How to Make a Box Mockup with Mockey
This is a quick guide on how to make a box mockup using Mockey.
- Launch Mockey.
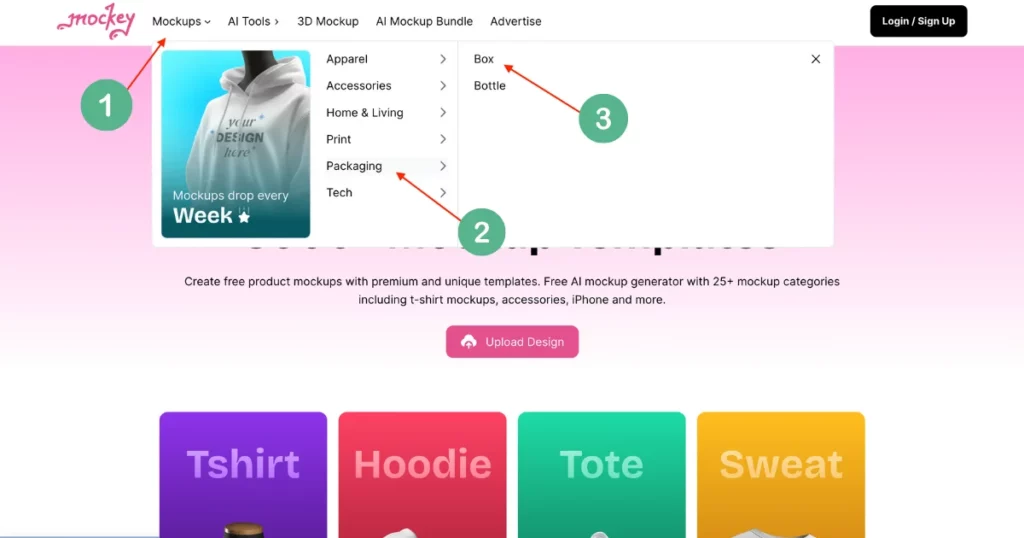
- Click “Mockups” and head to the Box category in the “Packaging” section.
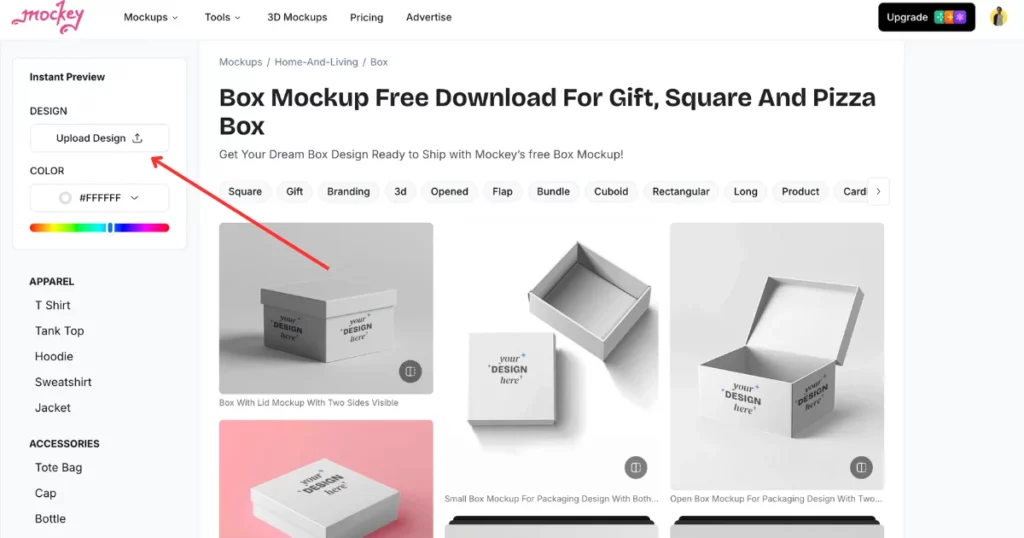
- Pick a box template and click “Upload Design” to add your design.
- Customize your design and download your box mockup with no watermark.
How to Make Box Mockups with Mockey – Step-by-step Guide
An in-depth guide on how to make a box mockup – from start to finish.
Step 1: Launch Mockey
Launch Mockey.ai. On the homepage, look for the “Mockups” option in the navigation bar. Click on it and then select “Packaging” and tap on the “Box” option. Make sure you sign up in Mockey before start.
Step 2: Upload Design and Customize
“Upload Design” is in the upper left corner. You can add your design directly from your computer or phone, whether it’s a text, logo, or other design element. After uploading, you can further customize your design by adjusting colors, and backgrounds, and resizing as needed.
Step 3: Download Your Mockup with No Watermark
Once your customization is complete, click “Download” to save your box mockup to your device for free without a watermark.
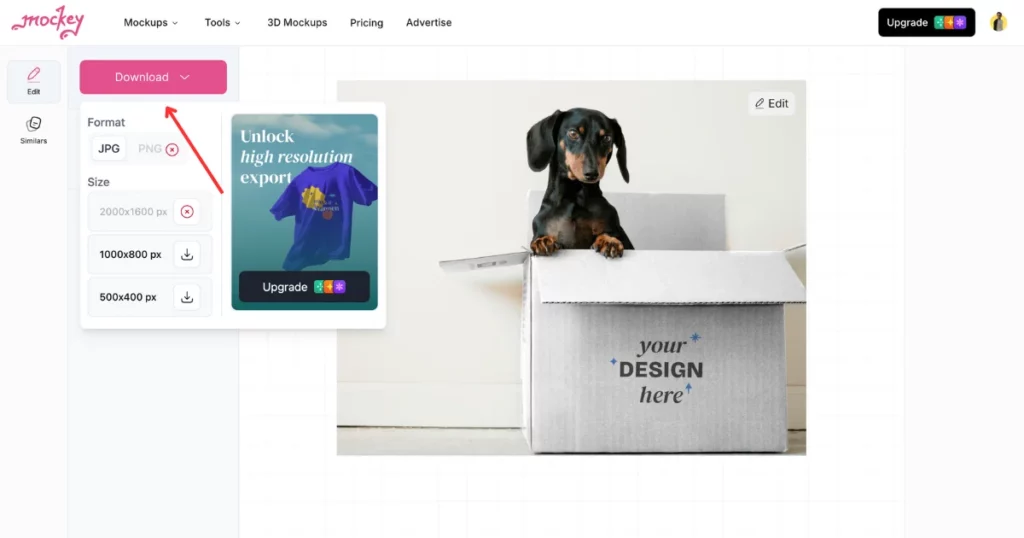
If you are using the free plan, your box will be downloaded in JPG format with two available sizes: “400 x 500 px” and “800 x 1000 px“. By upgrading to the premium plan, you can download at a higher resolution of “1600 x 2000 px” with the additional option of PNG format.
How to Make a Box Mockup in Photoshop
In this article, we will explain how to make box mockups in Photoshop in a step-by-step manner.
Step 1: Prepare Your Design
If you are trying to create a box mockup, start by taking the Rectangular Markup Tool and selecting the area of your design that you want to apply to the box.
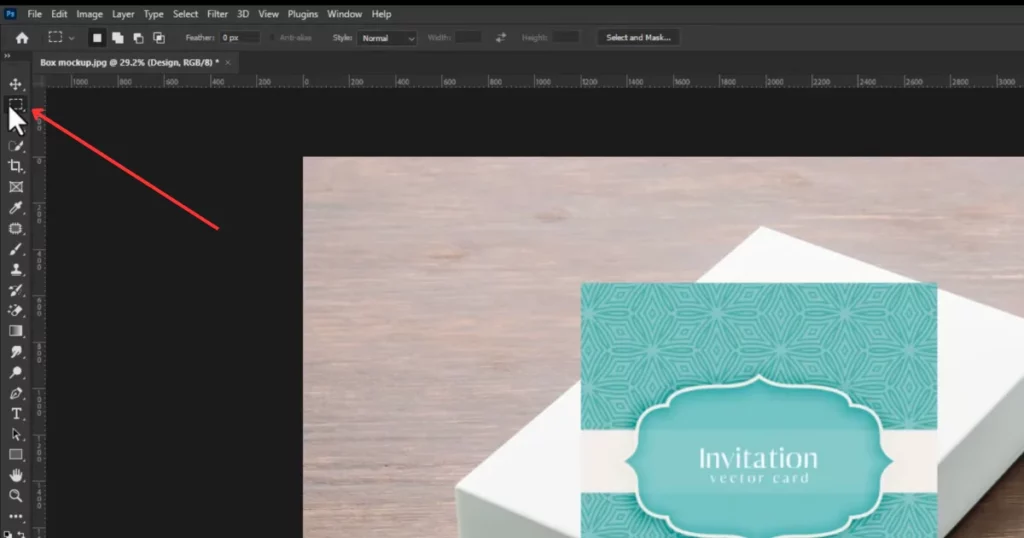
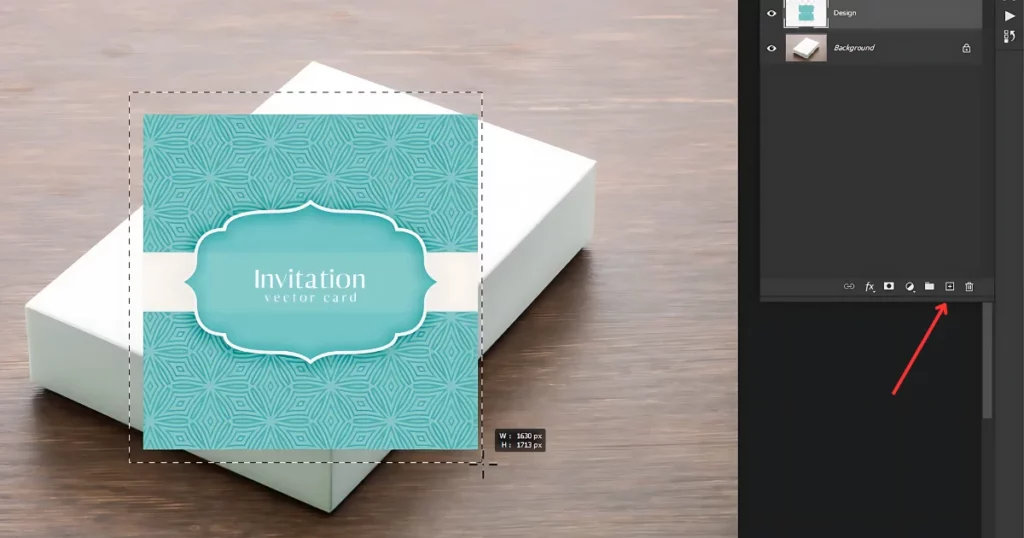
Once selected, press Ctrl + X to cut the selection and create a new layer.
Step 2: Hide the Design Layer
Next, disable the design layer by clicking on the eye icon next to it in the Layers panel.
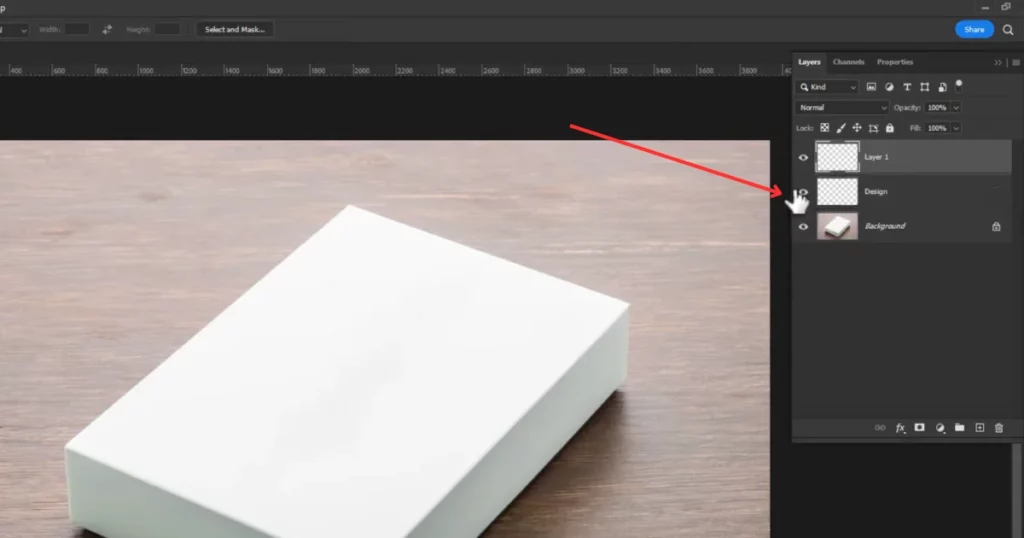
Step 3: Select the Box
Select the Background Layer and then take the Quick Selection Tool. Use this tool to select the box that you want to apply your design to.
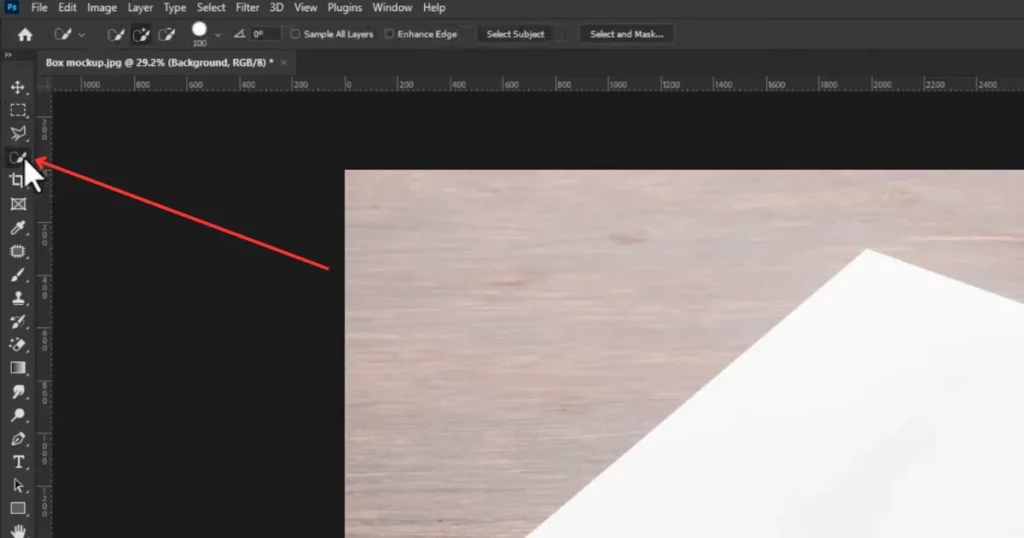
Step 4: Duplicate the Box Layer
With the box selected, drag and drop it onto the plus icon at the bottom of the Layers panel to create a duplicate of this layer.
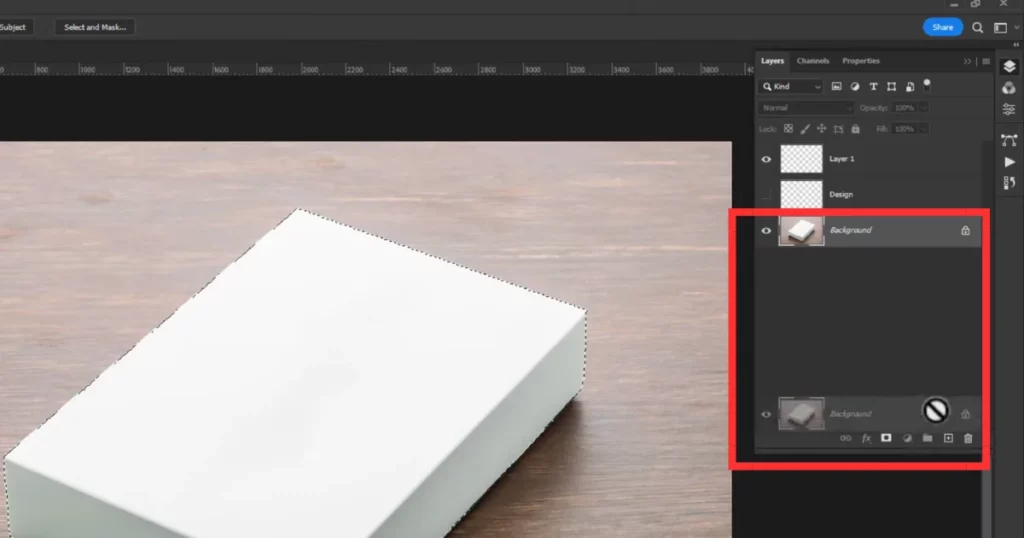
Step 5: Create a Layer Mask
Now, create a Layer Mask on the duplicated layer by clicking the mask icon in the Layers panel.
Step 6: Organize the Layers
Change the order of the layers so that your design layer is above the box layer. Then, hold Alt and click between the two layers to create a Clipping Mask.
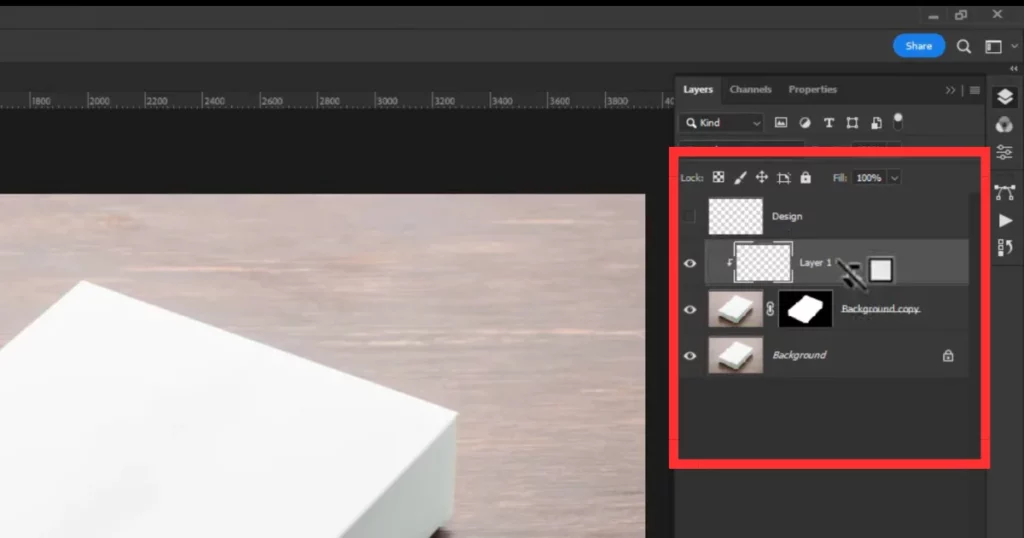
Step 7: Set Up Perspective in Vanishing Point
Go to File > Vanishing Point to open the Vanishing Point dialog.
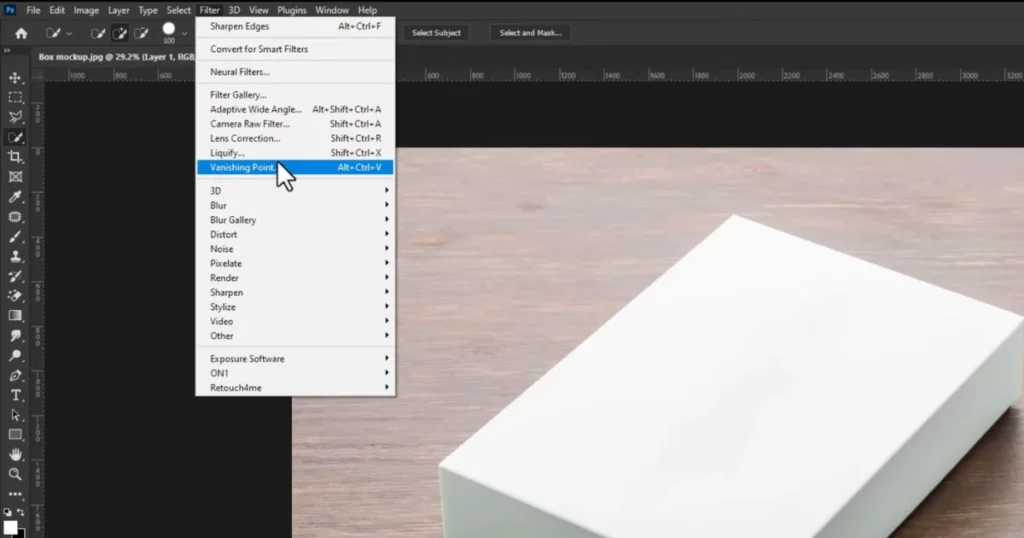
Here, create a Perspective Plane that matches the box’s shape.
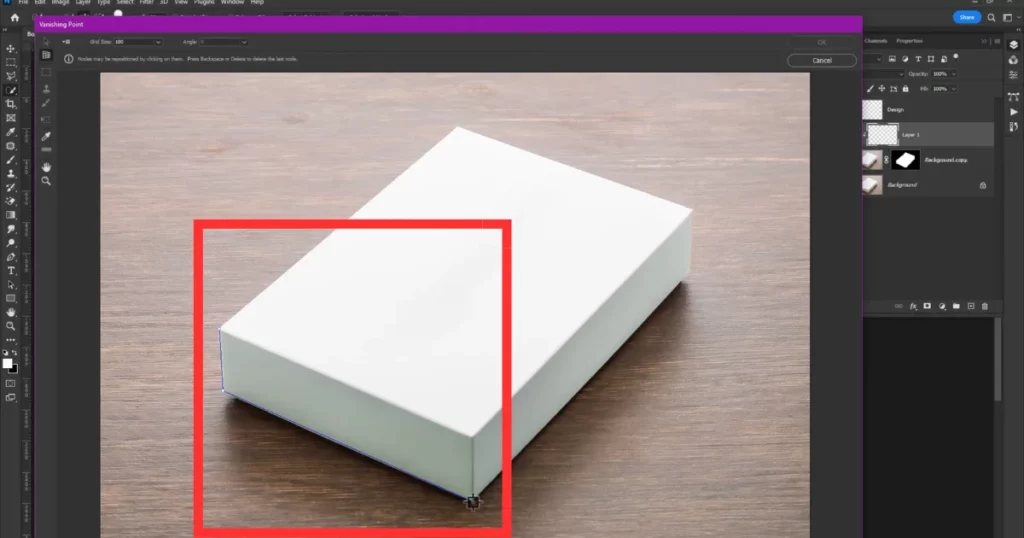
Step 8: Paste and Adjust Your Design
With the perspective plane in place, hold Ctrl and drag to adjust the plane’s points if necessary.
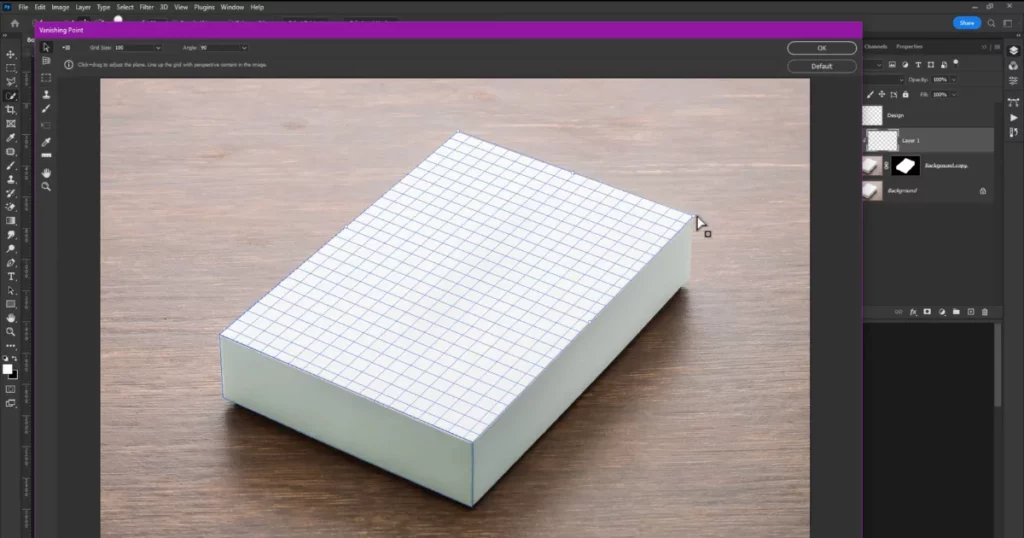
Once satisfied, press Ctrl + V to paste your design. Drop the design onto the plane.
Step 9: Transform and Adjust
Press Ctrl + T to transform your design and adjust its size and position so that it fits perfectly on the box.
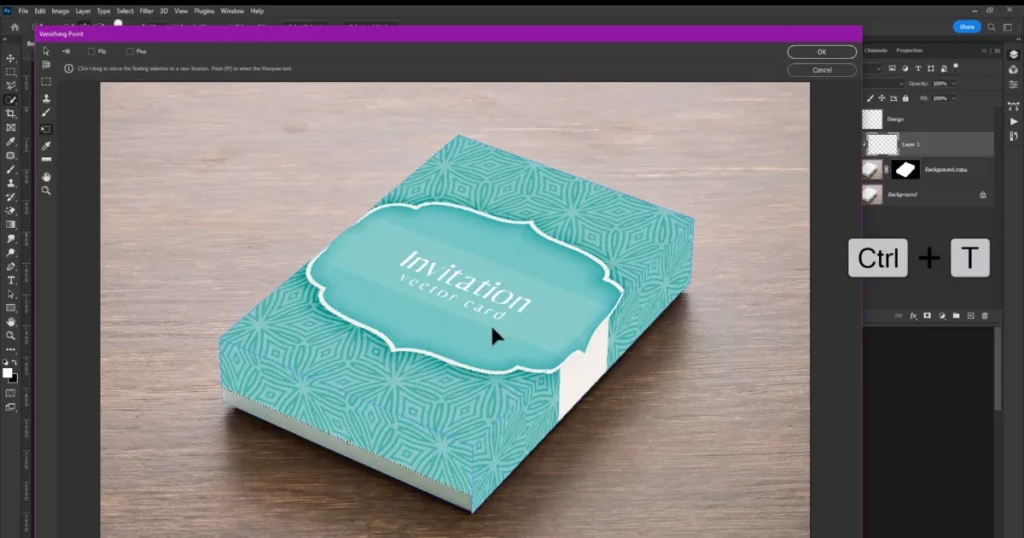
Step 10: Finalize with Blending Mode
Click OK to exit the Vanishing Point dialog. Lastly, change the blend mode of your design layer to Multiply for a more realistic appearance.
How to Make a Box Mockup in Illustrator
The following is a step-by-step guide that shows how to make box mockups in Illustrator.
Step 1: Set Up Your Document
Open Adobe Illustrator and create a new document. Set your artboard size based on your box dimensions, e.g., 7 cm width by 16 cm height for a cosmetic tube box.
Step 2: Create the Box Template
Draw the box outline using the Pen Tool (P) or import a template image and trace it using Image Trace (Window > Image Trace), checking “Ignore White” to capture only the outline. Scale the vector outline to fit the artboard. Adjust the artboard size by going to Object > Artboards > Fit to Artwork Bounds.
Step 3: Design the Box
Add graphics and text. Use the Rectangle Tool for images or logos and apply colors and patterns. Use layers to organize your design, and lock any reference layers to avoid accidental changes.
Step 4: Create the Mockup
Export your design as a PNG or PDF. Use Adobe Dimension or other 3D software to create a realistic mockup. Import your design, apply it to a 3D box model, and adjust lighting and angles for a polished look.
Additional Tips
- Watch video tutorials on platforms like YouTube for visual guidance on using Illustrator and Dimension.
- Consider downloading mockup templates from resources like Envato Elements or Envato Elements alternatives for faster results.
Following these steps will help you how to make box mockups in Adobe Illustrator.
Benefits of Making a Box Mockup
Box mockups are valuable tools for businesses, helping to make products stand out and be easily recognized. Here are some key benefits:
- Mockups let you try out different designs and see which one looks best before you start production.
- You get a realistic view of how your product will look and feel. This helps spot any design issues and make changes before manufacturing begins.
- Using mockups properly can save you time. They also give potential customers a clearer idea of your product compared to 2D drawings, which can boost sales.
- Mockups are great for marketing, like making social media posts and help create a polished and professional look.
- They also help maintain consistency across new social media platforms, making your brand easily recognizable through your product photos and packaging.
Tips for Making a Box Mockup
Making box mockups requires attention to detail and good design sense. Some tips to get great results:
- Pick the Right Software: Use software that lets you make top-notch box mockups with features like customizable templates and the best mockup tools.
- Use High-Quality Photos: Ensure your mockup looks professional by using high-resolution photos that accurately describe your product.
- Focus on Typography: The fonts you use on the box mockup can greatly affect how well it works. Choose clear and readable fonts that match your brand’s style.
- Think About Color Psychology: Colors can trigger certain feelings and convey messages. Research color psychology and pick colors that fit the message you want to send.
Conclusion
You have understood how to make a box mockup using Mockey, Photoshop, and Illustrator.
Making attractive box mockups is important in today’s market. Realistic and appealing mockups can greatly influence how consumers see your product and help increase sales.
Feel free to use our Mockey mockup generator to design custom boxes that showcase your brand. Just remember, keep it simple. Don’t overload the design with too many details—focus on highlighting your product.
Still confused about how to make a box mockup? Visit the Box mockup generator to know in detail.
FAQs
How to make a mockup for a box?
To make a box mockup, start by launching Mockey and selecting Mockups under the Packaging section. Choose a box template, upload your design, make any adjustments, and then download your mockup without a watermark.
How can I make my own mockups?
To make your own mockups with Mockey, click Mockups and go to the categories like T-shirt, hoodie, box etc. Choose a template, then click Upload Design to add your design. Customize it and download your mockup without a watermark.
How do you turn something into a mockup?
To make a mockup, start by selecting a suitable background image or template for your design. Next, overlay your design onto the template and adjust its size and perspective to look realistic. Customize the colors and textures to match your brand. Finally, save the mockup for use in presentations, marketing, or product displays.
How to create box mockups in Illustrator?
To make box mockups in Illustrator, go to Window > Mockup to open the Mockup panel. Choose your vector art and a template, drag them onto the canvas, and resize the art to match the box. Click outside the image to finish.
Related reading:
- How to Make iPhone Mockups for Free – Quick Steps
- How to Make T Shirt Mockup in 2024
- How to Make T Shirt Mockup in Photoshop (2024)
- What is a Mockup? Its Types and How to Create for Free
- Wireframe vs Mockup vs Prototype – Explained in 2024
- How to Make a Mockup: Create Mockup Online Without Photoshop
