This post will show you how to remove background in Photoshop. This tutorial is designed for beginners, so we’ll go slowly and explain everything clearly so you can follow along. Let’s get started!
Table of Contents
How to Remove Background in Photoshop in One Click
Here’s a quick guide summarizing the process of removing a background in photoshop in one click from an image:
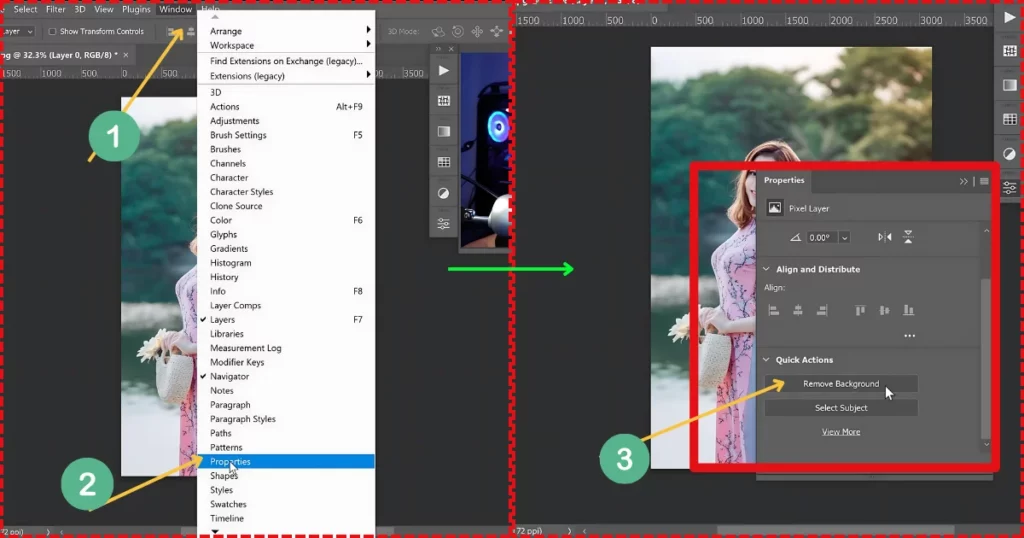
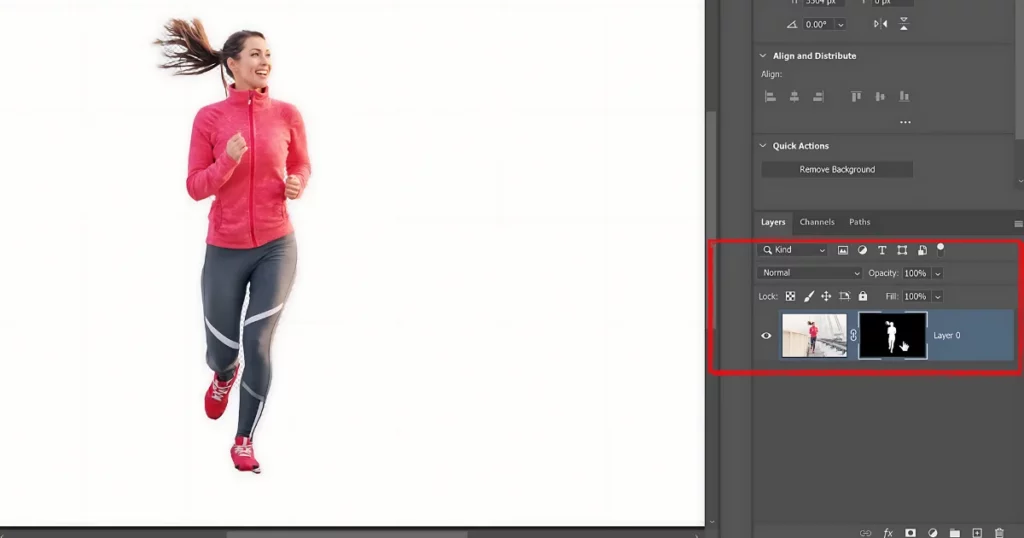
- Left-click on the lock icon.
- Go to the “Window > Properties.”
- Scroll to the bottom and click “Remove Background.”
To touch up any remaining areas:
- Select the fourth tool down on the toolbar.
- Left-click and drag to create a selection.
- Press “G” for the bucket tool, then “X” to switch to black, and left-click to fill in the selection.
- Press “Ctrl + D” to deselect.
- Press “B” for the brush tool, then “X” to switch to white, and fill in any remaining areas.
To add a new background:
- Drag the new background image into Photoshop.
- Hold “Alt” and drag the corner to resize it.
- Double-click to apply and move the new background layer underneath.
You’re done!
This is the best way to remove background in Photoshop which is clean and accurate. Adjustments like edge refinement and fine-tuning ensure a professional-looking final image.
How to Remove Background in Photoshop – Complete Guide
Here is a complete guide on how to remove background in Photoshop.
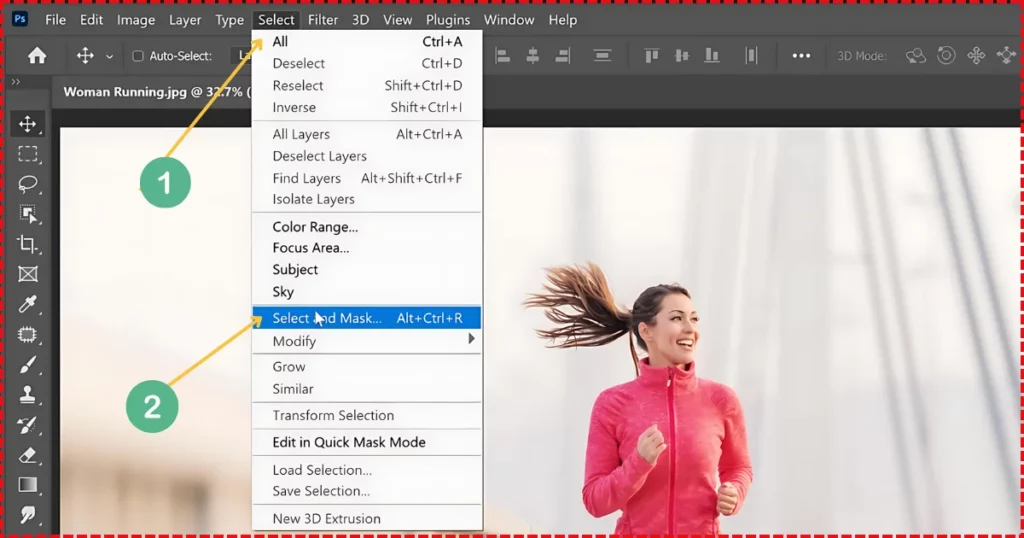
Here’s the image we’ll be working with: a woman running through a bridge. We’re going to remove the background. There are many ways to do this in Photoshop, but we’ll show you a simple technique that works in most cases. If it doesn’t, you can fine-tune the image further.
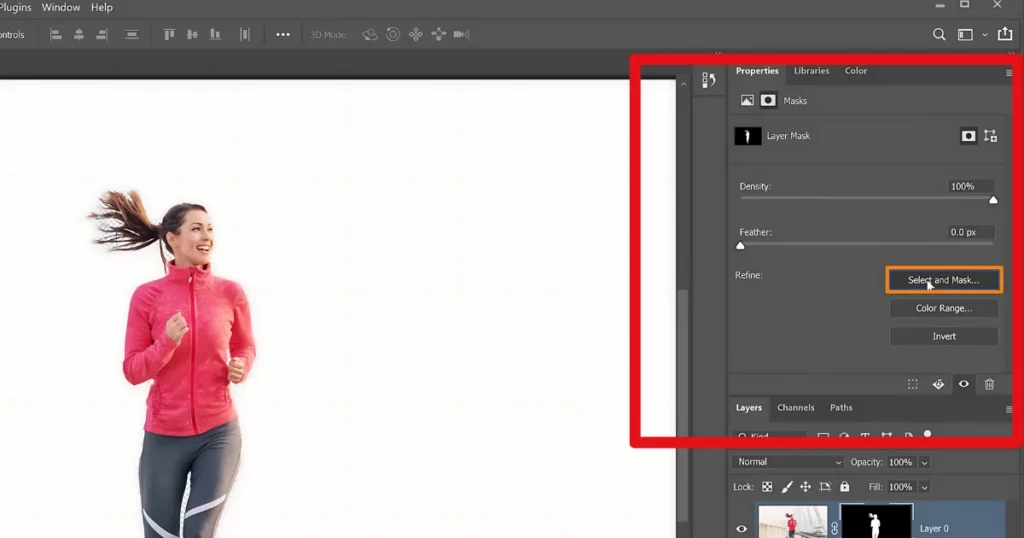
Step 1: Open the Image and Access Select and Mask
First, open the image in Photoshop. Then, head to Select > Select and Mask. This workspace allows accurate selection and masking.
Step 2: Figuring Out the Workspace for Select and Mask
You’ll see a toolbar with a limited set of tools similar to those in the regular Photoshop interface. These tools let you make or edit a selection, as well as zoom and pan around the image.
Toolbar options are found above the toolbar. There are additional settings available for the currently selected tool.

To the right, there are adjustable properties to fine-tune your mask or selection.
By default, you’re in onion skinning mode with transparency set to 50 percent, allowing you to see your selected pixels over the original image. Since nothing is selected right now, you see the original image at 50 percent opacity.
Step 3: Choosing in Select and Mask
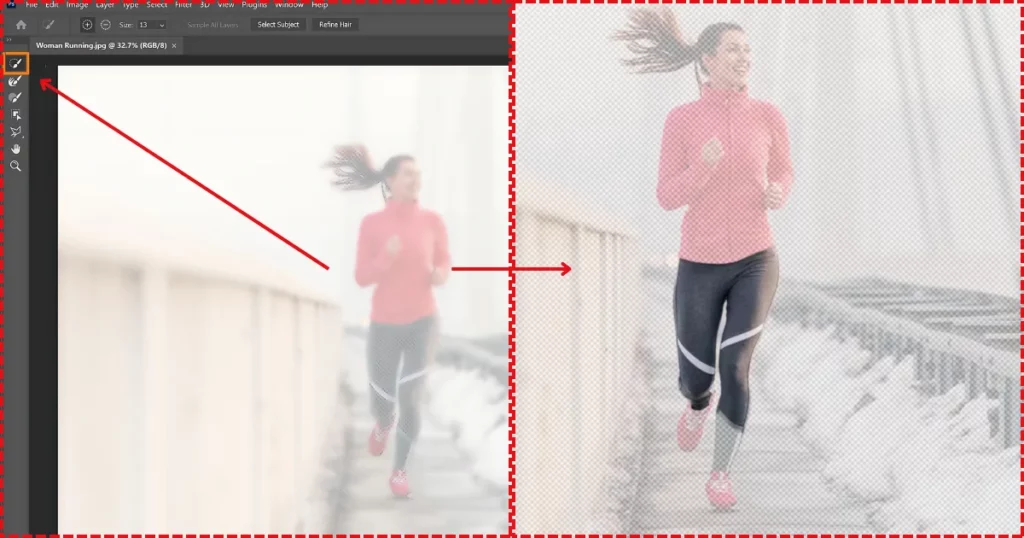
Once we start selecting something, the selected pixels will appear with 100% opacity. There are many ways to make selections in the Select and Mask workspace.
For example, to choose something specific like a piece of clothing, you can use the Quick Selection Tool. Please enable it from the toolbar, then click and drag over the image. Photoshop will automatically detect the edges of the areas you drag over.
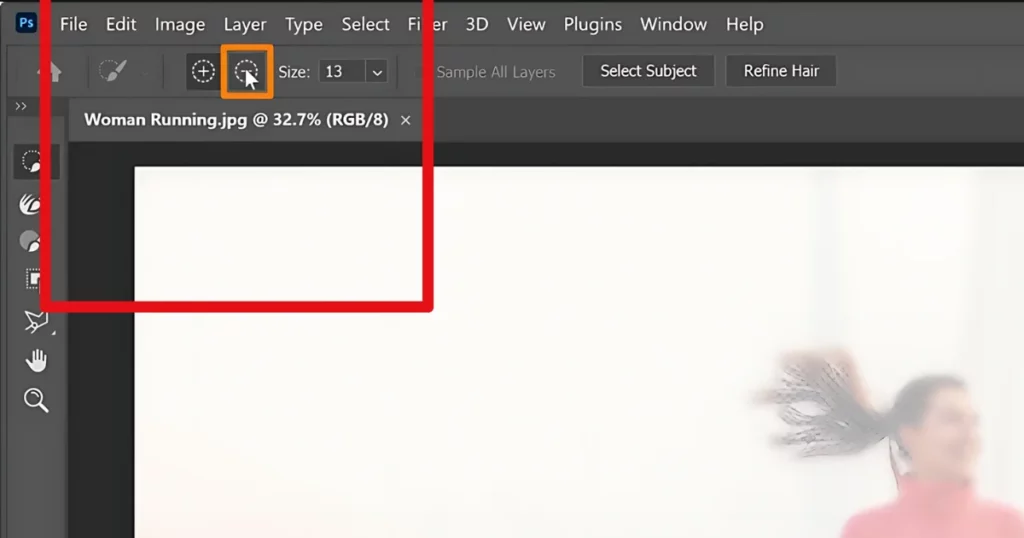
To remove areas from your selection, click the subtract icon or hold Alt on Windows (Option on Mac) while clicking and dragging.
In newer versions of Photoshop, like Photoshop 2021, you can use Adobe Sensei’s artificial intelligence to make selections. To complete this, click “Select Subject“. With a single click, Photoshop will analyze the image and identify the main subject. Although the selection might not be perfect, you can fine-tune it as needed.
Additionally, we’ll show you a tool that lets you select only one subject in an image with two subjects. We’ll switch to a different image to demonstrate this, and then we’ll return to the original image.
Step 4: Refine the Selection
If you click “Select Subject” in Photoshop, it will select both women in the image.
But if you want to select only one person, use the Object Selection tool in Lasso mode. To choose an object around the person you like, simply click and drag it.
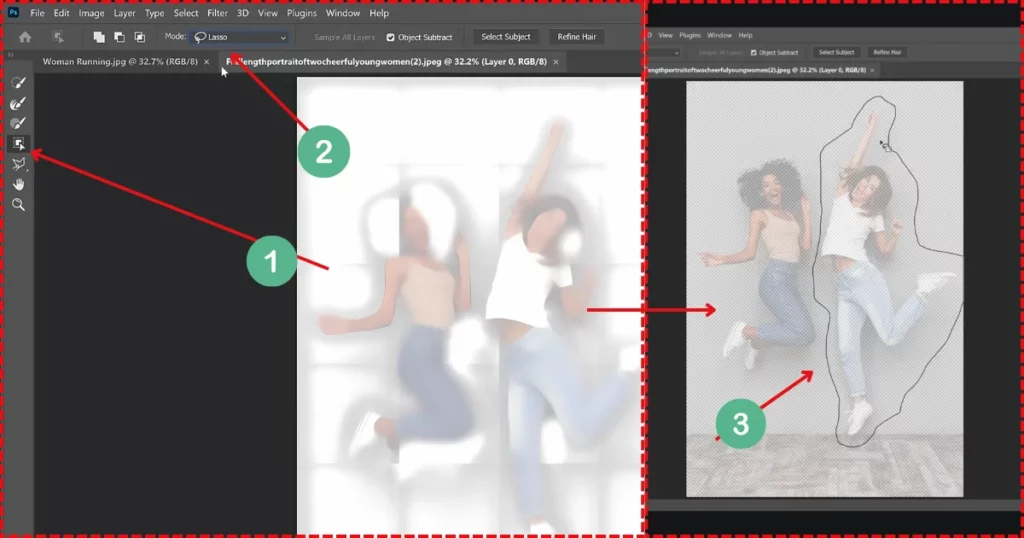
Photoshop’s AI will analyze the area and select the main subject. For images with multiple subjects, use the Object Selection tool to pick the main one. If there’s only one subject, click “Select Subject.”
Now, let’s go back to our original image.
We created this selection by clicking the “Select Subject” button to automatically generate it. These automatic selections aren’t perfect and need some adjustments.
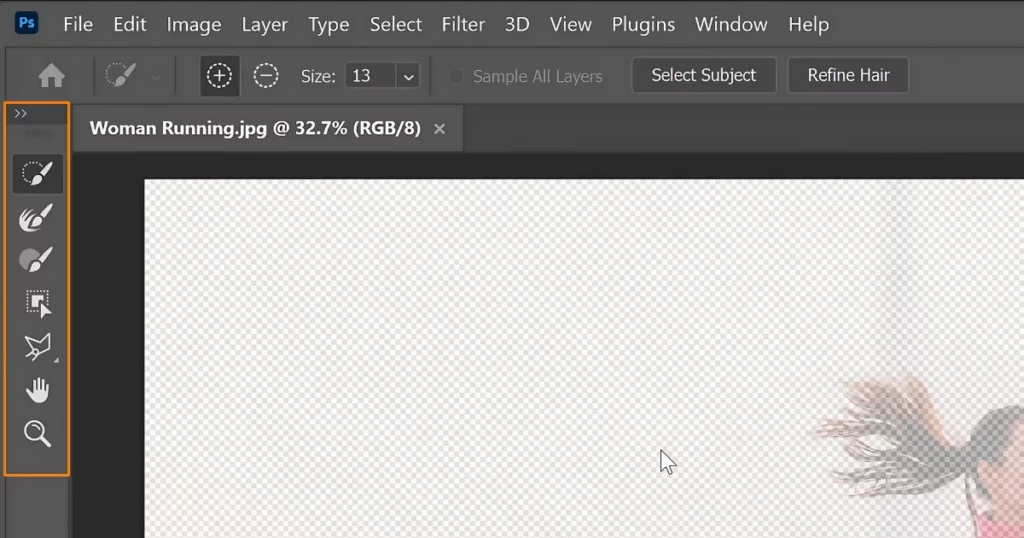
Step 5: Fine-Tuning with Select and Mask Tools
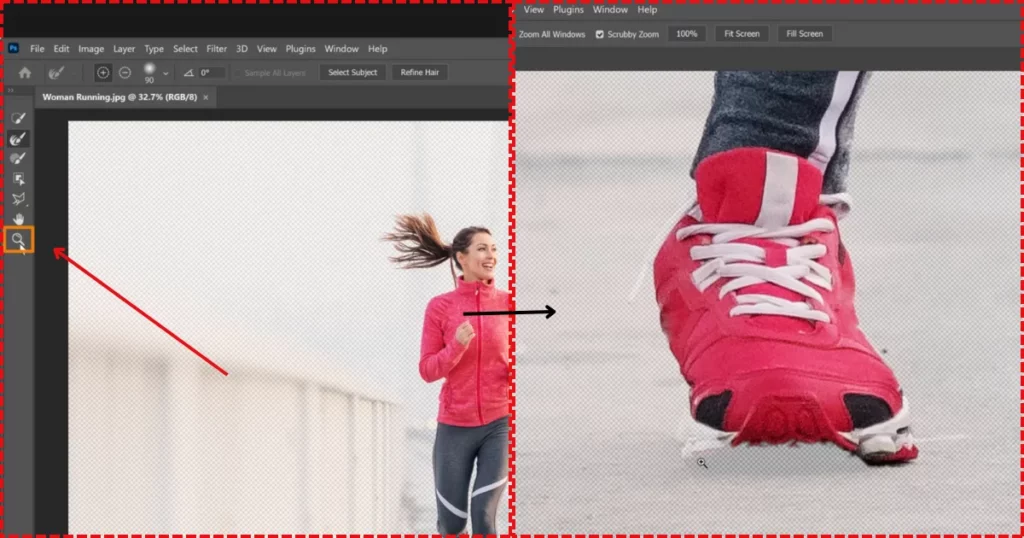
First, we’ll use the zoom tool to zoom into her shoe, where Photoshop’s AI missed a few areas.
To fix this, we need to add to the selection. There are several approaches to this:
- Use the quick selection tool, make sure the “Add” option is enabled, and click and drag to paint over the missing areas.
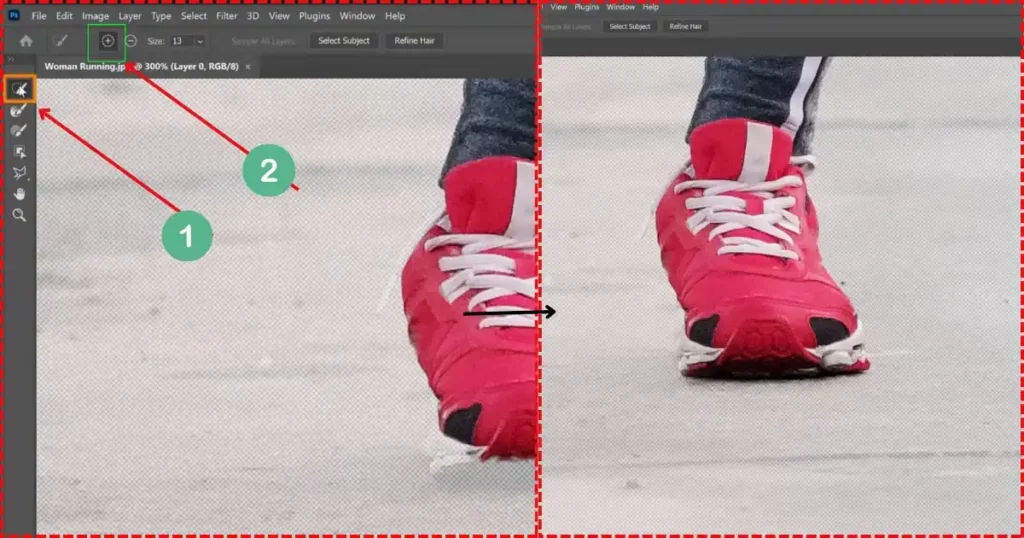
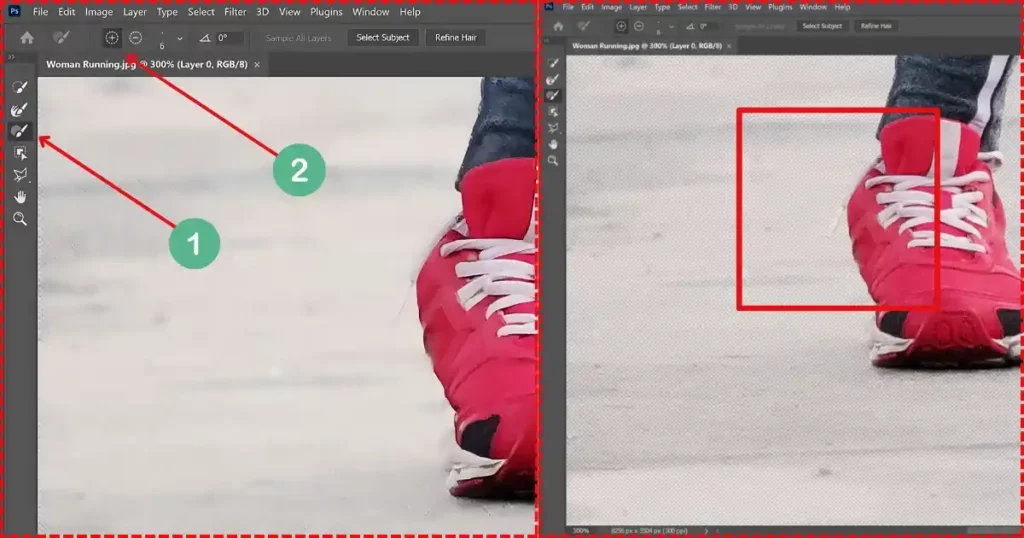
- Paint in any details that are missing, such as the shoelace, by using the brush tool and clicking the “Add” icon.
Here, you can see how we’re painting the shoelace back in.
Use the spacebar to pan and find other areas to adjust and fine-tune your image.
In this example, we’re not spending much time on small details, but make sure to do so in your projects because it makes a big difference. Now, we’ll fix the mask edge and double-click the hand tool to fit the image to the screen so we can see the entire picture. By “Mask Edge,” we mean a layer mask, which is a non-destructive way to hide pixels.
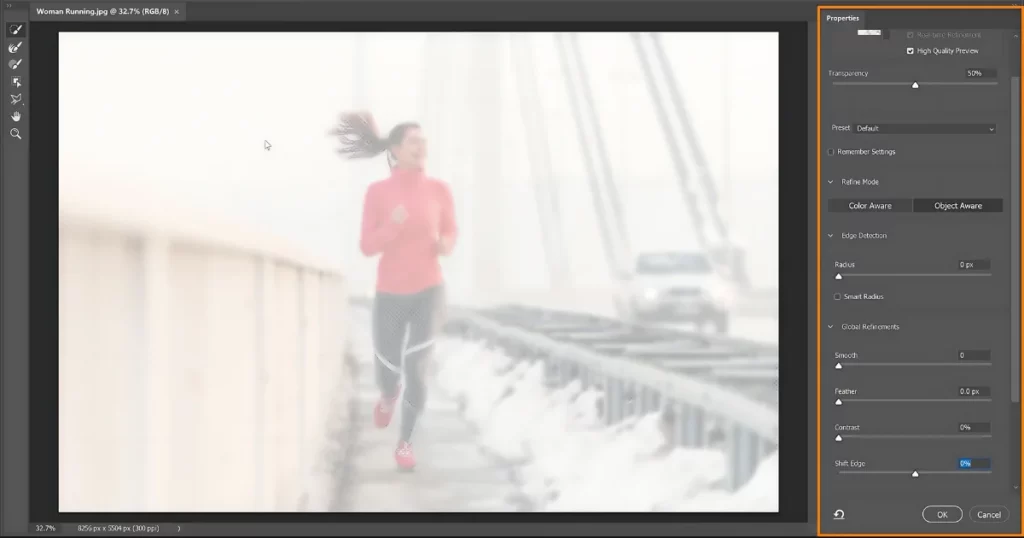
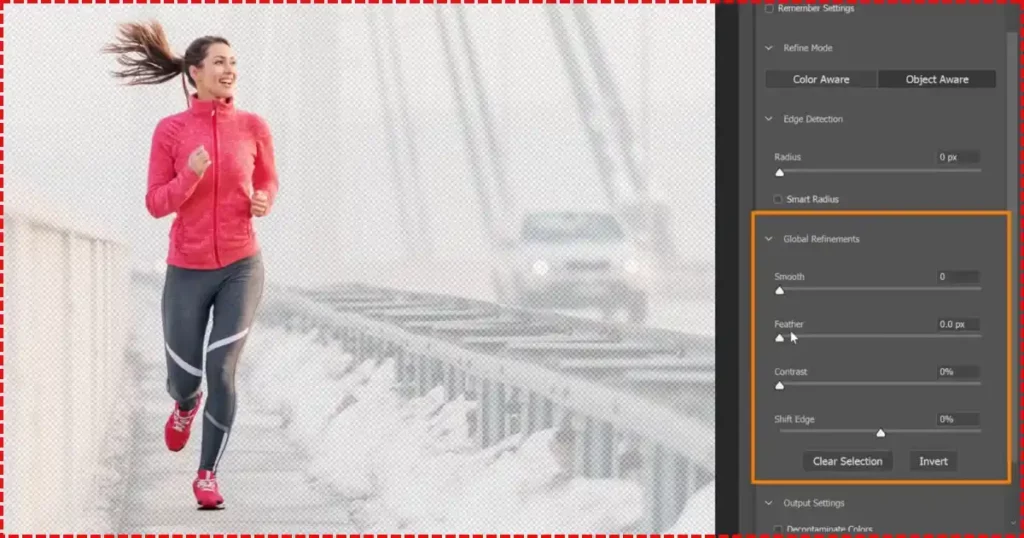
We want to adjust the edges of the mask to remove any jagged or blurry parts, making the cutout look realistic. Here, we have global refinement sliders—smooth, feather, contrast, and shift edge—that control the mask edges.
If you’re new to this, we’ll zoom in on her legs and select black and white under view.
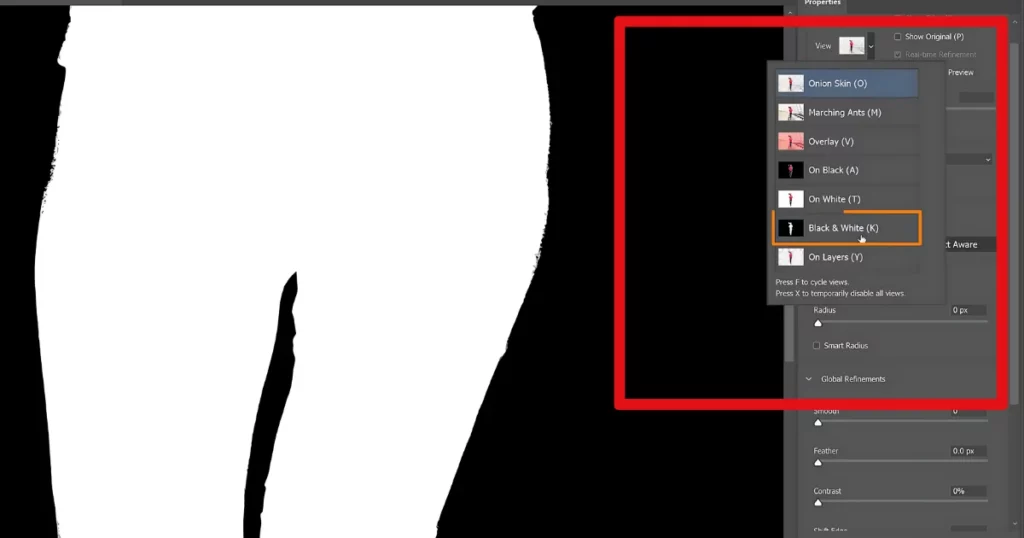
This shows the mask where white reveals and black conceals. Her silhouette is white because we want to keep her. My goal is to remove all the jagged edges for a cleaner cutout.
Step 6: Applying Mask
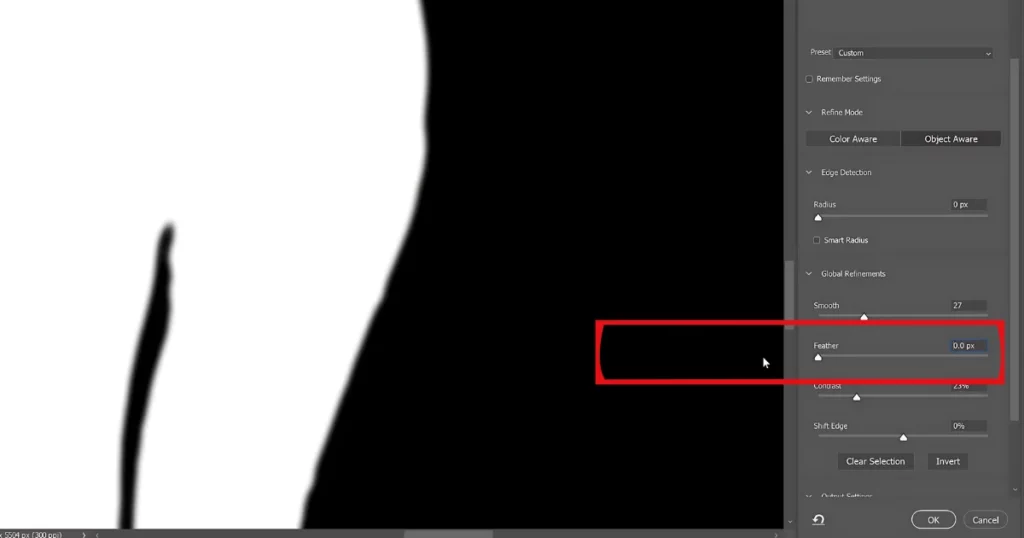
In order to make the edges smoother, we increase the smooth slider. See how much smoother they look now? All we had to do was use the smooth slider. Then, we increase the contrast to make the edges sharper. In some cases, you might need to feather the edges, which means blurring them. Dragging the feather slider to the right makes the edges blurry, but we don’t need that here, so we’ll leave it at zero.
Next, we can shift the edge in or out. This is useful because sometimes, selections have halos around the edges. Shifting the edge helps reduce these halos. Let us show you.
We’ll go to view and select “On black” to see our selection against a black background, making the white halos stand out.
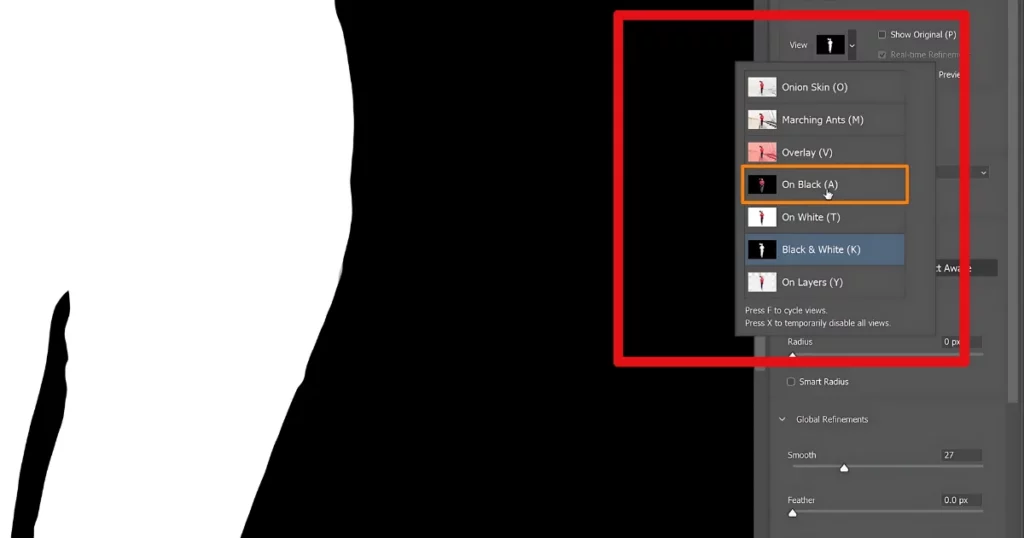
Notice the halos on the edges? This is called fringing. we’ll shift the edge in by dragging to the left, and Photoshop will reduce these halos.
If the imperfections are too extreme, it’s easier to paint them away. Select the brush tool, click on the minus button, and paint away the imperfections. Spend more time fine-tuning these details in your project than we are here.
We’ll double-click on the hand tool to fit the image to the screen. You’ll notice we haven’t touched her hair intentionally. We prefer a two-step approach to making selections. First, we select the entire body. Next, we tackle the hair. This method usually gives better results. Let us demonstrate the next adjustment: we’ll click and drag downwards. Under “Output,” we’ll select “Output as a layer mask” and press OK. Photoshop will then remove the background using a layer mask, which hides pixels without permanently deleting them.

In simpler terms, you can always go back and reveal hidden pixels. You can also edit layer masks in the selected workspace.
So, let’s return to the selected mask workspace and focus on adjusting the model’s hair. A white outline will appear around its thumbnail if the layer mask is active.

Choose “Select and Mask“. Now, use the refined edge brush to enhance the selection of her hair.
It’s important to work on this separately because adjustments like smoothing, contrast, and edge shifting are tailored for the body’s edges and don’t work well for hair.
So now we can focus on the hair while you continue painting. Photoshop will automatically remove the background in versions 2021 and newer. You can also use the refine hair button for AI-powered hair detection. However, it didn’t do well on her face this time, so we’re not satisfied with the results. We’ll undo that and manually apply the effect instead of using AI. Use the brush tool with the add feature to touch up areas like these highlights we lost.
Step 7: Outputting the Selection
We’ll apply adjustments to a layer mask in Photoshop. Then, we’ll add a solid color background—let’s make it pink. After adjusting the layer order, you might notice some imperfections in the mask. No worries—you can fix these using a brush tool. Simply paint with white to add and black to subtract. Zoom in for finer details.
Step 8: Final Adjustments and Output
Let us demonstrate how to do this. First, select your layer mask from the properties panel. You can adjust the density there to reveal more of the original background. Notice we need to reveal more of her shoe, so we’ll use the brush tool with a brush size of 11:30. Paint with white to reveal and black to hide pixels on the mask. Press “X” to switch between white and black quickly. Be patient when fine-tuning the mask. This step is crucial for a polished final result.
Once you finish, set the density slider back to 100. Also, there’s a feature for quickly creating masks that we didn’t mention earlier. To demonstrate, we’ll delete my current layer mask by right-clicking and choosing “Delete Layer Mask“. Notice in the properties panel, that when a layer is selected, there’s a “Remove Background” button.

Clicking this in Photoshop uses AI to analyze your image, make a selection, and create a mask all at once. However, we didn’t use this initially because we still needed to adjust the mask afterwards using the AI tools in the selected mask workspace.
Step 9: Adding a New Background
You can use either method, but since this video is for beginners, we kept everything in one workspace to make it easier to understand. However, you do have the option to use separate methods if you prefer. Let us undo the changes we made to our mask and show you how to bring in a photo as a layer to replace the background. Select Place Embedded from File. We have a new background image here which we’ll place over our current image. Once positioned, click the check mark to confirm the changes, and there you have it—a new background!
How to Remove Background from Logo in Photoshop
We will show you how to remove background from logo in Photoshop.
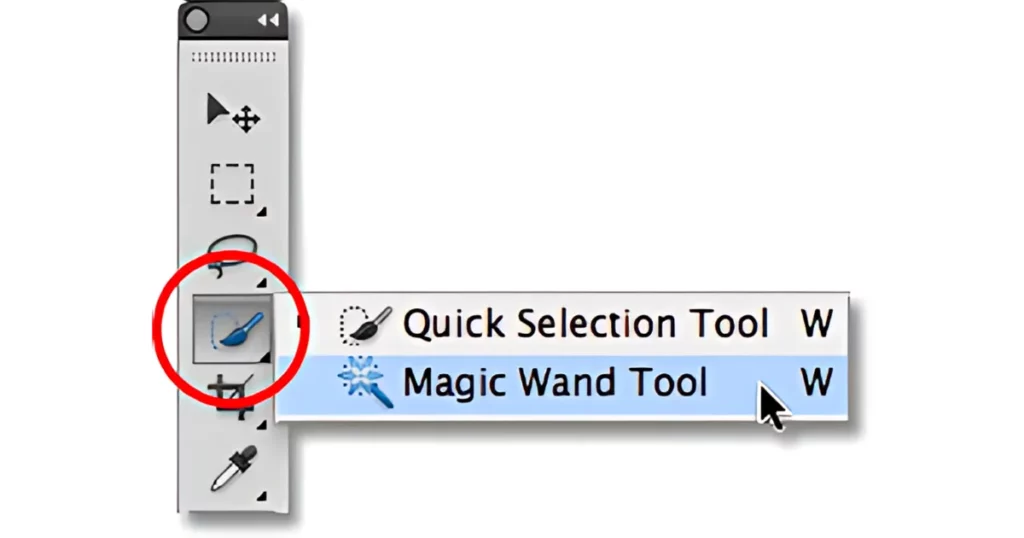
- Select the Magic Wand tool (or press W on the keyboard).
- Click on the background.
- Go to Select > Similar to select all pieces of the background.
- Invert the selection by going to Select > Inverse.
- Click the mask icon to make the background transparent.
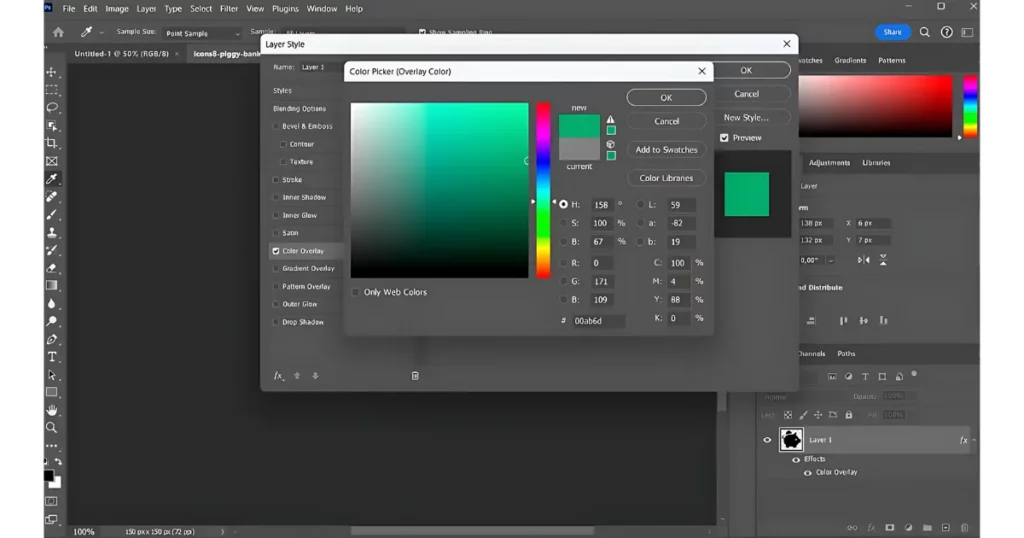
If you want to make the logo a single color:
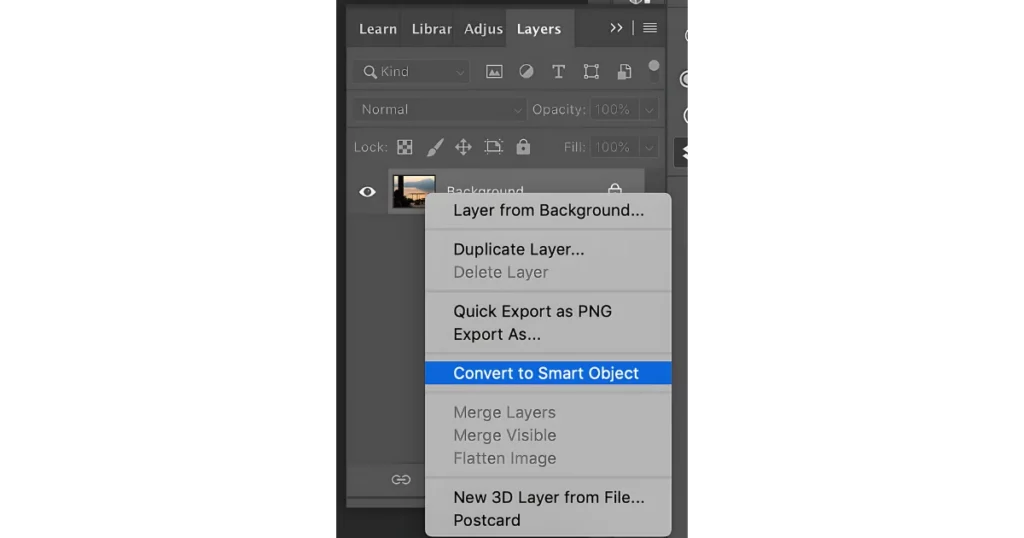
- Then tap “Convert to Smart Object“.
- Go to Effects > Color Overlay and pick your desired color using the Color Picker.
To save the logo for the web with transparency:
- Go to File > Export > Save for Web.
- Choose PNG-24 format and ensure transparency is checked.
- Save the file.
You can also resize the logo here if needed.
How to Remove Background in Photoshop Express Mobile App
In this Adobe Express tutorial, we’ll show you how to remove background in Photoshop Express mobile app.
- First, open the app on your iPhone or iPad.
- Next, add an image to your design by tapping “Add” at the bottom, selecting “Adobe Stock,” and choosing a photo. For this example, we’ll use a photo of a dog with a bow tie and glasses.
- After adding the image, select “Move Freely” instead of pinning it to the background. To make the image easier to see, change the background color to maroon.
- Then, tap on the image, scroll down, and select “Remove Background” between the “Crop” and “Shape” options. The app will remove the background in a few seconds.
That’s how you can remove a background in Photoshop mobile app.
Fastest Way to Remove Background of a Picture
There is a fast and easy way to remove the background of a picture. Mockey’s background remover is one of the best AI background removers to consider in 2024 and beyond.
To use it:

- Click Mockey’s Background Remover. Sign up there and upgrade your plan.
- Upload your image and select your type whether you want your background to be transparent or in white.
- After that click on the background remover < Download button to save the picture.
Conclusion
Learning how to remove background in Photoshop lets you create new things like collages, design materials, greeting cards, and custom items for your family and friends and families.
Removing a background in Photoshop can be easy or difficult. Our guide provides all the information you need to quickly and accurately create the images you want.
If you want an easier way to remove image backgrounds, try using Mockey’s AI background remover.
Your image background will be removed in less than 10 seconds, leaving you with a perfect image, even in tricky areas.
FAQs on How to Remove Background in Photoshop
How do I remove background tool in Photoshop?
To use the Remove Background in Photoshop, open your image and duplicate the layer (Ctrl+J for Windows or Command+J for Mac). In the Properties panel, click the “Remove Background” button under Quick Actions. To refine the edges, go to Select > Select and Mask, and use the Brush tool to clean up any remaining background areas, adjusting the Smooth, Contrast, and Shift Edge sliders as needed. Output the selection as a Layer Mask. Finally, save your image as a transparent PNG by going to File > Save a Copy.
How do I make the background transparent in Photoshop?
To remove a background in Photoshop 2024, open your image, go to the Contextual Task Bar, and click Remove Background. The background will become transparent automatically.
How do you remove background objects in Photoshop?
The Content-Aware Fill tool removes small background elements automatically in Photoshop. The Patch tool clones over larger areas. For complex backgrounds, use the Background Eraser tool or Select and Mask feature to refine selections and blend your subject into a new background, helping you remove distractions and focus on your subject.
How to remove background in Photoshop using quick selection tool?
Open your image in Photoshop. Select the Quick Selection Tool from the toolbar or press W. Paint over your subject to automatically detect edges. Refine the selection using the Properties tab (adjust Smooth, Contrast, Shift Edge). Output your selection as a Layer Mask and save your image in PNG format.
How to remove background color in Photoshop?
To remove the background color in Photoshop quickly, open your image. Click Remove Background in the Properties panel. Photoshop will automatically delete the background, making it transparent behind your subject.
Related reading: