Midjourney is one of the most popular Ai Image Generator on the Internet today. Midjourney consistently generates most interesting and high quality images. Midjourney Ai can also generate hands, eyes, toes, and gesturers with visible clarity, which many AI generators struggle with till today.
It is easily the top pick for anyone looking for an ai image generator or an ai art generator. However, the catch is that it is only available via its Discord channel. You can’t install Midjourney on your computer or run it on your own in the cloud server, like you can do with Stable Diffusion. Midjourney is also not available via APIs, so you can’t use it to build apps on it, the way developers can do with DALL·E 2.
Still, Midjourney is quite popular and among the top 3 Ai image generators on the internet. Let’s dive in and explore How to use Midjourney on Discord:
Table of Contents
What Is Midjourney?
Midjourney is an independent research lab, building a generative AI model to generate images from text prompts. Midjourney is a small self-funded team which is focused on AI, design, and images.
Ever since Mid journey Ai Image Generator was launched, it has become a highly appreciated, used, and loved product in the Ai world. If your haven’t it yet, in this blog we are sharing a detailed step-by-step guide on How to Use Mid journey:
How Does It Work?
Midjourney uses secret code that only its creators know, but they can still give a basic explanation of how it works.
Midjourney uses two new machine-learning tools: big language models and diffusion models.
You might know about big language models from using AI chatbots like ChatGPT. These models help Midjourney understand what you’re saying by turning your words into numbers, kind of like a secret code.
Then, these numbers help with another complicated process called diffusion.
Midjourney uses a cool technique called diffusion to transform random noise into stunning art.
This method has gained popularity in the last ten years, leading to a flood of AI-generated art.
In a diffusion model, a computer slowly mixes random noise with its image training data. Eventually, it figures out how to undo the noise, creating new images from scratch.
How Much it Costs?
ChatGPT and Microsoft Copilot can generate lots of text for free, but image generators have limits, like Midjourney which doesn’t even offer a free trial.
This is because making images needs a ton of computer power, especially graphics processing units (GPUs), and each GPU can only handle so much because of its limited video memory, which is crucial for cleaning up images.
Considering all that, it’s understandable that the best AI image generator comes with a price tag.
To get started, you’ll need to pay at least $10 a month, which gives you about 3.3 hours of GPU time, enough for around 200 image creations.
If you want more, the priciest option offers 60 hours of speedy GPU time for $120 monthly.
Midjourney starts at $10 monthly, but pricier plans offer more. With those, you get unlimited relaxed mode images, though you might wait up to 10 minutes. If top quality isn’t a must, check out other options like those from Google or Meta. Many are free and just as good as Midjourney.
How to Use Midjourney?
How to use Midjourney to generate AI images? Quicks steps on how to use Midjoruney:
- Create a Discord account.
- Create Midjourney account and join the Midjourney Discord Server by accepting the invitation.
- Head to #newbies channel and enter
/subscribecommand. - Subscribe to a Midjourney Plan.
- Go back to Midjourney Discord Server and use
/imaginecommand to enter your text prompt to generate an ai image. - Edit or Upscale your Ai Generated Image.
- Download the image.
Now that you know how easy it is, let’s look at each step in-depth.
Step 1: Sign up on Discord
Getting Started With MidJourney.
Discord is a chat app with support for Audio, Video, and Voice chat. It is somewhat similar to Slack. But its customisability, open-source tech, it being Free has gotten it wide adoption in many industries. Originally, Discord was developed for Gamers community to have a live voice chat while they play online or multi-player live games to coordinate their gaming moves. But due to its versatility, Discord got huge acceptance across tech industry.
You can sign up on Discord web app or download discord app on your PC or laptop. Also, Discord is free to use. Midjourney being a small self-funded team, decided to build an Ai Image Generator bot integration for Midjourney on Discord, that way the community of Midjourney users stay in one place while the organisations incurs no cost while managing a total number of 18.4 Million members in their discord server.
It is astounding to see that a huge AI Image Generator model can run entirely within Discord with 18.5 Million+ members. But that’s the beauty of technology.
Now that you’ve your discord account, it’s time for step 2, signup on Midjourney.
Step 2: Sign up for Midjourney
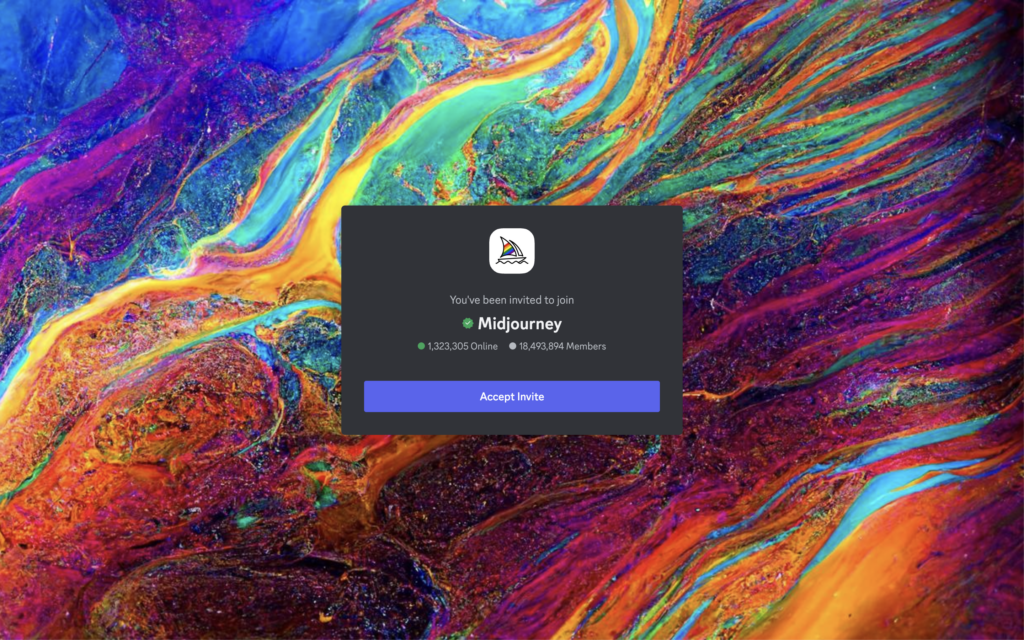
Head to Midjourney website and click on “Join the Beta”. You’ll be redirected to an invitation page to join Midjourney Discord Server, Accept invite, and you’ll join in immediately.
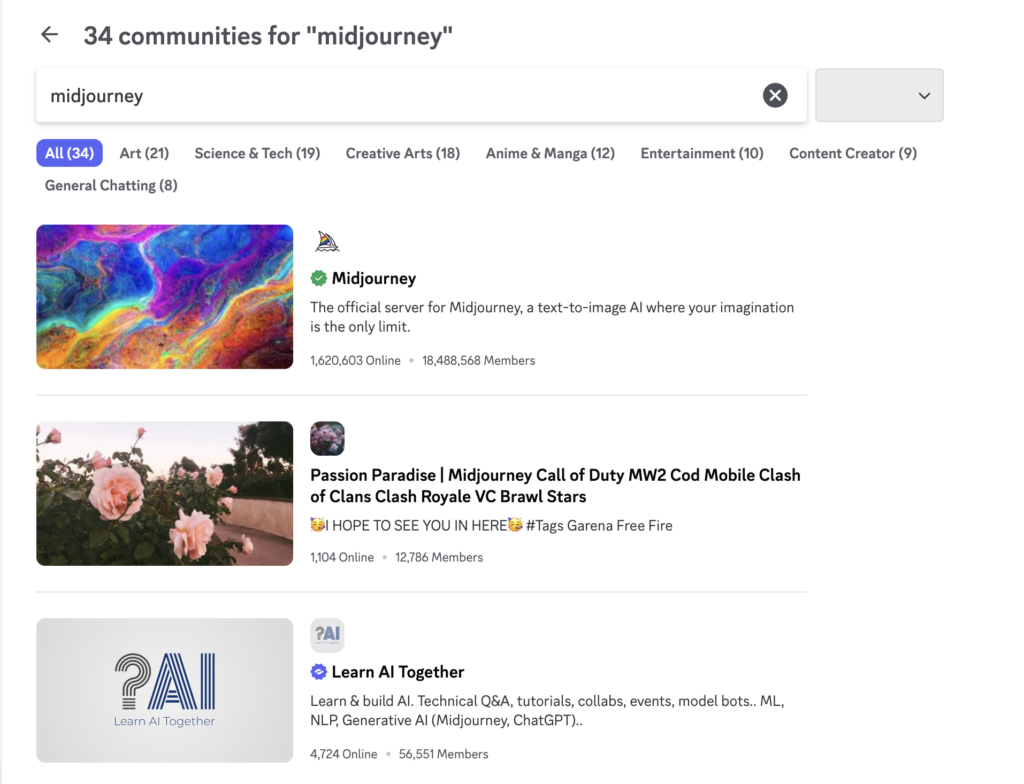
Another way to get into it’s Discord Server is by searching Midjourney on Discord Explore Page. You’ll see it as the top search result, click on it and join the server. The one with a verified checkmark is the original one.
Note: In late March 2023, Midjourney suspended free trials due to people abusing the system, though they’ve brought them back for limited periods to mark the release of new versions. The developers have stated that they intend to bring them back fully at some point, but there’s currently no ETA. Previously, the free trial offered roughly 25 free images (it was limited to 0.4 hours of GPU time) under a CC BY-NC 4.0 Creative Commons non-commercial license. When free trials return (or if they already have by the time you’re reading this), you’ll be able to skip the following step—at least until you burn through your free images.
Now, head to one of the #newbies room. You’ll see rooms like #newbies-5 or #newbies-35 or something similar.
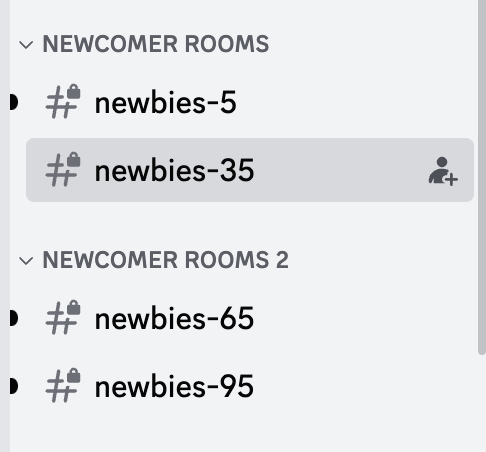
Next up, write /subscribe message and send it in one of the Newbies channel on Discord. You’ll see the following message next:
“Open the page below to pick your plan and subscribe to Midjourney! This is your personal link, do not share it with anyone!“

Click on “Manage Account” and it’ll take you to the subscription page. Let’s explore the subscription plans from Midjourney. Remember, that it is not free anymore and you’ll need to purchase a subscription to use it.
Note: These /subscribe etc. are called slash commands on Discord. This is the way to interact with bots on discord. The command is a way to tell the Bot that you want to subscribe to a Midjourney plan
Step 3: Purchase Midjourney Subscription
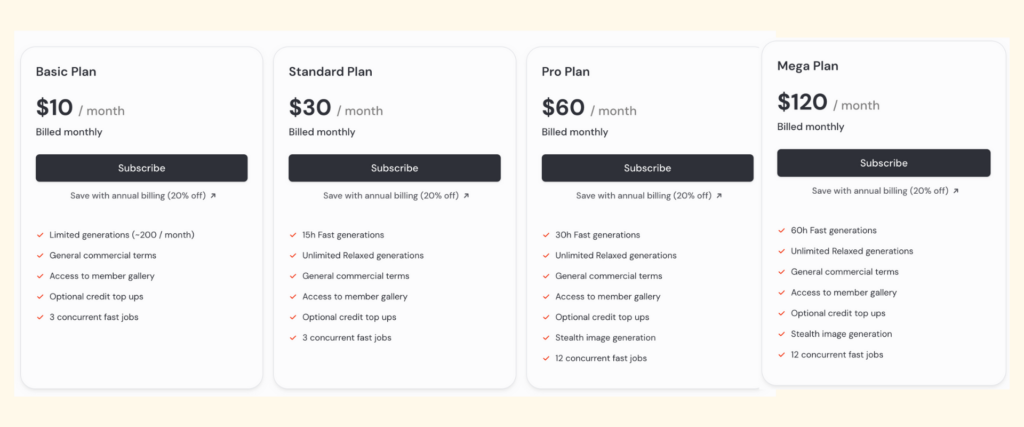
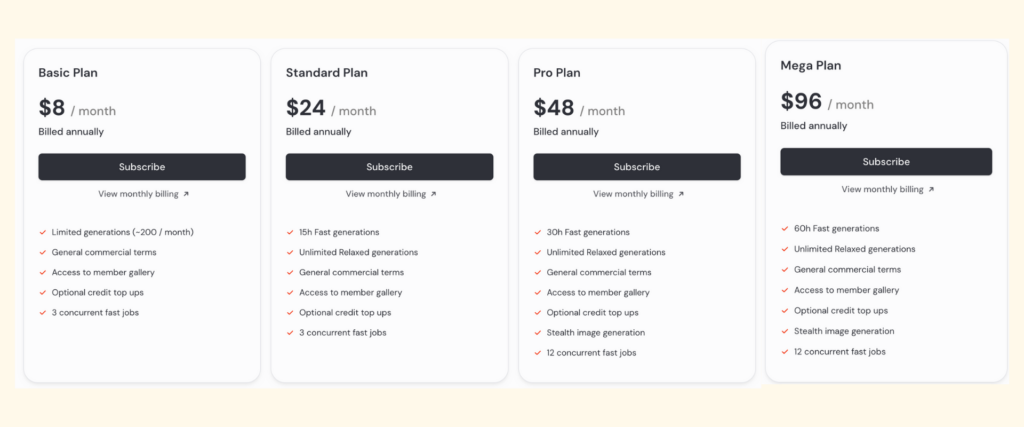
Midjourney offers monthly and annual subscription plans with different pricing structures and offerings to choose from. Depending on your use case and how often you’ll be using it, you can choose a plan that works for you.
Midjourney Monthly Subscription Pricing
The lowest plan is a monthly subscription starts at $10/month. It gives you ~200 image generations/month. In this plan, you can run 3 concurrent jobs. Which means that you can run three image generation prompts at the same time. Also, note that sometimes due to high GPU demand, the members with higher plans get priority and have access to Fast Generation. So if you need more images faster, we suggest you option for Pro Plan that costs $60/month and offers unlimited relax generations and 30 hours of fast generations.
Midjourney Annual Subscription Pricing
If you have your AI Image Generations requirements lined up for a long duration, it is recommended to opt for annual plans. The benefit of opting for Annual Plans.
Once you’ve picked your plan and subscribed to it, go back to Midjourney Discord Server to generate your 1st image.
Step 4: Generate Your First AI Image
Midjoruney was originally created to be used by Artists (which is another reason why they started with Discord). Unlike Stable Diffusion and Dall E 2, all your images and prompts are public by default. It makes all the Newbies channels full of Chaos. But it also opens up the imagination for new users, you can scroll in those channels to see what kind of images are generated on Midjourney.
Here’s a screenshot from a Newbie channel showing a few images generated by some users.
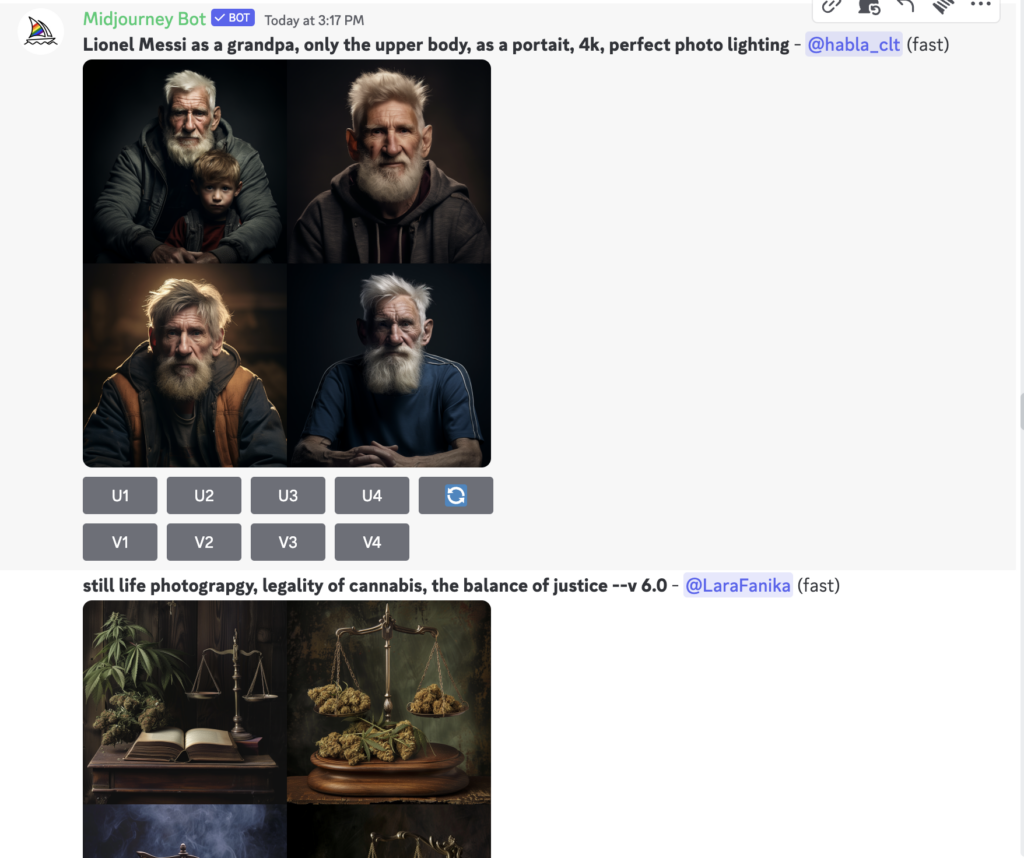
Another option is to write your image generation prompt /imagine in private chat with Midjourney Bot. But by default, the generated images will also get posted in the public channel. To keep your images private, you’ll need to subscribe to the Mega or Pro plans.
In the beginning, let’s start image generation from the public #Newbies channel. But if you want to keep track of your prompts, you can click the “Midjourney Bot” and send it DMs.
Write /imagine and this slash command will open a small Text Prompt input box. Once you’ve entered your prompt, press Return Key or Enter. If you need some ideas to get started, here are a few interesting prompts to try:
- “A futuristic cityscape blending ancient architecture with neon-lit skyscrapers.”
- “A whimsical forest where the trees are shaped like musical instruments.”
- “An underwater scene with a castle made of coral and schools of fish swimming through its open windows.”
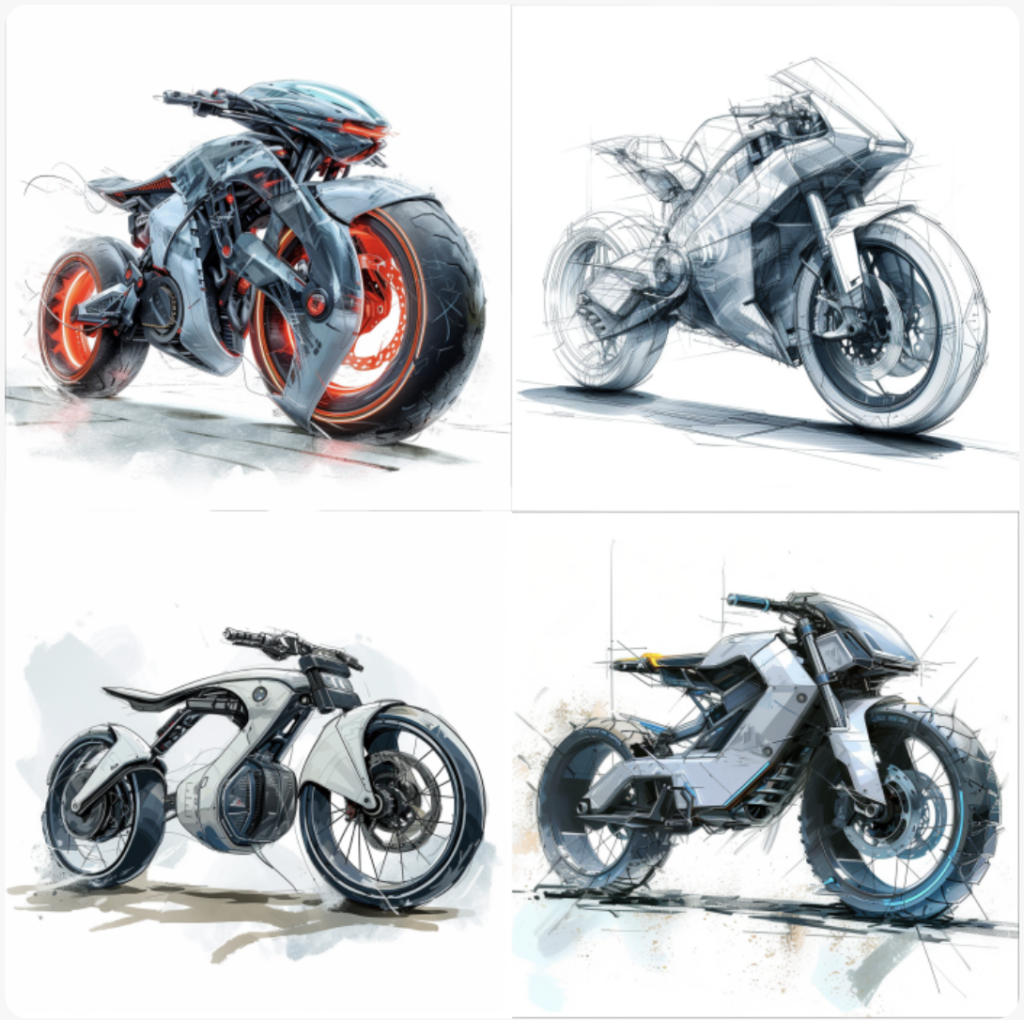
Wait for a few seconds or a minute and you’ll get 4 ai generated image variations for your text prompt.
Prompt Example: “a transparent sketch, illustration of a futuristic e-bike on a white studio background”
Step 5: Edit Your Images
Now, the big question is “How to edit images with Midjourney?“
It offers a few image editing features as well along with image generation. Let’s explore them one by one:
How to Use Upscaling and Variations in Midjourney
Below every set of generated images, you can see 9 buttons. The U stands for Upscaling and V stands for Variations. The 9th Button is to ask for regeneration.
- U1
- U2
- U3
- U4
- V1
- V2
- V3
- V4
- ????
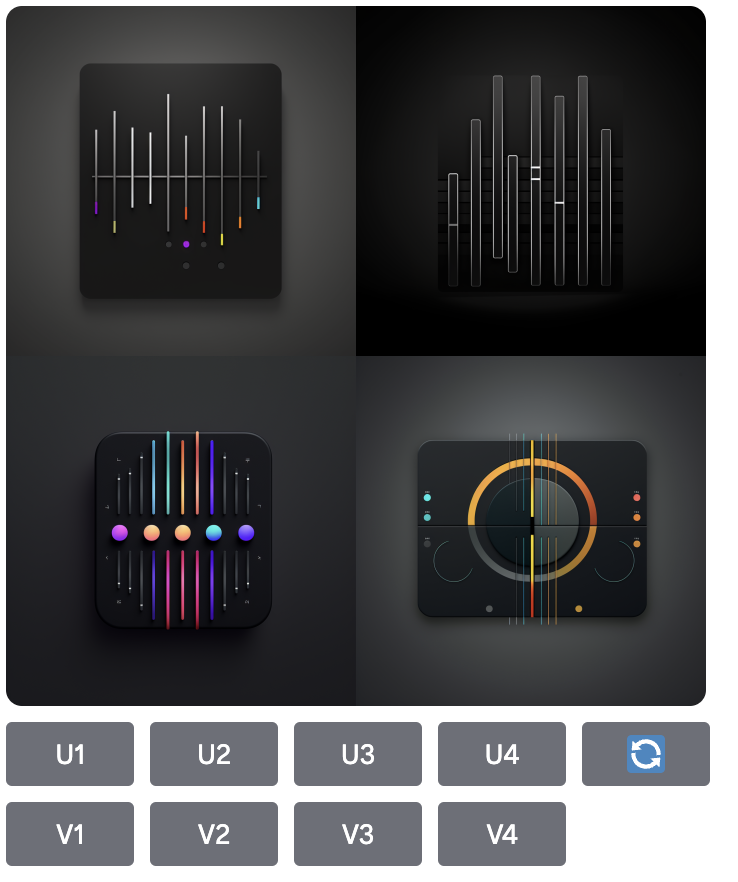
- U Buttons will upscale your select image to create a new version of the image with larger version and extra details. The latest version of Midjourney creates images with 1024 x 1024 Pixel images as default. The other U buttons are for you to select a particular version from above for further editing and upscaling.
- V Buttons will create 4 new variations of the chosen image. But, it will also match the composition and style based on the original prompt.
- The emoji button “????” is called re-roll button, it will reun your prompt again and generate 4 new images.
Editing Images with Pan and Zoom in Midjourney
Other editing features in it are Pan and Zoom. If you select an image with the U Buttons in latest midjourney version, you will see some additional controls pop-up.
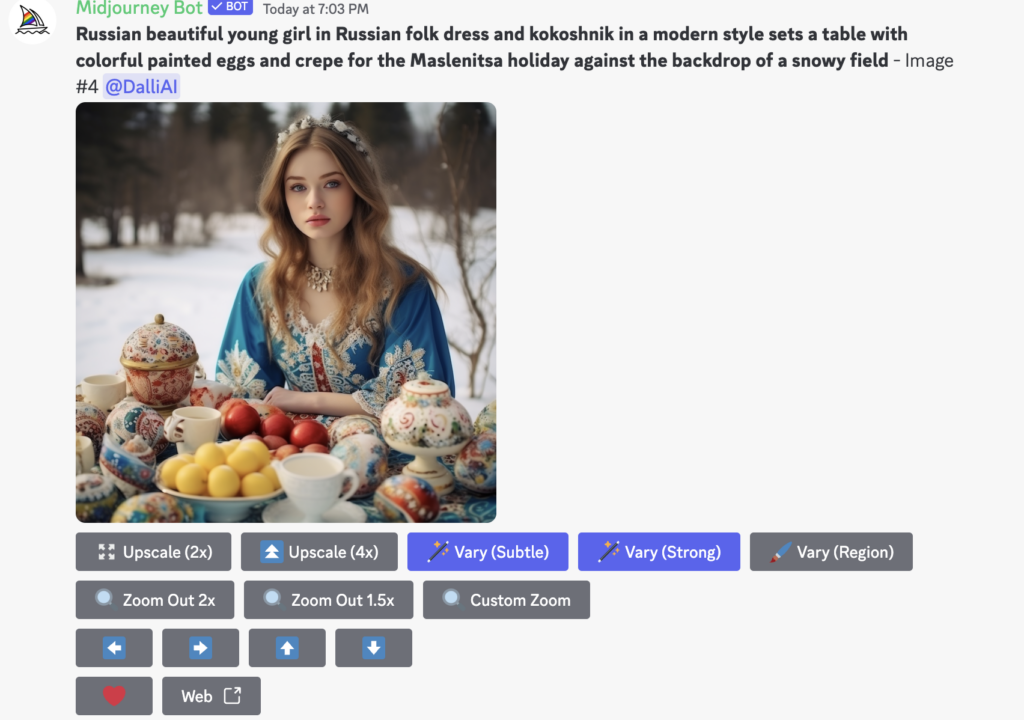
- Vary (Strong) and Vary (Subtle) (launched in Version 5.2) will create 4 variations your chosen image.
- Zoom Out 2x and Zoom Out 1.5x: Using these buttons you can zoom out and add let Midjourney ai automatically add more details around the image based on your initial prompt. It basically puts your pre-generated image into additional relevant context around it.
- Custom Zoom will zoom out from your image. At the same time, you can add another additional prompt to enter what you want to add in the image after zooming out. For example, you can ask the Ai to put the image in a photo frame and it put in a museum.
- 4 Arrows are Pan arrows: It allows you to automatically pan and expand your image in your selected direction. You can pan horizontally or vertically in either direction. Interesting part is, you can continue panning image in that direction.
- Make Square will convert the panned image into a cropped image with 1:1 (square) ratio.
You can try out each of these feature and see how they react. Also, the pan command can create images that are larger than 1024 x 1024 px, but the zoom command can’t do that. So use zoom rarely, since it’ll reduce the resolution of your original image.
Step 6: Save Your Image
Once you’ve played around with image generation by trying out prompt variations and using the image editing tools, you can save your favourite image. Right-click on the image, and select Save. Or open the full image, right click, and select “Save Image”.
These are the best six steps to learn how to start using Midjourney.
Tips for Using Midjourney
Top 10 Tips for Using Midjourney Experience:
- Be Specific: Keep your prompts concise and focused to achieve better results. Experiment with keywords and avoid starting with too many terms.
- Utilize Prompt Generators: Use tools like ChatGPT to boost your creativity and refine your vision.
- Explore the Creative Tag: Add “-creative” to encourage Midjourney to generate unique and unusual images.
- Try the Stylize Tag: Use “-stylize” to give Midjourney more creative freedom, with values ranging from 0 to 60,000.
- Incorporate Negative Keywords: Exclude specific terms (“-no”) to fine-tune your image outputs and achieve desired aesthetics.
- Utilize MidJourney Multi Prompt: Separate terms using “::” to ensure clarity and avoid misconceptions in complex prompts.
- Add Weighting to Your Prompt: Adjust the importance of each term using “::” to control the emphasis in your generated images.
- Experiment with Aspect Ratios: Specify aspect ratios (“-ar”) to tailor your images for different viewing experiences.
- Maintain Privacy: Directly message the Midjourney bot for private image generations, reducing clutter and distractions.
- Customize Your Settings: Use the “/settings” command to streamline your prompts by preselecting preferences such as quality and speed.
How to Write Effective Midjourney Prompts?
If you’ve been dabbling with AI Image Generators, you know that the control over your image output depends entirely on the prompt you give. Ever since ChatGPT came out, Prompt Engineering has becoming a new skill in the market. We’ve also curated a list of best prompts for ai art generation.
Given that it is a great AI Model, it gives out great results for most prompts. But keeping a few best practices in mind will help you get even better results. The Midjourney’s style is more artistic compared to Dall-E2 and Dall-E3, so all kinds of basic prompting will lead to an artistically styled image.
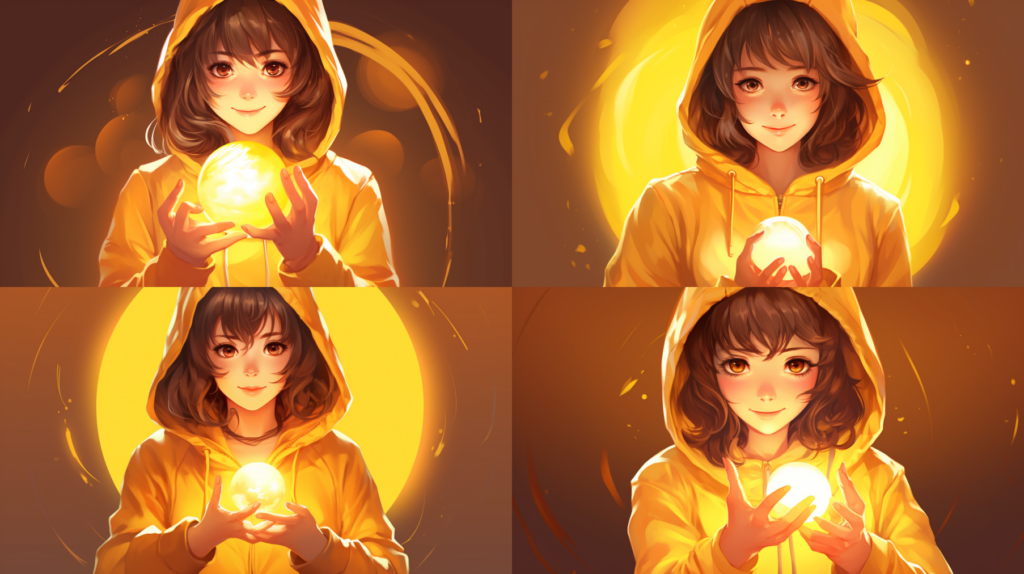
If you are someone who is looking for realistic images, you can look at RenderNet. Still, in the latest updates, if you ask Midjourney to come up with Photo Realistic images or hyperrealism, it might give you those results.
Be Specific in Your Prompt
Write your prompt with specific details is always better when using any AI Model. It ensures that your imagination is captured perfectly and the output is close to what you want. In your prompt, use strong words, specific numbers, references, and write down what you want it to generate. For example, the prompt used was: “superhero golden retriever protecting Gotham. Cinematic, flying –v 6.0 –style raw“, here’s the result:

Don’t Complicate It
This might sound counter intuitive to the above suggestion, but over complicating and writing a long descriptive prompt is also not the right approach. Use impactful words that capture the essence. You can also re-write the prompt and add what was missing in the image. So some trial and error will lead to good results.
Add Some Details
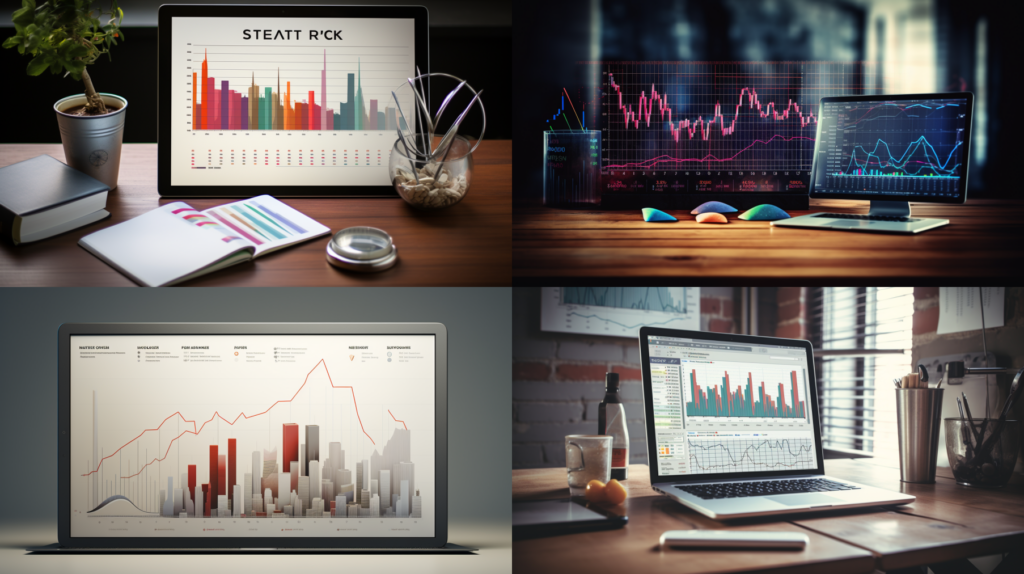
Midjourney docs recommend that you add the details like subject, surrounding environment, lights, color, medium, mood, composition, popular references, and image style. For example: “Sleek Magazine Photography style stock image showcasing the realm of statistics, with charts, graphs, and data analysis tools, in a modern, clean, and sophisticated setting –ar 16:9“, this kind of prompt gives Midjourney a lot of information to work with.
Use Images
Image to Image AI Generation is a great feature in Midjourney. You can paste a URL to the image and use it as part of your prompt. You can also upload the image in Discord and use it as a reference. Simply click on the + button in the chat box, then drag and drop the image into the prompt to add image URL automatically.
For example, the following photo was used as a prompt:

This is what Midjourney gave as a result:

People also use their own image to tweak it using Ai. You can use your own image and turn yourself into a superhero, futuristic robo-human, or a transport yourself 100s of year into the future. You’d notice that midjourney picks up all the details from the upload image and just amazes you with the results.
Another great slash command is /blend to merge multiple images into one new image.

But use blend with caution, it get weird, you can learn more about /Blend slash command in midjourney docs.
Experiment with Parameters
Along with your text prompts, you can also use some parameters to fix important details in your images, like Aspect Ratio (–aspect), Style, and Randomness.
- “— no” parameter is used as a negative prompt. If you don’t want clouds in the sky image, use it as “–no clouds” at the end of your text prompt.
- “Weird” is another parameter. As the parameter name suggests, it allows AI to give you strange and weird results.
Explore the full list of Parameters in Documentation. Here are some of those, though we won’t describe each in full detail, we’d recommend you try them out to see how the Ai reacts:
- –quality <.25, .5, or 1> — How much rendering quality time you want to spend. 1 is highest. Higher values use more GPU minutes.
- –iw <0-2> — If you use image and text both for image generation, you can set the weight of the image in prompt relative to the text.
- –fast — This lets you override your current job and run a single job faster.
- –chaos <0-100>
- –aspect
- –quality
- –relax
- –seed
- –random
- and a lot more…
Try /Shorten
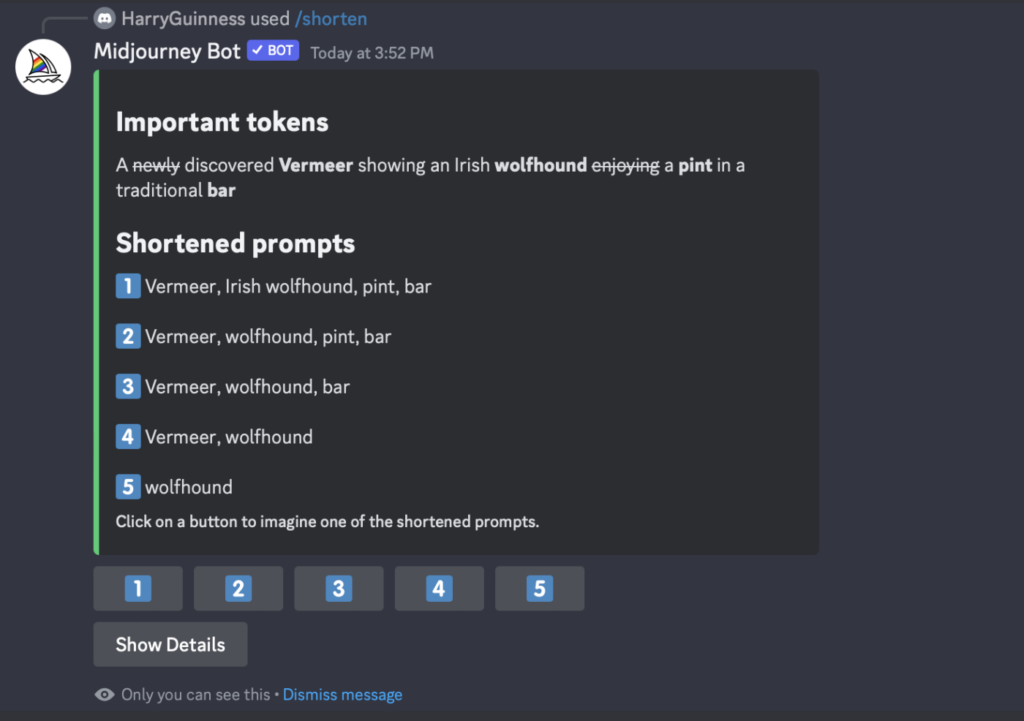
Sometimes, your text prompt might get too long. In that case, you can use /shorten to allow Midjourney to analyse your prompt and suggest the most meaningful tokens and shorter versions of it. You might not get exact same result, but /shorten slash command helps you see what keywords matter to Ai and what doesn’t.
Learn From Midjourney Docs
The team behind Midjourney has put together amazing documentation to get the most out of it. The Discord interface might make it tricky and sometimes difficult to use, but the docs help you navigate it better. Here are a few useful links to Midjourney docs:
Have Fun With AI
Ai image generators have a huge wow factor in them. Thousands of people just use these tools to let their own imaginations run wild and then they use AI to bring it to an image. The best part about using Midjourney is that it gives you exciting and fun results by default, so you don’t need to calibrate your text prompts a lot.
Also, once in a while, scroll through the Discord server to see what kind prompts are being written to get an idea. By keeping all the results public, Midjourney team has helped everyone in the community learn from each other and get better at using the Ai model.
Managing Midjourney Settings

Use /settings slash command to see different settings and options available to use on Discord. Here is a list of settings and options
- From the dropdown you can select which version of Mid journey model you want to use. It also includes the Niji model that is used to generate anime-style images.
- RAW Mode, Stylize low, Stylize med, Stylize high, and Stylize very high are used to set how strongly Mid journey’s default art style is applied on the images.
- Use Turbo mode to generate images four times as faster at double the cost. Fast mode is used by default, while Relax mode is free and unlimited for Pro plan users.
- High Variation Mode and Low Variation Mode determines variations when you use the V buttons.
- Remix helps change few aspects of text prompt when creating new image variations. Remix gives you control, but may complicate the output.
- Public mode and Stealth mode are used to keep your images public or private by default. But private mode is only available to Mega users and not everyone.
Midjourney Bot Assistance
The Midjourney Bot lets you create images from text on Discord.
Just add it to your server and use commands like /imagine to make images, /help for assistance, and /ask for questions about the bot.
You need an active Midjourney subscription to use it.
You can tweak what the Midjourney Bot can do either for the whole server or just specific channels.
Admins can limit its use in certain channels if needed. Users can also chat with the bot directly to edit images.
If you need more help with the bot, hop over to the #support channel on the official Midjourney Discord server or check out the Midjourney documentation.
Popular Question: How to Setup Midjourney on My PC?
You can download and install Stable Diffusion locally on your PC. And you can also use DALL·E via APIs. But those things are not possible with Midjourney.
Alternatively, you can install and use Openjourney model on your PC. Openjourney is an open-source model pre-trained and fine tuned on Midjourney images. This model can be used like any other stable diffusion model.
Openjourney has 86,000+ download on Huggingface since its launch in November 2022. This model has 123 M parameters and does pretty good job in generating images locally on your PC. If you are a techie, you can try it out.
All Midjourney Versions and Updates
Midjourney image generation was launched as an open beta on July 12, 2022. By March 2022, the Discord server launched with a request to post high-quality photographs to Twitter/Reddit for system’s training.
They keeps releasing new model versions to improve efficiency, coherency, and quality of the results. And the latest model is always the default one in Discord. But if you want to use older models, you can do so by using “–version x“ parameter at the end of your text prompt. Each model is good at generating different kinds of images. Also stay tuned for Midjourney V6, which is in alpha-version since 21st December, 2023.
--versionaccepts the values 1, 2, 3, 4, 5, 5.1, and 5.2--v is the shorter form of --version--v 5.2is set to default model currently
| Versions | Release Date |
| V1 | February, 2022 |
| V2 | April, 2022 |
| V3 | July, 2022 |
| V4 | November, 2022 |
| V5 | March, 2023 |
| V5.1 | May, 2023 |
| V5.2 | June, 2023 |
| V6 | December, 2023 (Alpha) |
FAQs
How do I use Midjourney prompt?
To begin your prompt on Discord, use commands starting with “/imagine” followed by what you want Midjourney to create. After about a minute, Midjourney will generate four images based on your prompt.
How do I use Midjourney with images?
With Midjourney, you can include images in your prompts by pasting a URL. If you haven’t uploaded the image yet, you can do so on Discord by clicking the + button, and then dragging it into your prompt to automatically add the URL.
Can I use Midjourney for free?
Midjourney, like many advanced AI tools, only offers paid subscriptions. Earlier at the time of first few model laucnhes, they used to provide fee credits but those programs have expired. It’s always best to keep an eye on Midjourney’s discord and website for any news on free usage options. But given the cost of running GPUs and Ai models, it is highly likely that midjourney will always stay a paid ai model.
How to use Midjourney AI?
1. Create a Discord account.
2. Create Midjourney account and join the Midjourney Discord Server by accepting the invitation.
3. Head to #newbies channel and enter /subscribe command.
4. Subscribe to a Midjourney Plan.
5. Go back to Midjourney Discord Server and use /imagine command to enter your text prompt to generate an ai image.
7. Edit or Upscale your Ai Generated Image.
8. Download the image.
Do you have to pay for Midjourney?
Midjourney offers different subscription plans: Basic Plan ($10/month), Standard Plan ($30/month), and Pro Plan ($60/month). The Basic Plan limits you to 200 images per month, while the Standard and Pro plans offer unlimited image generation in Relax Mode. You can pay for Midjourney using your credit or debit card or Alipay.
What does Midjourney do?
Midjourney is an AI-powered tool that specializes in generating digital artwork and images from textual descriptions. In simple words, it converts your texts to images using it’s Ai model trained on millions of images and parameters.
Can you sell Midjourney art?
To sell your art or use it in your shop with Midjourney, you’ll need a paid subscription. Their free tier doesn’t allow selling your generated images because of usage rights.
What is best free AI image generator?
There are many Ai image generators on the internet, but the best of those are behind paid subscription plans. To offer a solution, Mockey is coming up with an Ai Image Generator that gives you access to Dall-E, Stable Diffusion, Imagen, and many ai image generators under a single subscription plan. Meanwhile, you can explore these paid and free ai art generators.
