If you are coming to Leonardo AI for the first time or even want to learn how to use Leonardo AI’s new tools, this article can guide you.
This is the only article where you can learn everything such as how to use Leonardo AI image generation, real-time Canvas, Canvas editor, Motion, real-time generation, and Universal Upscaler.
Let’s cover every tool and understand how to use this best AI image generator.
Tip: Before going to use Leonardo AI, you need to create an account first. You will get 150 tokens to generate AI images.
What are the Tokens in Leonardo AI?
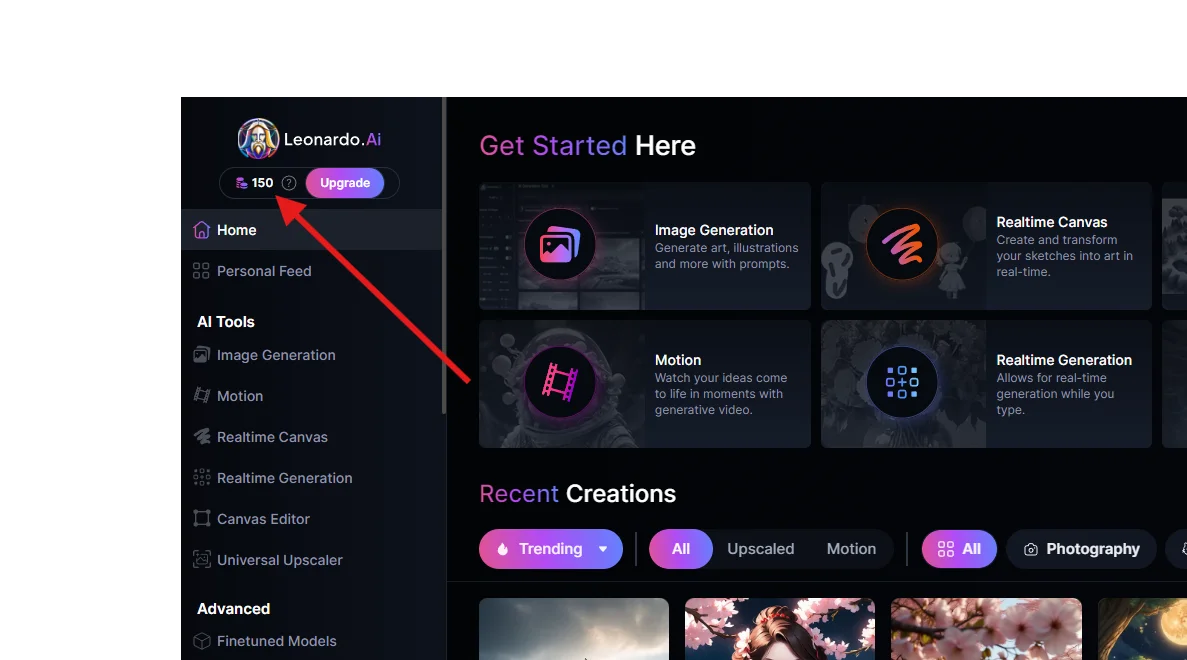
Tokens in Leonardo AI are like money for everything on the platform (except for a few things). You’ll see how many Tokens you need for an action right on the button. You can see the remaining tokens on the left.
What Happens When You Run Out of Tokens in Leonardo AI?
Users can still generate, but slower, when they run out of Tokens.
You must pay monthly or annually to upgrade.
| Apprentice Standard | Artisan Unlimited | Maestro Unlimited | |
| Pricing | $12/month | $30/month | $60/month |
| Key features | 8,500 tokens, Private generations, Train 10 models/month, Retain 10 models, Priority Infrastructure | 25,000 tokens, Private generations, Create 15 Collections, Train 20 models/month, Retain 20 models, Priority Infrastructure | 60,000 tokens, Private generations, Create 50 Collections, Train 50 models/month, Retain 50 models, Priority infrastructure, 3 Concurrent Generations |
Table of Contents
Leonardo AI Login
Login to Leonardo AI by going to their website. Then, just follow these steps:
- Visit https://leonadoai.com/login/.
- Log in.
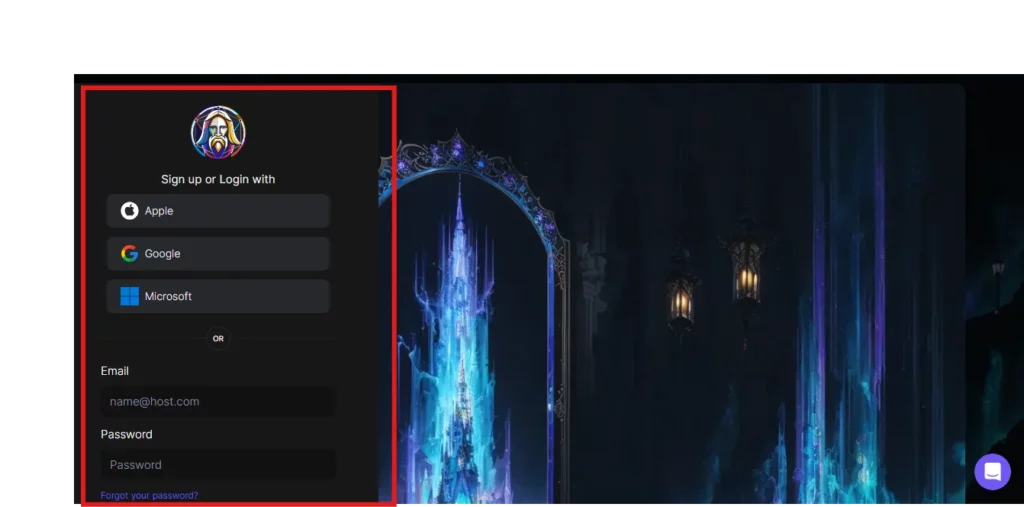
- Tap “Forgot your password” to reset it.
- Hit the “Login” button.
- “Sign up” to register for the first time.
Leonardo AI Feature Lists
Leonardo AI has two categories.
- Transparent PNG Generator
- AI Art Generator
Transparent PNG Generator is an AI-driven tool found in the customization section on the left side for generating transparent PNG images.
However, users are facing confusion regarding the usage of AI art generator tools. So, let’s understand them better.
What AI Art Generator Tools Are We Going to Learn?
There are currently six AI art generator tools of Leonardo AI such as:
- AI Image Generation
- Realtime Canvas
- Canvas Editor
- Motion
- Realtime Generation
- Universal Upscaler
Let’s start with the AI image generation tool.
How to Use Leonardo AI Image to Image with AI Image Generation Tool?
Here is a quick guide on how to use Leonardo AI image to image:
- Click on the AI image generation tool from the home page.
- Head to Image Guidance.
- Upload an image. Make sure the type option is in “Image to Image“
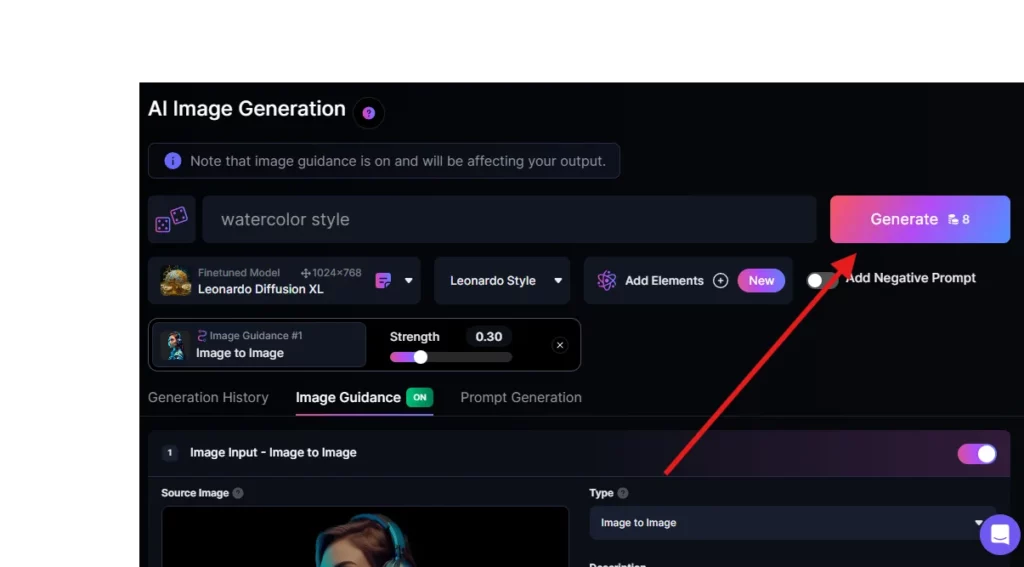
- Write a prompt description, e.g., watercolor style. Click “generate“
- Click on the Download icon to save on your PC.
Complete Guide to Use Leonardo AI Image to Image
- Go to the AI Image Generation page. Follow Generation History > Image Guidance
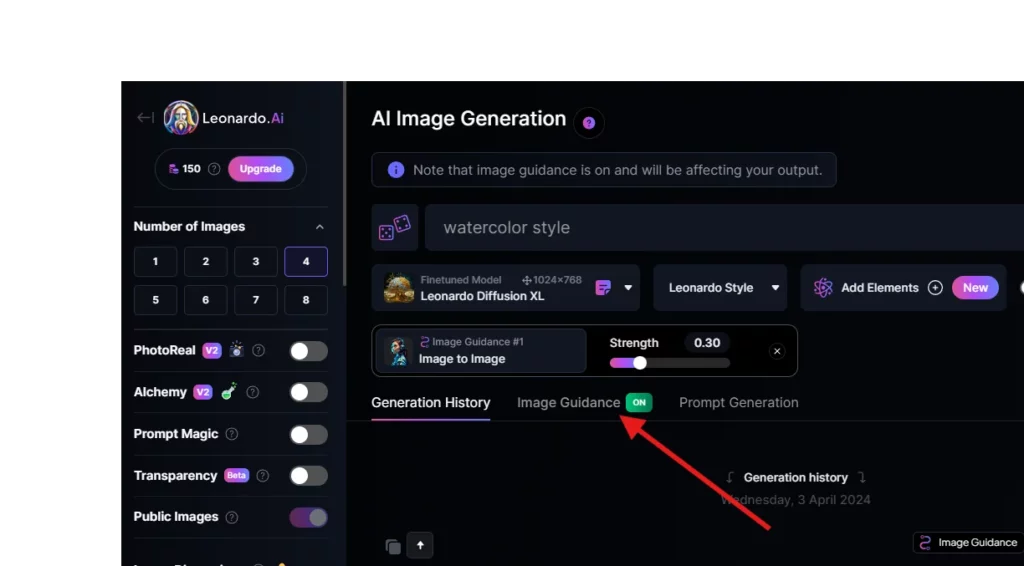
- Upload your image into the “Image Guidance” box. (Premium users can upload up to 4 images).
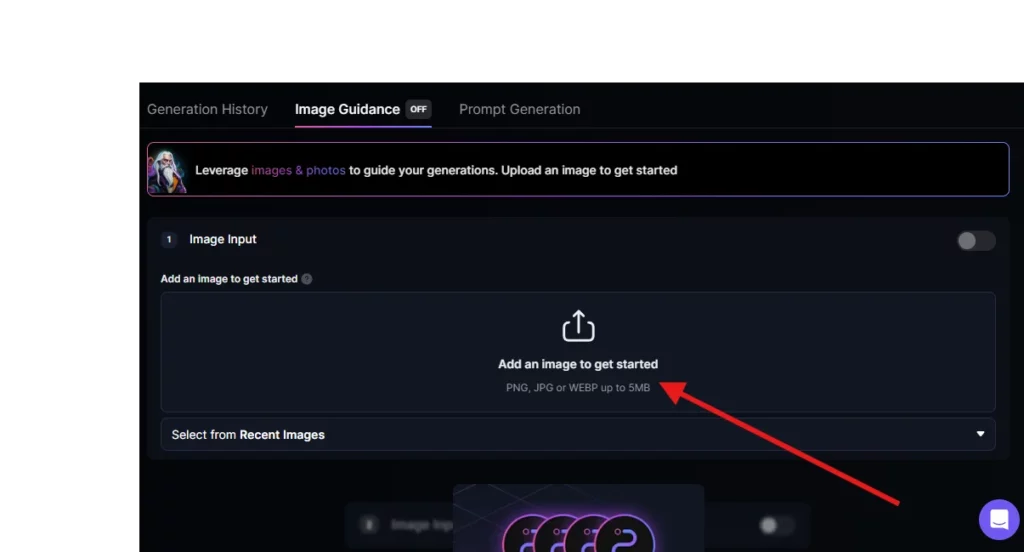
- Pick a ControlNet option from the dropdown menu. Some options may be greyed out if they’re incompatible with your base model. Hover over the ⚠️ symbol for instructions on how to adjust options. If you want to use an image as your starting point, select “Image to Image” instead. To use the Image Leonardo AI Prompt feature, first enable “Prompt Magic” in the sidebar.
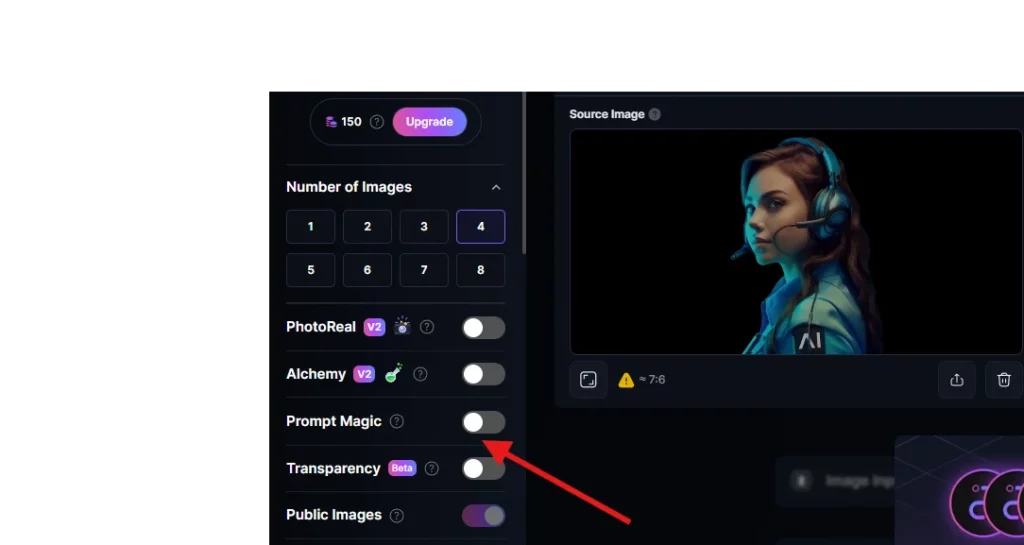
- Choose your desired weighting strength. Be careful with higher weights as they might give unexpected results. Experiment to find the right balance.
- Finally, click “Generate“!
Feature Breakdown of AI Image Generation
Here’s a simplified overview of each option:
- Depth to Image: Enhances 3D aspects of an image using depth info.
- Edge to Image: Transforms images into line art, great for restyling.
- Line Art: Creates simple outlines of objects for image generation guidance.
- Edge to Image (alt): Uses holistically nested Edge Detection for smoother outlines.
- Sketch to Image: Uses sketches as guides, ideal for composition-sensitive projects.
- Pose to Image: Replicates human poses from reference images.
- Normal Map: Provides detailed surface topology info for refined control.
- Pattern to Image: Transforms patterns into visually compelling artwork.
- QR code to Image: Optimizes and enhances QR codes for aesthetic appeal.
- Text Image Input (Text to Image): Generates stylized text art from uploaded images of black text on a white background.
????AI Image Generation Tip: Not all new Image Guidance tools may work with every base model. If they can’t be used, they’ll appear greyed out with instructions on what changes are needed to use them.
How to Use Leonardo AI Realtime Canvas Tool?
Here is a quick guide on how to use Leonardo AI Realtime Canvas:
- Tap the “Realtime Canvas” tool.
- Draw using a brush tool.
- Customize it
- Lastly, save it in your personal feed.
Complete Guide to Use Leonardo AI Realtime Canvas
- Start by clicking on Realtime Canvas on the main page.
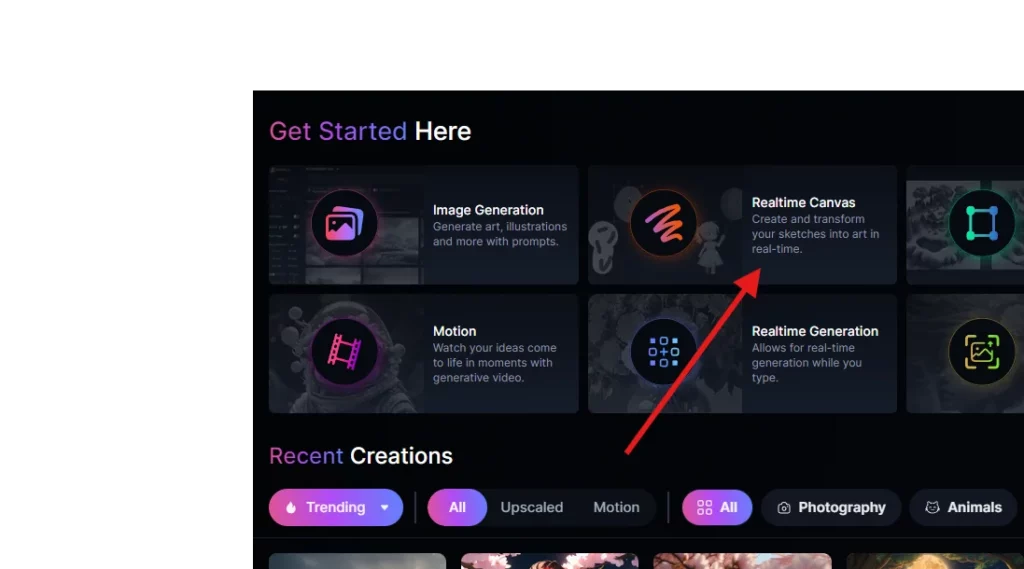
- Then, you can draw using the brush tool or upload an image. If you have something specific in mind, enter a prompt. The canvas updates in real-time as you draw.
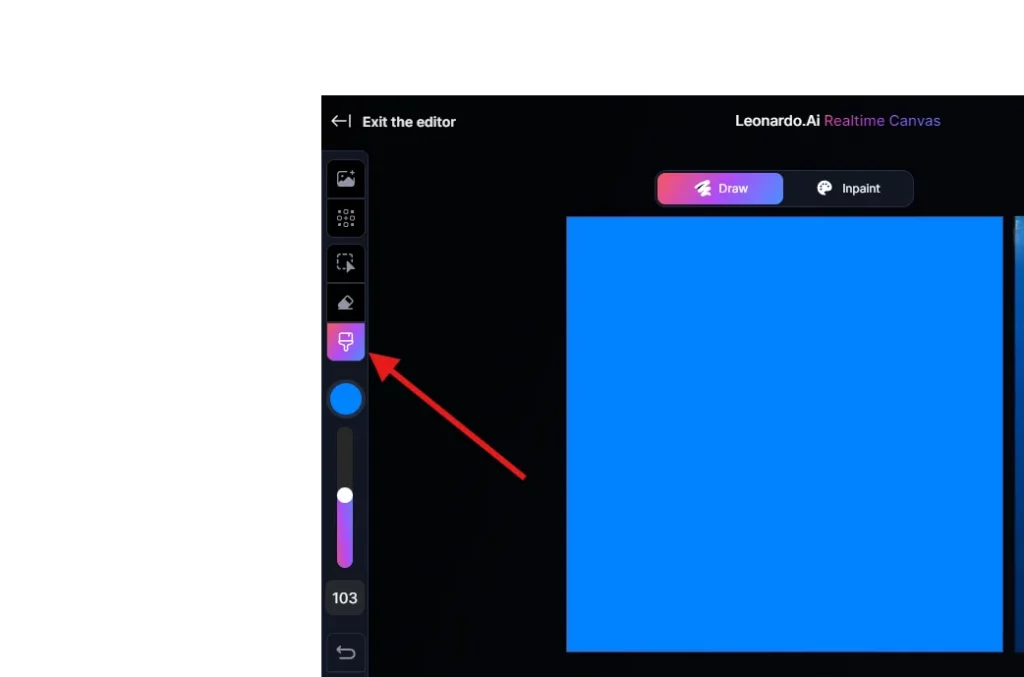
- If needed, you can adjust settings like Guidance, Style, and Creativity Strength. Paid users can also enable High Quality. These settings change how the final image looks.
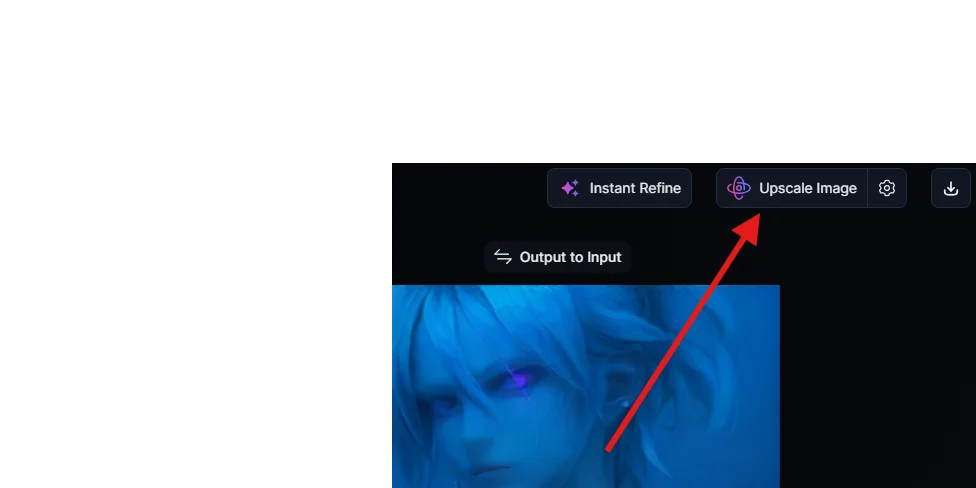
- To save your creation, click the Upscale Image button. This saves it to your Personal Feed and makes a larger version. If you want a quick refinement, use the Instant Refine button.
Feature Breakdown of Realtime Canvas
Here’s a simplified overview of each option:
- Premium Real-Time Mode: Sketch and watch as each stroke transforms into intricate detail almost instantly.
- Interactive Mode: Easily interact with the canvas, and see your sketches instantly turn into detailed artwork.
- Refinement & Personalization: Improve your artwork quality with Alchemy Refiner, which refines and saves the enhanced output to your Personal Feed for further customization.
- Style Presets: Explore different creative variations of your sketches with preset styles.
- Efficient UI: Navigate, upload images, and work with precision using a split-screen interface.
- Advanced Options: Customize outcomes with random or fixed seed options, and adjust guidance for prompt adherence and detail level.
????Realtime Canvas Tip: An inpaint strength between 0.45 and 0.75 usually works well. Try different settings to see what looks best. Use Instant Refine for better quality before drawing.
How to Use Leonardo AI Canvas Editor Tool?
Here is a quick guide on how to use Leonardo AI Canvas Editor:
- Hit the “Canvas Editor” tool.
- Click the “Upload Image” option.
- Use the tools on the left side and right side to customize
- Lastly, click on the Download artwork icon to save it on your PC.
Complete Guide to Use Leonardo AI Canvas Editor
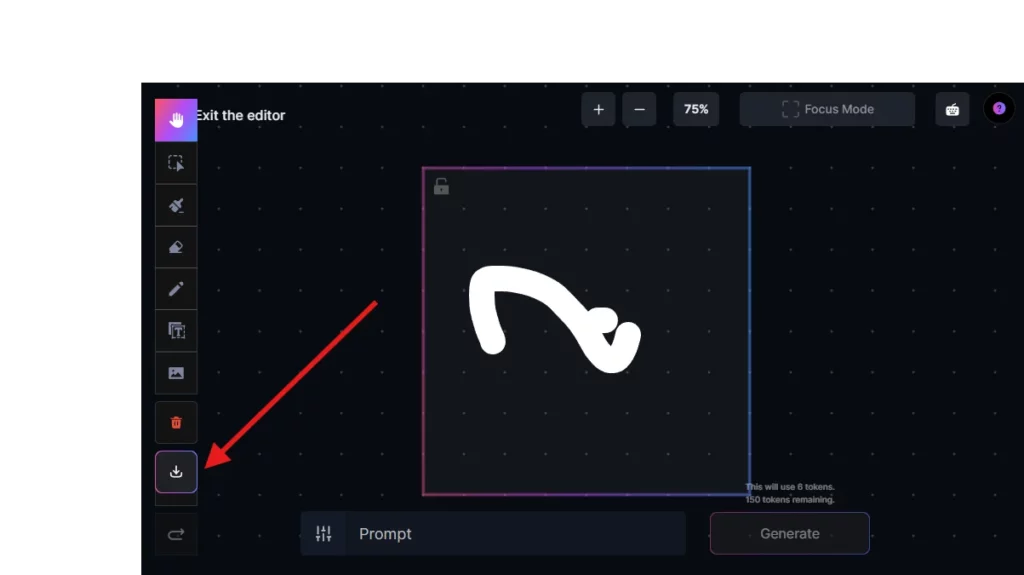
- To start, click “Upload Image“. Pick an image from your computer or the Community Feed. It will appear on the canvas, then you’re set!
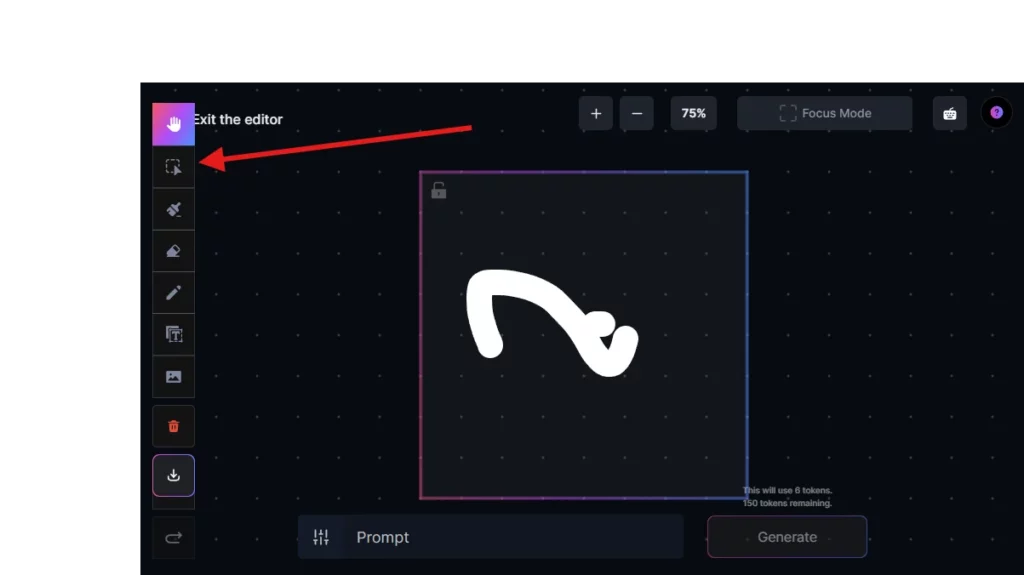
- To move things around, use the “Select” tool. Click “Select“, then click what you want to move.
- To edit, use “Draw Mask” or “Erase“. Drawing a mask keeps some details, erasing removes them. For “Draw Mask”, paint over what you want to change. For “Erase“, highlight what to remove.
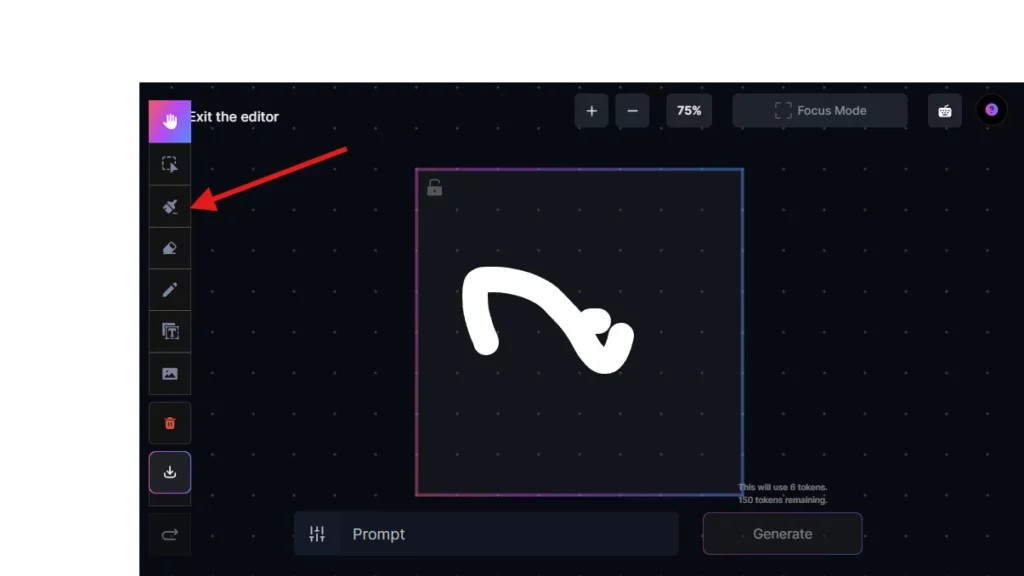
- When done, type a prompt to regenerate.
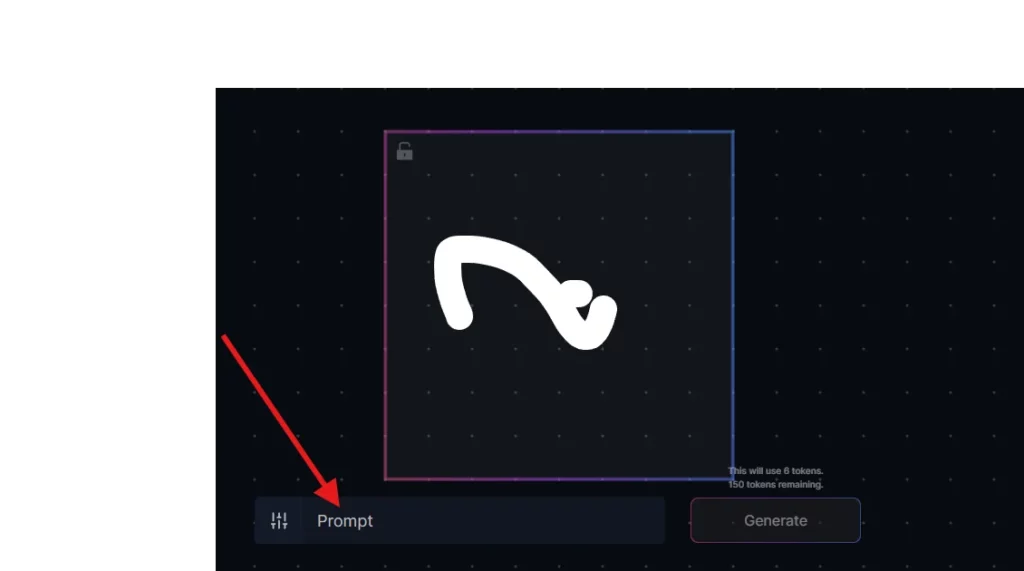
- You can choose what to erase: All, Images, Sketches, or Masks.
- Finally, when satisfied, click “Download Artwork” to save it.
Feature Breakdown of Canvas Editor
Here’s a simplified overview of each option:
- Upload an Image: Click “Upload Image” to add your picture to the canvas.
- Select & Move Elements: Click “Select” to move items around. Drag and drop to reposition.
- Pan & Move Canvas: Click “Pan” to move around. Click and drag the canvas to explore.
- Draw a Mask: Use “Draw Mask” to highlight areas for specific changes. Enter a prompt and regenerate the masked area.
- Erase: Use “Erase” to remove parts of the image. Enter a prompt and regenerate the erased area.
- Prompt & Generate: Enter your prompt and click “Generate” to create new content. Be specific and use full sentences.
- Control Parameters: Adjust settings like model, image count, dimensions, etc., on the Control Panel.
- Save Artwork: Click “Download Artwork” to save your image once satisfied.
- Undo & Redo: Use “Undo” and “Redo” to correct mistakes or revert actions.
How to Use Leonardo AI Motion Tool?
How do you use Leonardo AI motion? Here is a quick guide on how to use Leonardo AI Motion tool:
- Firstly, tap the “Motion” on the main page.
- Then, choose or upload an image
- After that, customize settings
- Click on Generate Video
- Then do some Preview, Refine, and Experiment
- Lastly, Save or Download and Share it.
Complete Guide to Use Leonardo AI Motion Tool
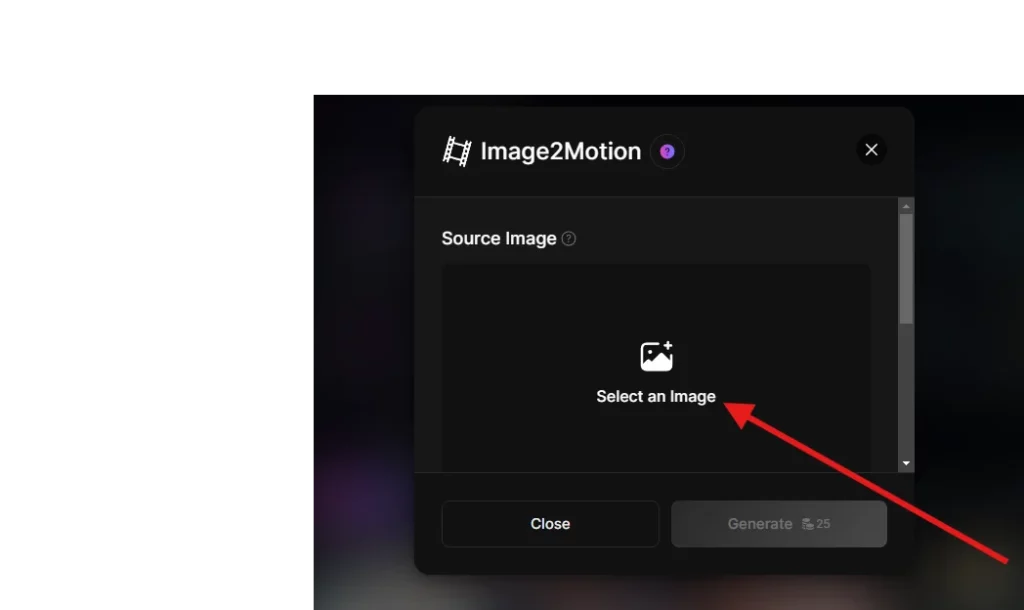
- First, choose a picture or upload one. You can even use images from the community feed to make motion videos. Just hit the “Image2Motion” button to get started.
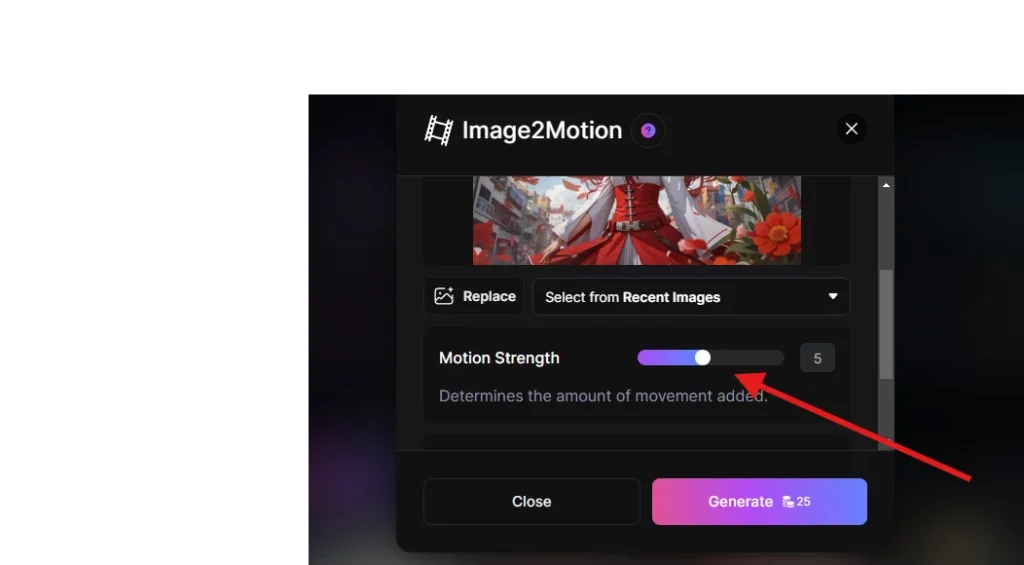
- Motion strength can be adjusted from 1 to 10. Higher numbers mean more movement. If you’re on a paid plan, you can also set privacy preferences.
- Click “Generate” to create your motion video. It only takes a few seconds, but it will cost you 25 credits.
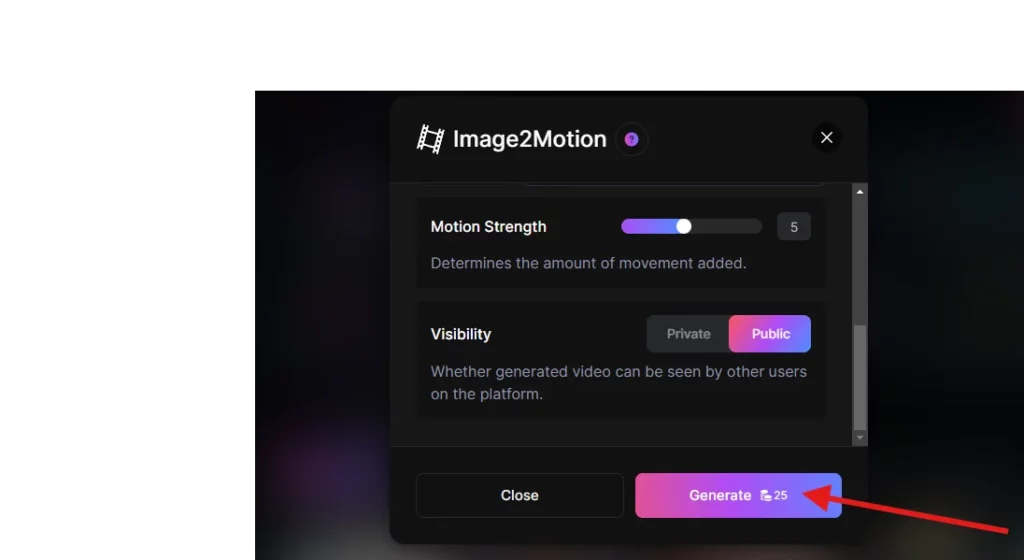
- Now, take a look at your motion video. Experiment with different images to get the effect you want. If it’s not quite right, adjust the strength slider.
- Once you’re happy with it, save or download the motion video to your device.
Feature Breakdown of Motion Tool
Here’s a simplified overview of each option:
- Motion strength: This parameter determines how much movement is added.
- Visibility: The platform allows other users to see generated video.
Benefits / Pros Using Motion Tool
- The Motion tool makes cool 3-4-second videos.
- It costs 25 credits per video for free users, who get 150 credits a day, enough for about 6 videos.
- Paid users can choose privacy settings for their videos.
How to Use Leonardo AI Realtime Generation Tool?
Here is a quick guide on how to use Leonardo AI Realtime Generation Tool:
- Hit the “Realtime Generation”.
- Type your prompt.
- Easily customize it. You can use the “Refine” option for better output.
- Lastly, click the download icon.
Complete Guide to Use Leonardo AI Realtime Generation Tool
- To start, go to the main page and select “Realtime Generation“.
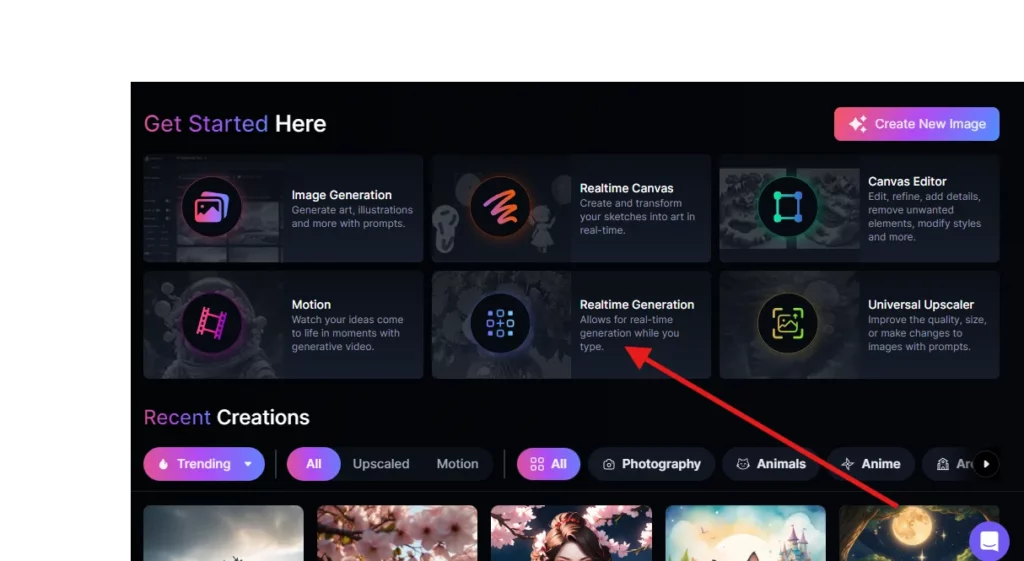
- Then, type your prompt in the textbox and see the output change as you type.
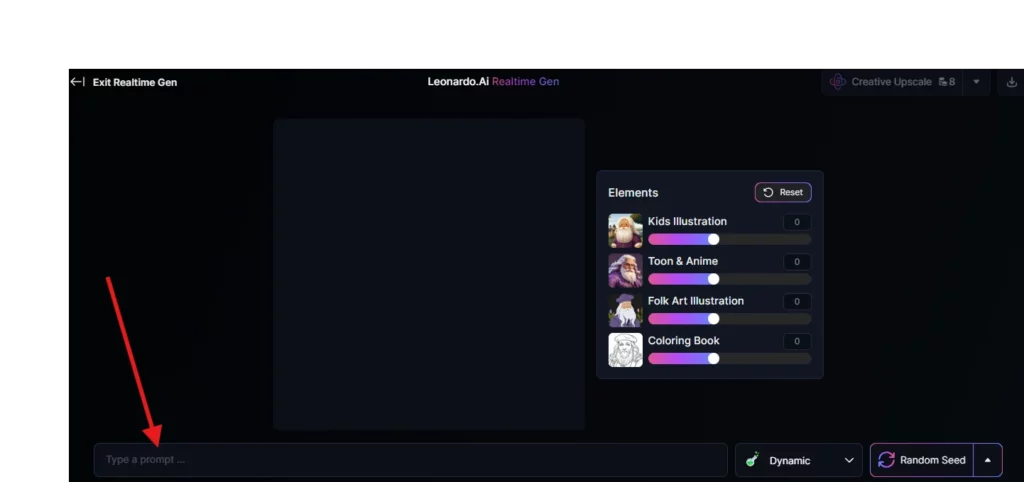
- You can also choose a style preset and add elements to customize it.
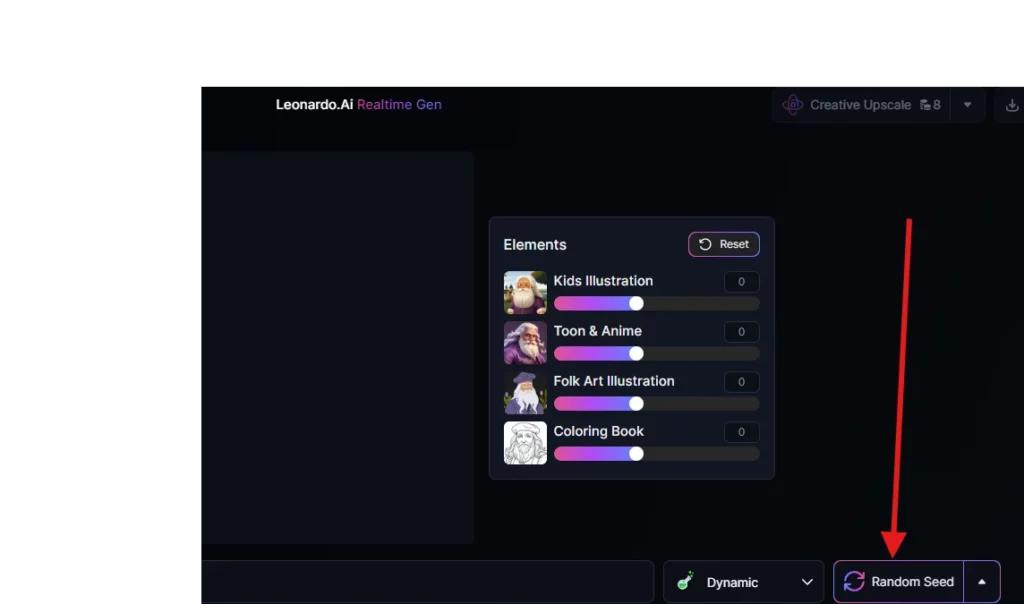
- Save your output or refine it using the options provided. If you want a different image, just click on “Random Seed” to get a new one.
Feature Breakdown of Realtime Generation
Here’s a simplified overview of each option:
- Elements: Adjust individual element weights to change the image.
- Random seed: Generate a new image with a Random Seed.
- Fixed seed: Set a fixed seed value with a Fixed Seed to keep changes consistent.
- Style presets: Choose style presets to alter the image’s overall look.
- Refine option: Refine your image with Alchemy Refiner using preset options: Creative Refine for smoother output, or Normal Refine for preserving details.
????Realtime Generation Tip: Leonardo.Ai’s Alchemy Refiner is great for photorealistic images in Realtime Gen. For other styles, try the regular AI Image Generation tool.
How to Use Leonardo AI Universal Upscaler Tool?
Here is a quick guide on how to use Leonardo AI Universal Upscaler Tool:
- Click the “Universal Upscaler”.
- Upload an image or pick from source images.
- Customize it.
- Tap the “Upscale” option.
- Lastly, click the download icon.
Complete Guide to Use Leonardo AI Universal Upscaler Tool
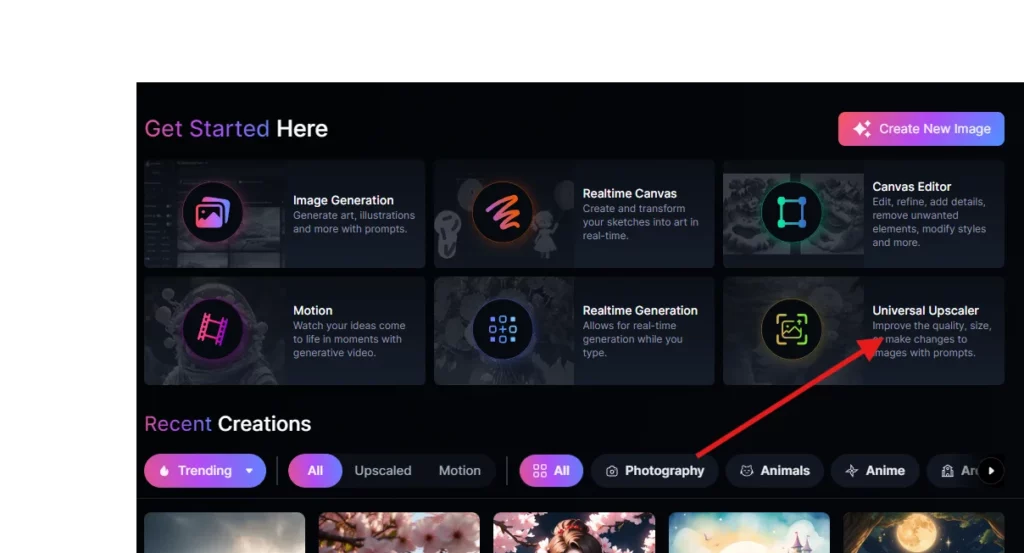
- Go to the main page and find “Universal Upscaler” on the left side.
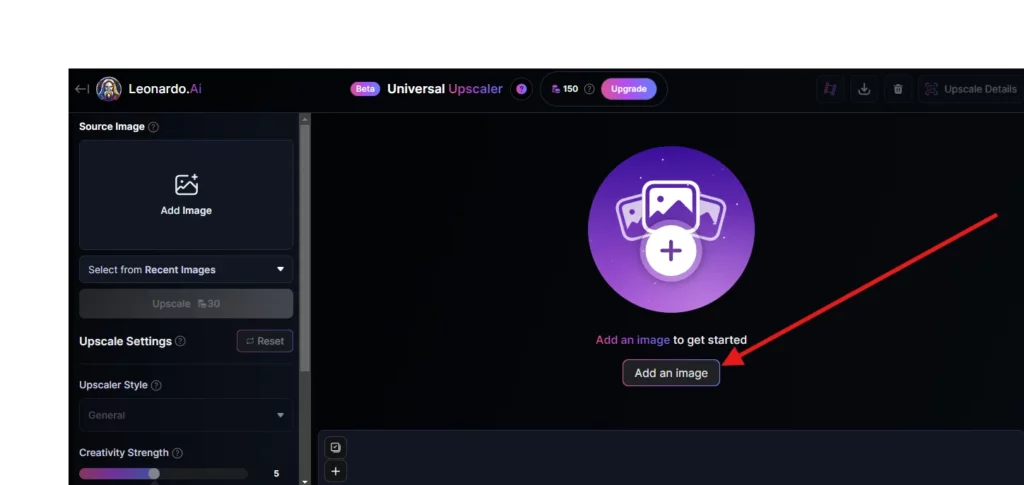
- Click “Add Image” and pick a picture from your device or the app.
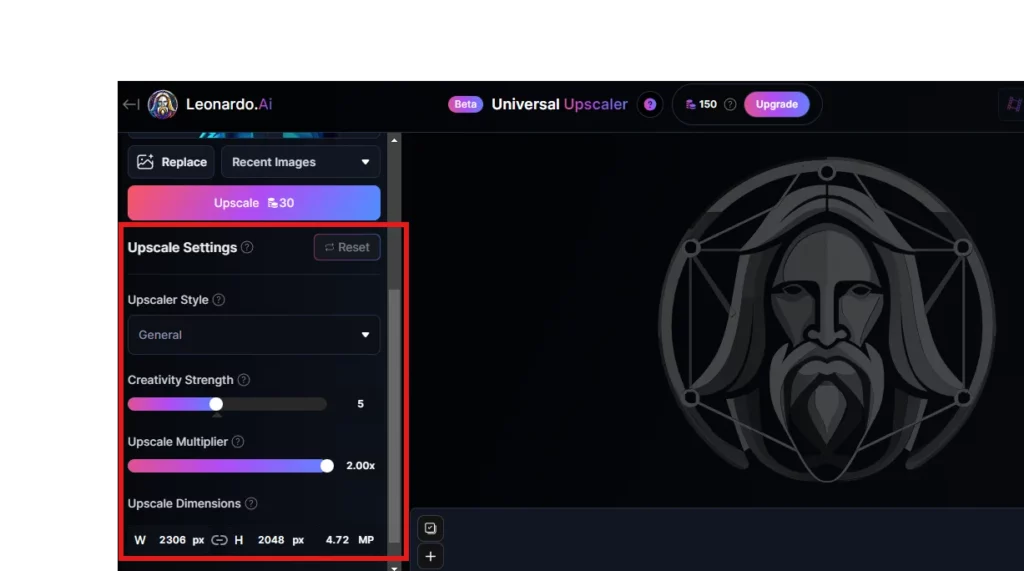
- Adjust the Upscaler Style, Creativity Strength, and Upscale Multiplier as you like.
- Hit “Upscale Image.”
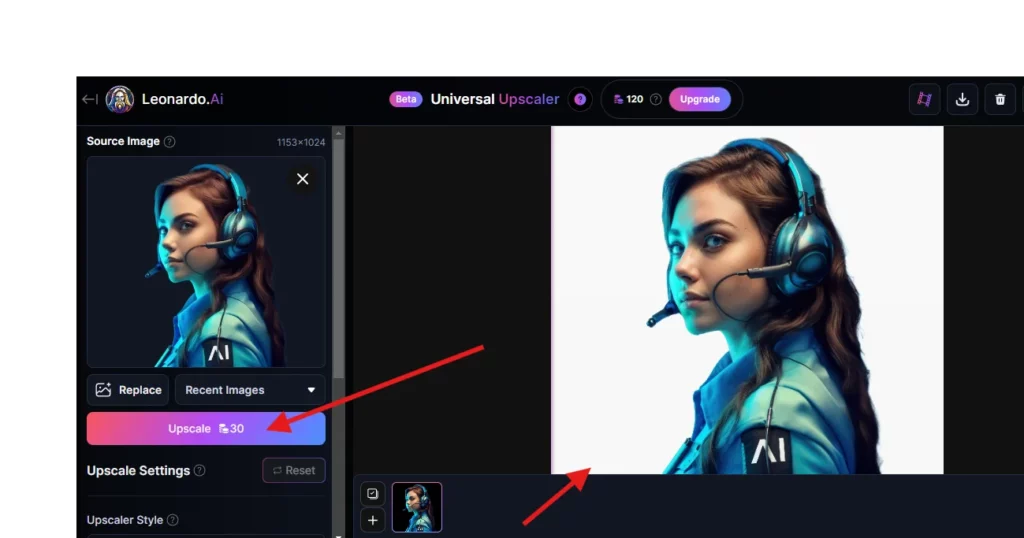
- Your upscaled image is saved automatically. To get it, just click the download button in the top right.
Feature Breakdown of Universal Upscaler
- Creativity Strength: This shows how much freedom Universal Upscaler has to add extra details when making images bigger.
- Upscaler Style: Different styles to choose from when making images larger.
- Upscale Multiplier: This lets you decide how much bigger the image should get, in increments of 0.25x, starting from 1.00x.
- Prompt: An optional guide for the upscaler, but usually not needed.
????Universal Upscaler Tip: For images closer to the original, keep creativity low on the Universal Upscaler.
Summary on How to Use Leonardo AI Image Generator
Let’s summarize what we have learned about Leonardo AI tools.
Getting Started with Leonardo AI
- Sign in on the LeonardoAI website with an Apple, Google, or Microsoft account, or email address.
- Access Featured AI models and recent community images.
- Open Community Feed for a complete library of images.
- Access Personal Feed for your own generated images.
- Explore Fine-tuned models for specific styles.
- Utilize three main tools: AI Image Generation, AI Canvas, and Texture Generation.
AI Image Generation
- Type prompt in the prompt line and hit Generate.
- Each generation consumes tokens.
- The free plan offers 150 tokens daily.
- Explore various options for image generation such as Image Variations, PhotoReal, and Alchemy.
- Set image dimensions and aspect ratio.
- Utilize Guidance Scale, Tiling, and more for specific results.
- Write a correct prompt by defining the main subject, background, environment, and details.
- Use Negative Prompts if needed.
- Choose an AI model like Absolute Reality or DreamShaper.
- Add Elements for further customization.
- Use Image Guidance for existing image references.
Editing Generated Images
- Preview, delete, or download images in JPG format.
- Upscale images and remove backgrounds.
- Use AI Canvas for deeper modifications.
- Upload and edit images, overlap multiple images.
- Utilize tools like Sketch and Text for further editing.
- Set generation frame and draw masks for specific modifications.
- Merge details of one image into another for desired results.
Using AI Canvas in Inpaint-Outpaint Mode
- Generated modifications are new images with the same size as the frame.
- Modifications can be selected, moved, and deleted.
- Masks can also be selected, moved, and deleted.
- Use CTRL (or CMD) and Z to undo any action.
- The result of corrections depends on AI options on the right.
- Options include model selection, number of images to shuffle, and size/aspect ratio of the generation frame.
- Save the entire content by going to Download Artwork on the left.
- Obtain a PNG format which saves any transparent or blank area.
Switching Modes
- Switch to Img2Img for heavier corrections by matching the original image.
- Choose Sketch2Img to brush on the image for specific shapes and colors.
How to Use Leonardo AI in Discord?
How to use Leonardo AI in Discord? To use Leonardo AI on Discord:
- Log in to your Leonardo AI account via your web browser.
- Visit Leonardo.ai.
- Click “Start Using Leonardo” and sign up.
- Check your email for a Discord invite.
- Accept the invite, choose the language, and agree to terms.
- Enter the Discord server.
- Go to newcomers’ chat, post a message, and wait for instructions.
- For quicker access, use the Early Access link in chat.
- Fill out the form for better chances.
- Once you get the welcome email, click the link.
- Log in with Google, set up your username, and start exploring Leonardo AI features in Discord.
How to Use Seed in Leonardo AI?
To use seed in Leonardo AI, think of it as a special number that creates a unique style for an image. If you use the exact prompt and seed, you’ll get a similar style each time. But if you change the seed, even with the exact prompt, the style of the image will be different.
To use the seed in Leonardo AI:
- Click “AI image generation“.
- Choose “Absolute Reality” from the models.
- Type your prompt.
- After the image is made, click and copy C.
- Scroll down and click “Show advanced settings“.
- Turn on “Use fixed C” and paste the copied seed.
- Add a desired facial expression to your prompt, like smiling or sad.
- Your result will match your prediction.
Is Leonardo as good as Midjourney?
No, it’s not. Leonardo AI is far better than Midjourney. In terms of pricing plans, user interface, and customization features, Leonardo AI is the first choice of many people.
To understand why Leonardo AI is better than Midjourney, check our complete guide on Leonardo AI vs Midjourney.
To Conclude
We have learned how to use Leonardo AI’s six AI art generator tools such as AI image generation, Realtime Canvas, Canvas editor, Motion, Realtime Generation, and Universal Upscaler.
We covered details about the pricing plan, tokens and feature breakdown of Leonardo AI. Hope, you learned about every tool.
Also, we learned how to use Leonardo AI in Discord and how to use seed in image generation.
FAQs
How do I get started with Leonardo AI?
First, go to the Leonardo website and make an account. Then, pick how you want to sign in: with Apple, Google, Microsoft, or email. Finally, sign in with your new account.
Is Leonardo AI free?
The basic Leonardo is free, but you use up daily tokens with each new prompt. Paid plans start at $10 a month for more features and fewer restrictions, but the free version should be okay for most people.
Can you use Leonardo AI on mobile?
Use Leonardo AI on your phone for free! Just hop on the Leonardo AI Discord server to start creating awesome images with AI.
Is it legal to use Leonardo AI?
Yes, you can use the images you make here for commercial use.
