Figuring out how to draw lines on Canva? Well, you’re in luck! Drawing lines is a really useful skill to have when you’re designing something on Canva. Whether you’re making a poster for your school project, a birthday card for your friend, or just a fun doodle, knowing how to draw lines on Canva can help make your designs look even cooler! In this easy guide, I’ll show you exactly how to draw a line on Canva step by step. So, let’s get started!
Table of Contents
Before discussing the steps, let us answer some common questions about how to draw lines on Canva.
Can I Draw Lines In Canva
Of course, you can easily draw lines in Canva using Drawing Tools or by adding a line to an existing shape.
Can I Draw a Shape in Canva
Definitely! Canva provides various tools to design shapes. By using Canvas Drawing Tools, you can draw your own shapes or choose from pre-made ones.
Can I Create Wireframe in Canva
Yes, it is possible to create wireframes in Canva. Canva offers a variety of templates and tools that can be utilized to create wireframes for websites and mobile applications. Canvas drag-and-drop interface and easy-to-use design tools make it a great choice for creating wireframes.
The doubts people had now on these questions must have been cleared. Now let’s talk about the steps.
Quick Steps on How to Draw Lines on Canva
Here is a quick step to draw lines on Canva.
- Step 1: Click the “Create a Design” Option to Select Your Size.
- Step 2: Click the “Draw” Feature on the Left Sidebar.
- Step 3: Select One of These Tools (Pen, Marker, and Highlighter).
- Step 4: Use Color, Weight and Transparency.
- Step 5: Download Your Final Output.
Brief Discussion on How to Draw a Line on Canva
Here is a brief discussion on how to draw lines on Canva.
Step 1: Click the “Create a Design” Option to Select Your Size

When you select the “create a design” option, Canva offers a wide selection of templates and design options to choose from, such as social media graphics, posters, flyers, business cards, and much more. You can also choose from pre-set design sizes based on the intended platform or output, such as Instagram posts, Facebook covers, or print-ready documents.
Alternatively, you can use “custom size” to create a design with specific dimensions that are not already available in Canva’s pre-set templates. This option allows you to input the exact measurements you need for your design and customize it to your liking.
Step 2: Click the “Draw” Feature on the Left Sidebar
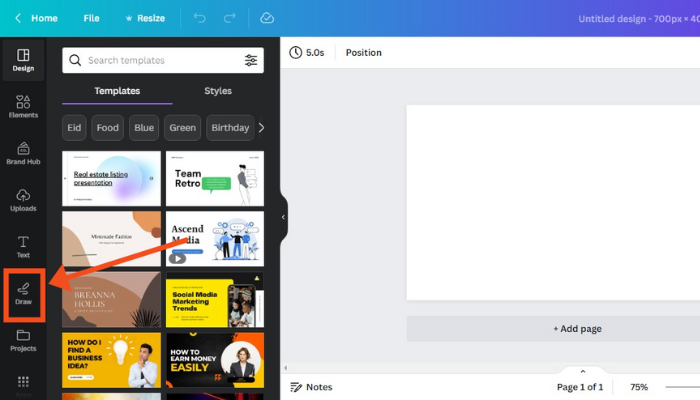
Now, you need to look for the left sidebar. It’s usually on the left side of the screen and has lots of different tools and options to choose from. Once you’ve found the sidebar, you should see a button or feature labeled “Draw“. Click on that, and a bunch of different drawing options will pop up.
Step 3: Select One of These Tools (Pen, Marker, and Highlighter)
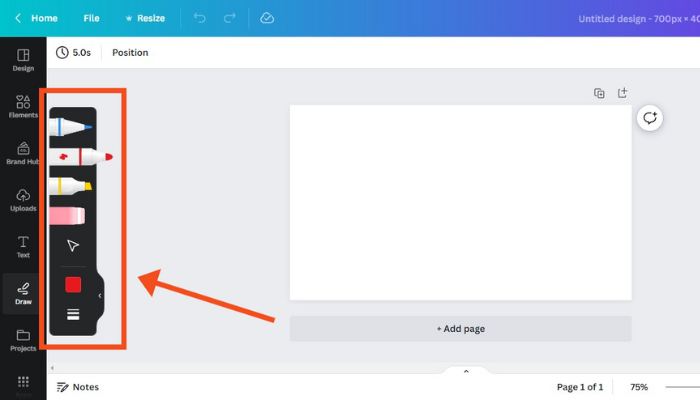
Think of it like choosing which type of crayon or pencil you want to use when drawing on paper. The Pen will give you a thin, precise line, the Marker will give you a thicker line, and the Highlighter will help you draw attention to important parts of your design. Once you’ve chosen your tool, you can start drawing by clicking and dragging your mouse or touchpad.
Step 4: Use Color, Weight and Transparency

First, let’s talk about Color. Color is what makes your lines look different from each other. You can use different colors to make your lines stand out or blend in with your design. Canva has a lot of different colors to choose from, so you can pick the one that you like best.
Next, we have Weight. Weight is how thick or thin your line is. You can change the weight of your line to make it look bold or delicate. For example, if you want your line to be really thick, you can make it heavier. If you want it to be thin, you can make it lighter. It’s all up to you!
Finally, we have Transparency. Transparency is how see-through your line is. You can make your line more or less transparent to make it look like it’s blending in with the background or standing out. It’s a really cool effect!
So there you have it! Use color, weight, and transparency, which can help you learn how to draw lines on Canva.
Step 5: Download Your Final Output
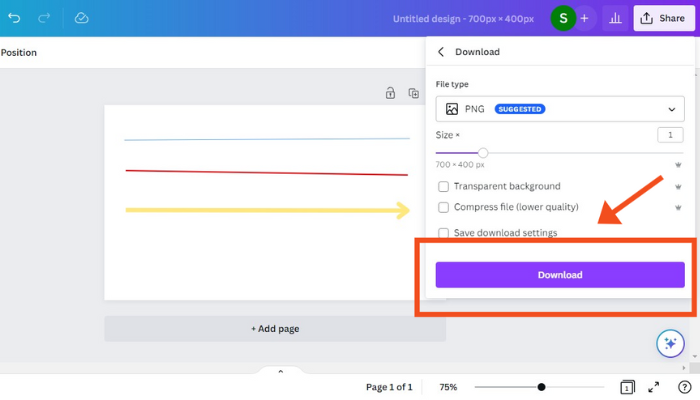
After you’ve finished drawing on Canva, you can download your work.
Your screen will show a “Download” button in the top right corner. You can download any file type. You can select from a range of options such as PNG, JPEG or PDF. After selecting your preferred file type, click on the “Download” button again. Your download will start automatically, and you’ll be able to save the file on your computer or device.
How to Draw a Freehand Line in Canva

Drawing a freehand line in Canva is actually pretty easy. Once you’re on the design page, look for the “Elements” tab on the left-hand side of the screen. Click on it, and then look for the “Shapes” section.
In the “Shapes” section, you’ll see a bunch of different options for shapes you can add to your design. Currently, we are not interested in those. Instead, look for the “Line” option. It should be near the top of the list, and it looks like a diagonal line.
Click on the Line option, and then click and drag your mouse on the design page to draw your freehand line. You can make it as long or as short as you want, and you can also change the thickness and color of the line using the options that pop up when you click on it.
And that’s it! You’ve drawn a freehand line in Canva. If you want to draw more freehand lines, just repeat the process. Have fun with it!
How to Draw Curved Lines in Canva
Make a curved line in Canva using this method:
- Use the curved line element from the “Elements” tab and adjust its size and angle as needed.
- Use an outlined circle element from the “Elements” tab and cover part of it with a filled circle element that matches the background color.
- Use the text tool and type an underscore sign (_) repeatedly to make a straight line, then use the “Curve” option from the “Effects” tab to bend the line.
How to Add Doodles in Canva
Adding doodles to your Canva design is a fun way to make it look more creative and unique. To get started, open up Canva and choose the design you want to work on. Once you’re on the design page, look for the “Elements” tab on the left-hand side of the screen. Click on it, and then look for the “Illustrations” section. In the “Illustrations” section, you’ll see a bunch of different options for adding fun doodles to your design. Click on the doodle you like, and then drag it onto your design page. If you want to move it to a better spot, you can resize it. And if you want to add more doodles, just repeat the process.
How to Add Arrows in Canva
In Canva, there exist two methods for using arrows.
- To simplify, begin by navigating to the left sidebar’s “Elements” tab and searching for “arrows.” This should be your first step.
- There is a wide range of arrow elements available for you to select from. You can easily incorporate them into your design by dragging and dropping them.
In case you wish to create your arrows, it is important to note that Canva currently only allows the creation of straight arrows. The following instructions can guide you on how to make them.
- To insert a straight line into the design, hit the “L” key on the keyboard.
- Be certain to choose the line by using a left-click on it.
- Hit the “Line end” located above your design, and select any arrow style you desire. If you are looking for an arrow that has both directions, then you will need to repeat the same steps for “Line start.”
Why Use Hand-Drawn Elements in Canva
Using hand-drawn elements in Canva can add a really cool, unique touch to your designs. It’s like adding your own personal touch, kind of like drawing a picture with your own hands. Hand-drawn elements can also make your designs look more fun and playful, which is great if you’re making something for kids or just want to add some personality to your design. Plus, Canva has lots of cool hand-drawn elements you can use, like doodles and sketches, so it’s easy to get started. So if you want to make your designs stand out, try adding some hand-drawn elements in Canva!
How to Draw On Canva Mobile?
To draw on Canva mobile, first open the Canva app and select the design you want to add a drawing to. Then, tap on the “+” icon and select the “Draw” option. Choose the drawing tool you wish to use and start drawing on the Canvas. Once you’re finished, you can save your drawing or add it to your design.
Who Can Use the Drawing Tool?
It doesn’t matter whether you use the free or Canva Pro; you can use the drawing tool. For those who frequently use Canva, it is recommended that they upgrade their account to Canva Pro, which would provide them with access to over 100 million stock photos, audio, graphics, and videos. Also, a collection of 610,000+ free templates that are updated regularly with fresh designs.
What Would You Do With the Drawing Tool Canva
Using the drawing tool Canva is a terrific way to give your creations a unique touch. Use the Canvas drawing tool to add doodles, drawings, and shapes to your designs. Additionally, you can apply this feature to give your drawings original borders and shapes. It is a fantastic choice if you want to include doodles, illustrations, or elements.
Can Importing Drawings Into Canva Possible?
Yes, it is possible to import drawings into Canva. Canva supports a variety of file formats, including PNG, JPEG, SVG, and PDF, which can be used to import drawings created in other software programs. Canva also provides a range of tools and features to help you edit and enhance your imported drawings, such as the ability to resize, rotate, and crop images, apply filters and effects, and add text and graphics to your designs.
Visit: Canva
Conclusion
To sum up, if you want to add lines to your Canva designs, it’s super easy to do! Just follow these simple steps. From there, you can customize the line’s color, thickness, and style to match your vision.
Watching this YouTube video can also assist you in learning how to draw lines on Canva.
Drawing lines is a great way to add some extra creativity and style to your designs, and now that you know how to do it on Canva, the possibilities are endless! Take advantage of your imagination and get started. That’s all there is to it when it comes to how to draw lines on Canva!
FAQs
How do you make thin Lines in Canva?
To make thin lines in Canva, select the line tool from the toolbar on the left and click on the line weight dropdown menu. Adjust the slider to decrease the line thickness and customize the color and opacity to your liking.
Where is the pen tool in Canva?
The Pen tool in Canva is located in the “Draw” tab under the “Text” category. It can be used to create custom shapes, paths, and lines.
Can you add cut lines in Canva?
Yes, Canva allows you to add cut lines to your designs. Simply select the “Elements” tab and search for “Lines”. From there, you can choose a straight line and adjust its size and color to create a cut line for your design.
Does Canva have grid lines?
You can find grids on Canva by searching “grids” in the search bar. There, you will find single as well as multi-frame grids that can serve multiple purposes.
Can I use Apple Pencil on Canva?
You can use the Apple Pencil on the Canvas iPad app. This allows for more precise and natural drawing and editing on the platform.
How to bend a line in Canva?
Bending lines is not possible on Canva. However, to bend a line in Canva, you need to choose a bended line element from Canva’s “Elements” tab. After dragging and dropping the element onto your design, adjust its size and position.